You hear the drip before you see the stain. Then you notice the ceiling discoloration, the damp drywall, or the water running down a wall after one of those hard South Florida rain bands moves through. In Broward, Miami-Dade, and Palm Beach, that kind of leak rarely stays small for long. Sun bakes sealants, wind drives water sideways, and tropical weather finds every weak flashing, cracked tile, loose shingle, and failed penetration.
Roofing leak repair isn't just about stopping water today. It's about figuring out whether you're dealing with a simple entry point or a roof system that has started to fail in more than one place. On South Florida homes, especially tile and flat roofs, that distinction matters. A quick patch can buy time. It can also hide a larger issue if the diagnosis is wrong.
We approach leaks in a very specific order. Protect the inside first. Stabilize the roof only if it can be done safely. Then track the path of water, because the spot where you see damage inside often isn't where the water entered. If you maintain properties in different climates, even routine roof care habits change by region. For example, homeowners comparing algae and debris issues in drier mountain conditions may find this guide to professional roof cleaning in Flagstaff useful for understanding how climate affects roof maintenance decisions.
If you're looking at active interior damage right now, keep your focus on containment and safety first. If you need a visual reference for common roof problem areas and exterior conditions, this roofing inspection image helps show the kind of failures we look for during a leak call.
Table of Contents
- That Drip Is a Problem Your Guide to Roofing Leak Repair
- First Response What to Do When Your Roof Is Leaking
- Playing Detective How to Pinpoint the Source of a Leak
- A Practical Guide to DIY Roof Leak Repair
- Safety Gear and Tools You Absolutely Need
- Budgeting for Roof Repair Cost and Timeline Estimates
- DIY Fix vs Professional Repair Knowing When to Call for Help
- Frequently Asked Questions About Roofing Leak Repair
That Drip Is a Problem Your Guide to Roofing Leak Repair
A roof leak gets your attention fast because water never damages just one thing. It stains ceilings, softens drywall, swells trim, damages insulation, and creates electrical concerns if it reaches fixtures or wiring. On South Florida roofs, the challenge is worse because leaks often show up after wind-driven rain, not just straight rainfall, so water can enter through areas homeowners don't expect.
The first mistake people make is assuming the leak is directly above the stain. Sometimes it is. Often it isn't. Water can travel along decking, underlayment, battens, trusses, or the top side of drywall before it finally drops into the room below. That's why good roofing leak repair starts with a calm response, not guesswork.
What makes South Florida leak repair different
Tile roofs are common across Broward, Miami-Dade, and Palm Beach. They hold up well, but they aren't simple to troubleshoot if you don't know where water is slipping beneath the field tile. Flat and low-slope roofs bring a different set of problems. Ponding areas, wall upstands, penetrations, drains, and old patchwork repairs can all become entry points.
Add heat, salt air, and storm exposure, and you get a roof system that can fail in several ways at once. We don't treat a tropical-storm leak the same way we'd treat a clean, isolated puncture on a mild day.
Practical rule: Stop interior damage first. Diagnose second. Repair third.
What actually works
Good leak handling follows a sequence:
- Contain the water inside. Buckets, towels, and moving valuables come first.
- Reduce pressure in the ceiling cavity if needed. If water is ballooning drywall, controlled drainage may prevent a larger ceiling collapse.
- Stabilize the roof only during safe conditions. Wet tile, steep slopes, and active wind are where homeowners get hurt.
- Identify the actual entry point. Not the stain. The source.
- Match the repair to the roof type. Shingle, tile, metal, and flat roofs each require different materials and methods.
A small leak can still signal a serious problem if it has been active long enough to affect flashing, decking, or adjacent components. That's where experience matters. The right repair is the one that restores drainage, seals the actual failure point, and doesn't create a new trap for water.
First Response What to Do When Your Roof Is Leaking
When water is actively entering the house, your job is damage control. Don't start by climbing onto the roof in the rain. Start inside, get control of the water path, and make the house safer.

Protect the interior first
Use buckets, storage bins, or any stable container to catch dripping water. Put down towels, plastic sheeting, or old blankets to keep water from spreading across flooring. Move furniture, electronics, rugs, and artwork out of the area.
If the ceiling drywall is bulging and holding water, that pocket can break open on its own and dump a lot more water at once. In that situation, some homeowners use a small controlled puncture at the lowest point of the bulge to drain it into a bucket. If you do that, clear the area first and make sure you're not under a light fixture or electrical hazard.
Check the attic if it's safe
If you can access the attic without stepping through insulation or exposing yourself to wiring hazards, look for the water trail. Bring a flashlight. Look for wet decking, darkened wood, dripping nails, soaked insulation, or a shiny path along framing members.
Don't assume the first wet spot is the entry point. Water often travels before it drops.
If you can see daylight around a vent, pipe, or flashing transition, that's not a small detail. That's a likely failure point.
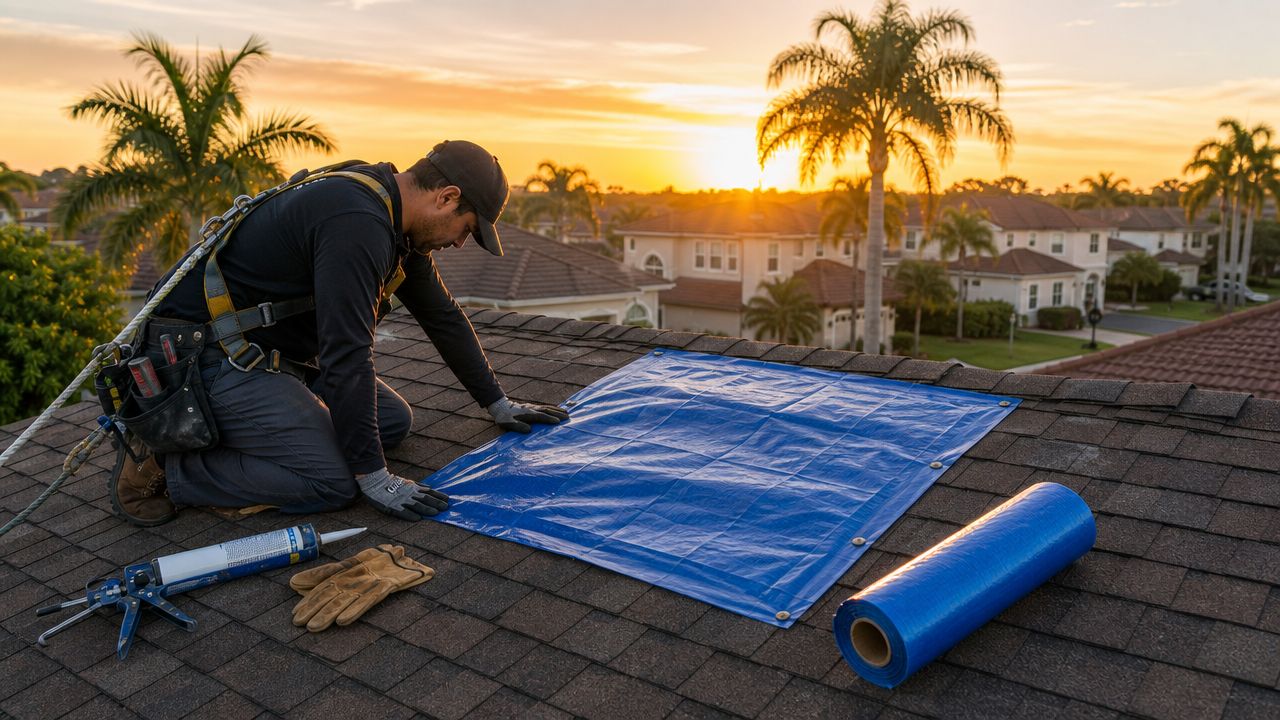
Temporary exterior stabilization
If the weather breaks and the roof is safely accessible, a temporary tarp can help. It must be secured so water sheds over the patch, not under it. Practical leak-fix guidance stresses that patches must overlap downhill so water sheds over, not under, the repair, and sealing the wrong areas can trap water or worsen intrusion, which is especially important on South Florida homes and low-slope roofs exposed to tropical and wind-driven rain, as noted in this emergency roof leak repair guidance.
That means a sloppy patch can make the leak worse. We see that a lot after storms. Someone seals the uphill side only, traps water at a penetration, or creates a lip that channels runoff under the temporary repair.
Use common sense here:
- Tarp over area, not just hole: Extend the cover beyond the visible suspect area so runoff stays above the temporary fix.
- Secure without creating new punctures if possible: Weighting or careful fastening matters. Random screws through vulnerable areas don't.
- Don't smear sealant everywhere: Broad, blind sealing often hides the actual path and interferes with proper repair later.
When to stop
Stop immediately if the roof is steep, wet, high, tiled, or near power lines. Also stop if wind is still pushing rain across the roof. A temporary stabilization only helps if you get off the roof in one piece.
The right first response isn't the boldest one. It's the one that limits damage, preserves evidence of where the water is coming from, and avoids turning an interior leak into a fall injury.
Playing Detective How to Pinpoint the Source of a Leak
Finding the leak is usually harder than fixing it. The stain on your ceiling is just the final stop. The leak's source may be several feet away, uphill, or off to one side where water entered and then traveled along something solid before dropping.
A careful diagnosis saves a lot of wasted patching.
Start from underneath
The attic tells the truth if you know what to look for. Use a bright flashlight and inspect the underside of the roof deck, the framing, and the insulation around the damaged area. Look for dark water marks, mold, damp insulation, rusted fasteners, or drips hanging from nail tips.
Missed nails, often called shiners, can collect condensation or point you toward a path of moisture. Follow water marks uphill if you can. That's usually more useful than staring at the ceiling stain below.
This roofing company logo and inspection reference is the kind of visual identifier you may see on inspection materials when a roofer documents leak paths and problem areas.
Exterior trouble spots that fail first
Once the roof is dry and safe to inspect, pay attention to the transitions. Open-field roofing materials do fail, but leaks often show up at edges, joints, and penetrations before they show up in the middle of a clean roof slope.
Common failure points include:
- Pipe boots: Rubber collars crack, pull away, or fail around the pipe.
- Flashing at walls and chimneys: Small gaps at metal transitions can admit a surprising amount of water.
- Valleys: Debris buildup, improper overlap, or aged materials can send water beneath the roof covering.
- Roof vents and equipment curbs: Fasteners, sealant joints, and corner details often break down first.
- Tile laps and displaced units: A cracked tile isn't always the leak, but it can expose underlayment or redirect water where it doesn't belong.
- Flat roof penetrations: These are high-risk areas on South Florida commercial and residential low-slope systems.
Follow the water, not the symptom
A hose test can help in some situations, but it needs to be controlled. One person stays inside. One stays outside. Wet one area at a time and wait. Flooding the whole roof at once only creates confusion.
The leak you can see is often the result of water taking the easiest path, not the shortest one.
Diagnosis also means ruling things out. Sometimes the problem isn't the main roof at all. It may be a wall crack, an unsealed rooftop penetration, a failed curb, or even water entering around a vented assembly and showing up as a ceiling leak below.
If you can't trace it with confidence, don't start opening random areas or applying patch material by guess. Roofing leak repair works when the diagnosis is disciplined. Without that, people end up fixing the wrong spot and calling the same leak "new" the next time it rains.
A Practical Guide to DIY Roof Leak Repair
Some leaks can be stabilized or repaired by a capable homeowner. Some shouldn't be touched except by someone who works roofs regularly. The deciding factors are roof type, access, weather, and whether the failure is isolated and visible.
Before doing any repair, make sure the roof is dry enough to work on safely and that you've identified the likely entry point. Then match the method to the roof system.
Asphalt shingle repairs
Asphalt shingle leaks often show up around lifted tabs, exposed fasteners, pipe boots, vents, and wall flashings. If a shingle is cracked, torn, or missing, the repair needs to restore both water shedding and attachment.
A basic small repair usually involves a flat pry bar, roofing nails, compatible roofing sealant, replacement shingles, gloves, and a utility knife. Lift surrounding tabs carefully. Remove the damaged shingle without tearing the units around it. Install the replacement in the same course, re-fasten as needed, and reseal lifted tabs that lost their bond.
Don't overdo the sealant. A little in the right place helps. A lot in the wrong place creates mess, traps debris, and complicates future work.
Concrete and clay tile repairs
Tile roofs are common here, and they're where homeowners often break more than they fix. The tile you step on wrong becomes the next repair. The tile you pry up too aggressively can crack the adjacent one.
If a single tile is broken and the underlayment below is still intact, replacing that tile may solve the immediate issue. The challenge is access and handling. You need to lift the surrounding course carefully, remove the damaged unit, and set the replacement without disturbing the layout or creating a new path for wind-driven rain.
On older roofs, a cracked tile may only be the symptom. If underlayment has aged out below the tile field, swapping visible broken pieces won't stop recurring leaks.
Metal roof repairs
Metal roofs leak at seams, exposed fasteners, flashing transitions, and penetrations more often than in the middle of a solid panel. The repair has to account for movement. Metal expands and contracts, so rigid, random patching doesn't last.
For a minor fix, tighten or replace failed fasteners if the substrate still holds properly. Rework failed sealant only after cleaning the area. For seam issues or penetration flashing failure, use materials made for the specific metal roof system. Generic caulk from a hardware shelf usually isn't a roofing leak repair plan.
Flat roof repairs
Flat and low-slope roofs demand a more technical approach because water doesn't run off them the same way it runs off steep slopes. On these systems, details matter.
A reliable field method is outlined in this flat roof leak repair guide. Inspect in daylight after rain, trace standing water or wet patches to penetrations and wall upstands, mark the defect, then apply the chosen patch with at least 75 to 100 mm overlap beyond the visible damage. Press the patch or membrane from the center outward, and fully seal the edges to avoid air pockets and capillary water tracking. The same guidance notes that the substrate needs to be dry before repair, and contact adhesives are typically allowed to become tacky for about 5 to 10 minutes before bonding.
That sequence matters more than people think. If you patch over moisture, rush the adhesive, or leave the edge unsealed, the repair may look finished and still leak at the next storm.
| Roof Type | Primary Tools | Repair Materials |
|---|---|---|
| Asphalt shingles | Flat pry bar, hammer, utility knife, caulk gun | Replacement shingles, roofing nails, compatible roof sealant |
| Concrete or clay tile | Tile removal tool, pry bar, gloves, ladder setup | Matching replacement tile, approved adhesive or fastening hardware where applicable |
| Metal roofing | Driver, hand tools, wire brush, caulk gun | Replacement fasteners, metal-compatible sealant, flashing materials |
| Flat roof | Utility knife, roller, brush, measuring tape | Patch membrane, adhesive, primer if required, edge sealant |
What DIY can and can't do
DIY works best for small, visible failures on low-risk access. It doesn't work well for broad leak patterns, hidden underlayment failure, repeated flashing problems, or anything on a dangerous roof surface.
If you're doing your own repair, think in terms of water management, not just hole filling. The roof's job is to shed water in sequence. Every repair has to respect that sequence.
Safety Gear and Tools You Absolutely Need
Most leak repairs don't go wrong because of a missing tube of sealant. They go wrong because someone climbs where they shouldn't, works on a slick surface, or uses the wrong ladder setup. Roofing is unforgiving. Wet tile is slick. Granulated shingles can break loose underfoot. Low-slope roofs seem safe until you step near an edge or through a weak area around old damage.

Safety comes before repair
The minimum safety gear should include high-grip roofing footwear, gloves, eye protection, and a stable ladder with proper footing. On higher or steeper roofs, fall protection isn't optional. A harness system only helps if it's anchored correctly and used by someone who understands it.
If your leak is near a vent penetration or rooftop exhaust detail, this Purified Air Duct Cleaning's venting guide is worth reviewing because roof penetrations create both leak and safety issues when they're installed or maintained poorly.
A good visual reminder of the equipment and roof-access planning involved in field work can be seen in this roof repair tools and setup image.
The tools that actually matter
You don't need a truck full of gear for a simple repair, but you do need the right basics.
- Ladder with proper setup: The ladder should sit on stable ground and be secured so it can't shift while you're stepping on or off the roof.
- Pry bar and utility knife: These are standard for lifting shingles, cutting patch material, and removing failed pieces cleanly.
- Caulk gun and roof-compatible sealant: Use a sealant made for roofing applications and the material you're repairing.
- Flashlight and moisture awareness: Leak finding often starts in darker attic spaces or shaded roof transitions.
- Buckets, tarps, and interior protection materials: Sometimes the smartest tool is the one that prevents further indoor damage while you wait for conditions to improve.
Safety gear isn't extra cost. It's part of the repair.
Tools don't replace judgment
A homeowner with good tools can still get into trouble fast on a fragile tile roof or a flat roof with hidden soft spots. We use ladders, harnesses, roof jacks, hand tools, moisture tracing methods, and material-specific patch systems because the roof decides what the repair requires. That's also where a service option like Paletz Roofing and Inspections fits. They handle repairs, inspections, and reroofing for shingle, tile, metal, and flat roof systems in South Florida.
If you're choosing between buying gear and making one leak attempt or stepping back and arranging a proper inspection, be honest about access, footing, and your experience level. The roof doesn't care that the leak looks small from the driveway.
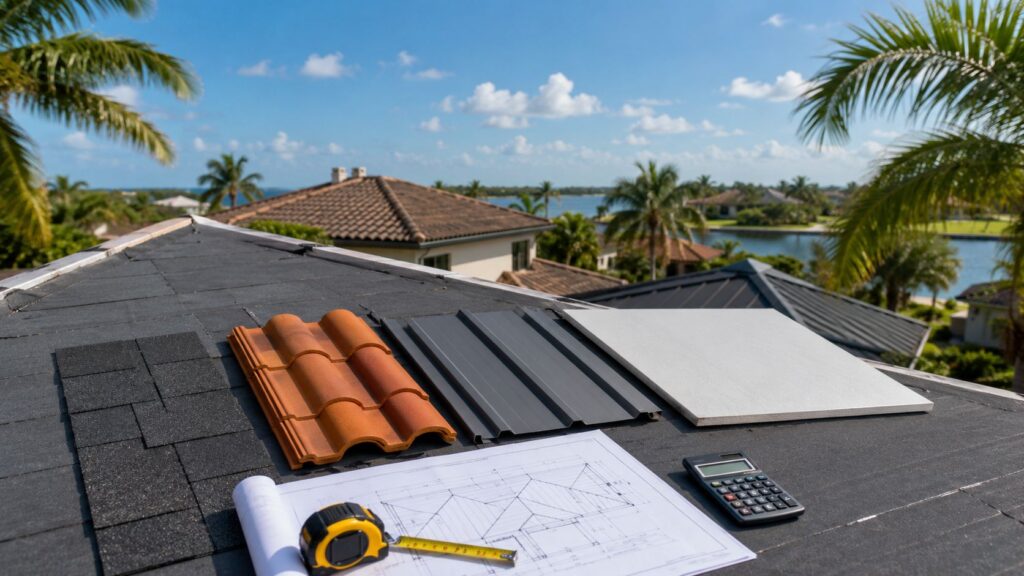
Budgeting for Roof Repair Cost and Timeline Estimates
A Broward or Miami-Dade homeowner often sees the same thing after a hard rain. One ceiling stain, one drip, and the hope that it is a cheap patch. Sometimes it is. In South Florida, it can also be the first visible sign of wind-lifted tile, failed flashing, a flat roof seam opening up, or wet decking that has been taking on water since the last tropical system.
Cost follows scope. The drip inside rarely tells you the full story outside.
A widely cited 2026 estimate says most professional roof leak repairs cost $350 to $1,500, with minor fixes such as replacing a few shingles sometimes as low as $150, while complex repairs involving areas like chimneys can rise above $2,500. The same source notes that many residential repairs are completed in 2 to 5 hours, while larger structural or specialty-material work can take 1 to 2 days, according to this 2026 roof leak repair price guide.
Independent consumer guidance from 2026 puts the average in a similar range at $360 to $1,550, says labor commonly runs $35 to $90 per hour, and shows regional variation, including $350 to $900 in the U.S. South, according to this ConsumerAffairs roof leak repair cost overview.
Those numbers are useful, but South Florida roofs bring their own pricing pressure. Tile repairs usually take more care because matching profile and color is harder, and walking the roof without breaking surrounding tiles takes experience. Flat roofs on additions, carports, and low-slope sections can look simple from the ground, but finding the actual entry point through seams, penetrations, and ponding areas often takes longer than homeowners expect.
The detail being repaired matters just as much as the material. A slipped shingle or one exposed fastener is usually a smaller ticket than a valley repair, wall flashing failure, chimney transition, or leak around HVAC supports and vents. Once we open an area and find soft decking or saturated underlayment, the repair stops being a quick patch and starts becoming a real section rebuild.
For budgeting, homeowners should plan around three common scenarios:
- Small, isolated repair with easy access: Often the least expensive and often finished the same day.
- Leak with concealed damage: The starting price can change once wet wood, failed underlayment, or damaged flashing is exposed.
- Tile or flat roof repair after storm weather: Diagnosis and dry-in usually take longer, and material matching or specialty patching can raise the total.
Timeline also depends on weather windows. In Palm Beach, Broward, and Miami-Dade, a repair might only take a few working hours once we are on the roof, but afternoon storms, high winds, or a wet roof can push the actual calendar timeline out. That matters if tarping, temporary dry-in, or follow-up visits are needed while materials are ordered.
DIY work can lower the upfront spend on paper. It also gets expensive fast when the first repair misses the source, cracks adjacent tile, or traps water under a patch that was never going to hold in Florida heat and rain. Budget for the repair based on roof type, access, and what storm exposure may have done to the surrounding area, not just the size of the stain on the ceiling.
DIY Fix vs Professional Repair Knowing When to Call for Help
A homeowner can handle some leak situations. A professional should handle others from the start. The difference isn't bravery. It's whether the problem is isolated, visible, and safely reachable, or whether the leak pattern suggests a roof system issue instead of a single bad spot.

When a repair is still a repair
A limited DIY fix can make sense when all of the following are true:
- The leak source is visible: You can clearly identify a displaced shingle, a small puncture, or a simple exposed failure.
- The roof is safe to access: Low height, dry conditions, stable footing, and no fragile tile field under your feet.
- The damage appears localized: One area, one event, no history of the same leak returning.
- You have the right materials: Not leftover caulk and guesswork.
If those boxes aren't checked, you're already moving out of the safe DIY zone.
When the leak is telling you something bigger
One of the most important decisions in roofing leak repair is recognizing when you're not dealing with a repair anymore. You're dealing with a replacement conversation.
Independent roofing guidance notes that repeat leaks often signal deeper system failure, and when leaks keep returning despite patching, especially around rooftop equipment or flashing, it's a strong indicator the roof may be near the end of its service life and needs a professional assessment, as explained in this recurring roof leak case discussion.
That shows up in the field in a few familiar ways:
- Same room, same stain, new storm: The patch may have covered the symptom but not the water path.
- Multiple penetrations leaking close together: That often points to broader aging around flashings or equipment curbs.
- Tile roof with recurring underlayment issues: The tiles may look serviceable while the waterproofing below is no longer reliable.
- Flat roof with patch on top of patch: At some point, continued spot work stops being efficient or dependable.
A roof that keeps needing the same leak repair is giving you an answer. It just isn't the answer most people want.
Professional help also makes sense when the leak is hard to trace, the roof is steep or fragile, interior damage is spreading, or the building has more than one vulnerable area. What you're paying for isn't only the patch. It's the diagnosis, safe access, and the judgment to tell a one-time repair from a roof that's starting to fail as a system.
Frequently Asked Questions About Roofing Leak Repair
Will my homeowner's insurance cover a roof leak repair
Coverage usually comes down to cause and condition. A leak tied to a recent wind event or storm damage is handled very differently from slow deterioration, neglected maintenance, or an older roof that has been taking on water for months.
In South Florida, we tell owners to document everything the same day if possible. Photograph the ceiling stain, wet insulation, damaged contents, and the roof area if it can be seen safely from the ground or attic. Save receipts for tarping or emergency dry-out work. On tile and flat roofs in Broward, Miami-Dade, and Palm Beach, that paper trail often matters as much as the repair itself.
Does emergency leak service cost more
Yes. After-hours service, temporary dry-in work, tarping in bad weather, and returning after the roof dries out can raise the final bill. As noted earlier in the budgeting section, emergency response often adds a noticeable premium.
That is common here because many leaks show up during a hard summer rain or right after a tropical storm, when stopping interior damage cannot wait until the next clear morning.
How do I know whether my roof is still under warranty
Start with your permit records, closing documents, contractor invoice, and any manufacturer paperwork from the original installation. Material coverage and workmanship coverage are often separate, and they do not always last the same length of time.
Before approving a repair, ask one direct question. Will this repair affect any remaining warranty coverage? That matters on tile systems with underlayment issues and on flat roofs where the manufacturer may require a specific repair method or approved product.
What do local code requirements mean for leak repair
Local code can change what starts as a small repair. In Broward and Miami-Dade especially, wind resistance, fastening, approved assemblies, and permit rules are not details you sort out after the work starts.
We see this come up when a homeowner expects a simple patch and the opened area shows wet decking, failed underlayment, or broader attachment problems. At that point, the job may no longer be a small isolated repair. It may be the start of a larger code-driven correction, especially after storm damage on older tile or low-slope roofs.
How can I reduce the chance of another leak
Keep drains, scuppers, valleys, and gutters clear before storm season. Watch roof penetrations, vent flashings, wall-to-roof transitions, and any prior repair areas. On tile roofs, do not assume the tile tells the whole story. The underlayment underneath often fails first. On flat roofs, standing water and repeated patching deserve attention early.
The practical rule is simple. If a stain appears once, inspect it. If it reappears after the next storm, stop treating it like a one-time problem.
If your home or commercial building in Broward, Miami-Dade, or Palm Beach has an active leak, schedule an inspection with Paletz Roofing and Inspections. They handle leak diagnosis, repairs, reroofing decisions, and roof system evaluations for tile, shingle, metal, and flat roofs, with service suited for South Florida weather conditions.