Before you can even think about finding a roof leak, you have to get your gear in order and put safety at the top of the list. This isn't a task you just jump into. The whole process starts with a pre-inspection check, which means grabbing things like a powerful flashlight and a solid ladder, and most importantly, making sure you have a spotter.
Let's be crystal clear about one thing: Never attempt a roof inspection during or after rain. A wet roof is a serious falling hazard, and no leak is worth that risk.
Preparing for a Safe and Effective Leak Hunt
Jumping into a leak hunt without the right prep is a classic rookie mistake, one that leads to wasted time and potential danger. I like to think of this stage as a mission briefing. You’re gathering intelligence, checking your gear, and reviewing safety protocols before you ever set foot in the attic or climb that ladder.
A methodical approach here makes the actual search go so much smoother. The goal isn't just to find the leak, but to do it without hurting yourself or causing more damage. Rushing almost always means you'll miss a crucial clue or, worse, have an accident.
Your Leak Detection Toolkit and Safety Checklist
Having everything you need within arm's reach means you can stay focused on the task at hand instead of running up and down the ladder for forgotten tools. This simple checklist covers the essentials for a safe and productive inspection.
| Category | Item | Pro Tip and Safety Note |
|---|---|---|
| Visibility | High-Luminosity Flashlight or Headlamp | Attics are pitch black. A headlamp is best because it keeps your hands free for balancing and investigating. |
| Access | Sturdy Ladder | Check for stability before you climb. Make sure it's on level ground and tall enough to prevent overreaching. |
| Documentation | Camera or Smartphone | Photos are your best friend. Snap clear pictures of stains, damage, and potential entry points. |
| Containment | Buckets and Towels | If the leak is active, a bucket can save your ceiling. Towels are great for managing minor drips. |
| Personal Safety | Rubber-Soled Shoes | Good grip is non-negotiable. Never wear sandals or smooth-soled shoes for this kind of work. |
| Personal Safety | A Spotter (Friend or Family Member) | This person holds the ladder, passes tools, and is there in case of an emergency. Never inspect a roof alone. |
Putting these items together beforehand streamlines the entire process and reinforces a safety-first mindset from the very beginning.
Prioritizing Safety Above All Else
I can't say this enough: safety is the single most important part of this whole process. A roof leak is an annoying problem, but a fall can change your life forever. Don't take shortcuts here.
The first rule of thumb is to always check the weather forecast. Forget about getting on a roof if it's wet, icy, or even just a little windy. Shingles become incredibly slick with the slightest bit of moisture.
Your personal safety is far more valuable than a quick diagnosis. If you feel even slightly uncomfortable with heights or the stability of your roof, the best decision is to call a licensed and insured roofing professional.
Always have a spotter. Their job is to hold the ladder steady, stay nearby in case you need help, and hand you tools so you’re not making risky moves. When you're ready to climb, wear rubber-soled shoes with excellent grip and test your footing carefully. Move slowly and deliberately.
If you end up needing a professional eye on the problem, the photos you took will be incredibly helpful for a team like Paletz Roofing and Inspections. By taking these precautions seriously, you set yourself up for a search that is not only effective but, most importantly, safe.
Finding the Leak's Trail Inside Your Home
The first sign of a roof leak rarely announces itself with a dramatic drip right over your head. It’s usually more subtle—a faint, discolored patch on the ceiling or a musty smell you can’t quite place. To find the real source, you have to think like water.
Water is a master of misdirection. It almost never drips straight down from where it gets in. Instead, it follows the path of least resistance, traveling along rafters, roof decking, and insulation before it finally pools and soaks through your ceiling. That water stain in your living room could be caused by a tiny breach ten or even twenty feet away near a chimney or vent pipe.
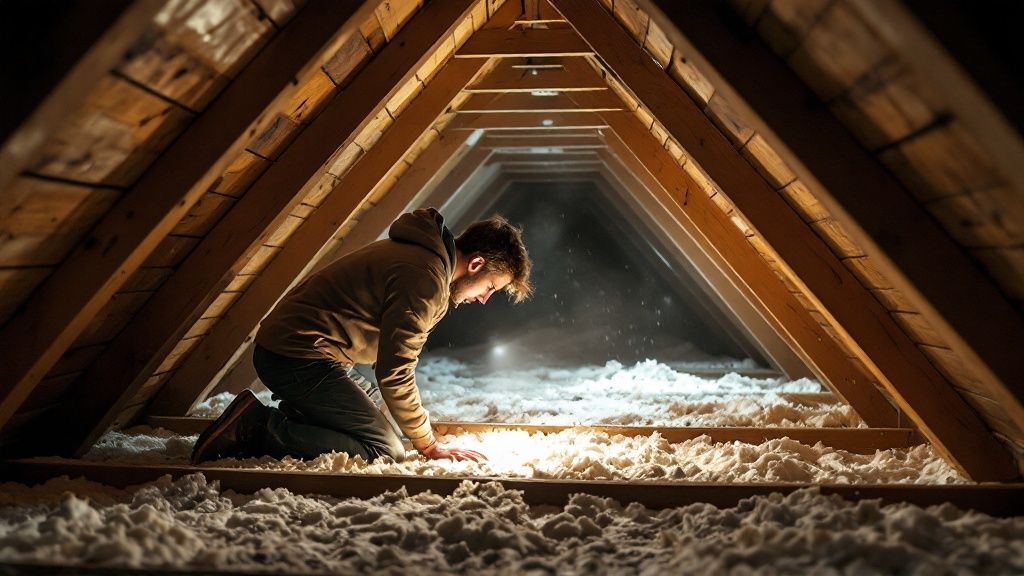
Because of this, your investigation starts inside, usually in the attic. This is where you'll find the earliest and most accurate clues.
The Attic Inspection: A Detective's View
Before you even head up, take a moment and just… smell. A persistent musty or earthy odor is a dead giveaway for mold or mildew, which only grows where there’s moisture. That scent alone tells you you’re on the right track.
Once you're in the attic, turn off your flashlight and let your eyes adjust. Look up toward the roof decking for any slivers of daylight peeking through. While not every pinpoint of light means an active leak, it’s a definite weak spot in your roof's defense and a prime suspect.
With your flashlight back on, start a slow, methodical scan of the underside of the roof deck. You’re looking for:
- Dark Stains or "Black Wood": Water-soaked wood is a lot darker than dry wood. Pay extra attention to the areas around anything that pokes through the roof, like pipes or vents.
- Streaks and Drip Marks: Look for lines running down the rafters or decking. These are the literal trails left by traveling water.
- Rusted Nails: The tips of roofing nails sticking through the decking will often show rust or have a black ring around them if they’ve been wet.
And don’t forget the insulation. Waterlogged insulation loses its fluffy texture and becomes matted down and compressed. I've seen homeowners overlook this sign countless times, but it’s often the most direct clue, sitting right under the water's path. Gently part the insulation in suspicious spots to check the drywall or vapor barrier underneath for dampness.
Pro Tip: Water loves to follow gravity along the top of a rafter or truss before dripping off at a low point. If you find wet insulation, trace the nearest rafter upward. That's how pros find the water's travel route and get closer to the entry point.
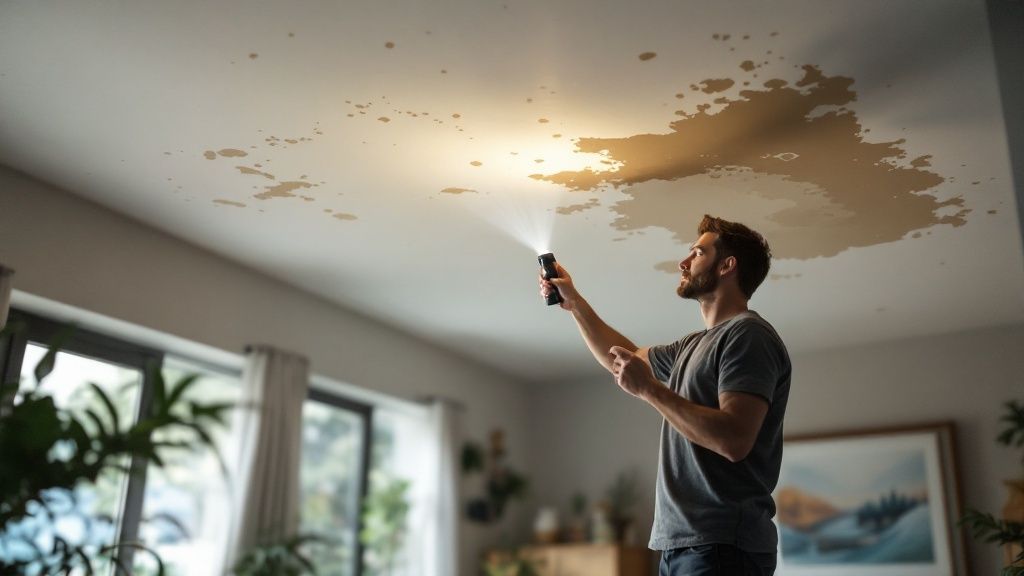
Reading the Signs in Your Living Space
If you can't get into your attic or the inspection doesn't turn up anything, your search moves to the living areas. The signs here are usually more obvious but can be just as misleading about the source. You're looking for more than just that classic brown water stain.
Check the walls carefully, especially where they meet the ceiling. Bubbling, blistering, or peeling paint means moisture is trapped behind the surface. Gently press on these spots; if they feel soft or spongy, you’ve confirmed there’s water.
It's a huge issue for property owners. In fact, the global water leak detection market is projected to grow from USD 5.63 billion in 2025 to USD 8.43 billion by 2032. This growth is driven by new tech and a greater awareness of just how costly water damage can be. You can learn more about water leak detection system market growth and see why pinpointing these problems early is so critical.
Documenting Your Indoor Clues
Before you even think about climbing on the roof, create a "leak map." Grab your phone and take clear pictures of every sign you find:
- Wide Shots: Get the whole stained area in relation to the room's layout.
- Close-Ups: Snap detailed pictures of peeling paint, dark spots, or any active drips.
- Measurements: Use a tape measure to note the distance of the interior damage from two different exterior walls.
This documentation is gold. It gives you a specific target area to focus on when you move your inspection outside, turning a random search into a calculated investigation. You're no longer just looking for a hole; you're looking for the specific failure that caused the stain above your bedroom window. This inside-out approach saves a ton of time and dramatically increases your chances of finding the real culprit.
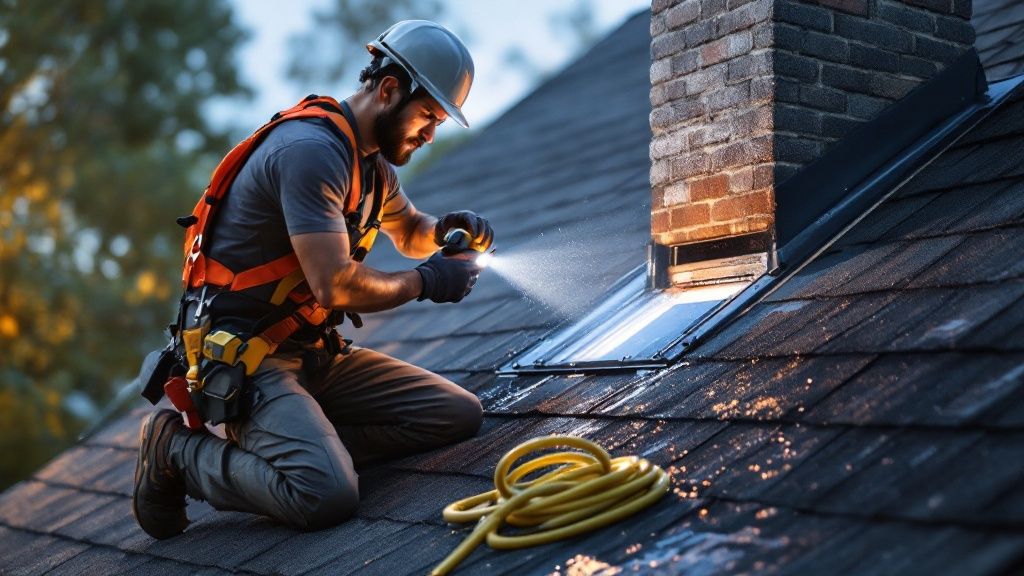
Conducting a Thorough Exterior Roof Inspection
Alright, you've mapped out the water stains inside. Now it’s time to head outdoors and play detective. The exterior inspection is where you connect the dots, matching the interior clues to the actual entry point on your roof. This isn't just about randomly looking for a hole; it's a focused hunt based on where roofs most commonly fail.
Before you get started, it helps to know what you're looking at. Spending a few minutes with an ultimate guide to roofing materials will tell you whether you have asphalt, tile, or metal. Each one wears out differently, so knowing your roof type helps you spot trouble faster.
And let’s be clear: safety comes first. Don’t even think about getting on the roof unless you’re 100% comfortable with heights and have the right safety gear. A sturdy, properly-placed ladder and a spotter on the ground are non-negotiable. If you have any doubt at all, stay on the ground and use a good pair of binoculars. It's much safer and you can still spot a lot of problems.
Zeroing In on Roof Penetrations
Nine times out of ten, your leak is coming from something poking through the roof. Think vent pipes, chimneys, skylights, or attic fans. Every single one of these creates a seam in your roof's armor, a potential weak spot that relies on flashing and sealant to stay watertight. Over the years, the sun and weather just bake these seals until they fail.
Start your search by looking closely at the seals around these areas. You're hunting for:
- Cracked or Peeling Caulk: Sealant doesn't last forever. When it dries out and pulls away from the flashing or siding, it leaves a perfect channel for rainwater.
- Rusted or Damaged Flashing: Look for any signs of rust on metal flashing. Heavy winds can also bend or lift flashing, breaking that crucial watertight seal.
- Worn Rubber Boots: The flexible rubber "boots" that seal around plumbing vent pipes are notorious for failing. Years of direct UV exposure cause them to become brittle and crack. This is easily one of the most common leak sources we find.
I've seen a tiny, almost invisible crack in the sealant around a skylight let in a shocking amount of water during a storm. It's a classic example of how a leak can seem to appear from nowhere.
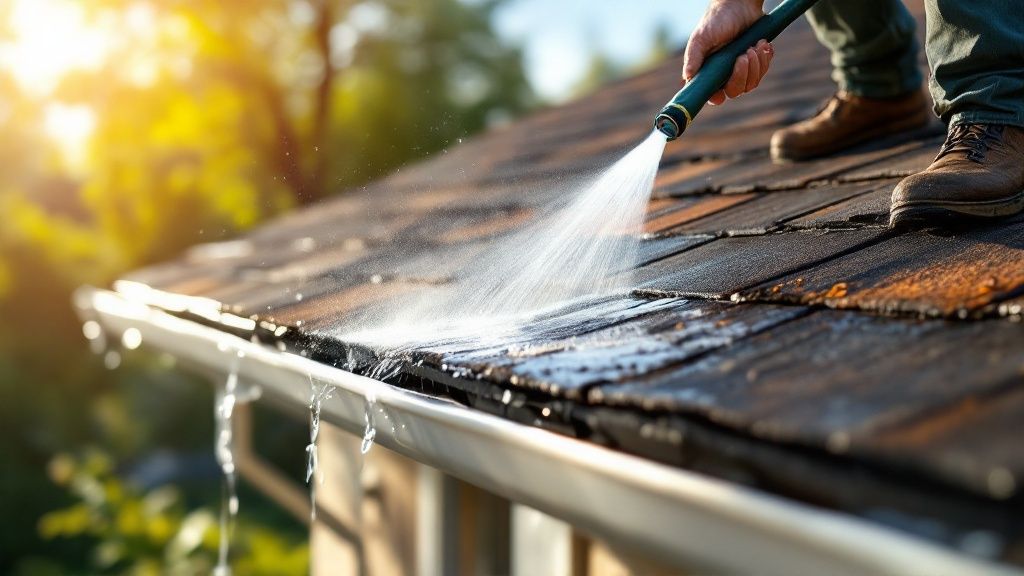
Scrutinizing the Field of Shingles
Next, scan the main expanse of your roof, what we call the "field." You're looking for any signs that the shingles themselves are compromised. Forget about finding an obvious hole—the real culprits are usually far more subtle.
Carefully look over the shingles for these red flags:
- Missing or Damaged Shingles: This one's the most obvious. A single missing shingle is like an open door, exposing the underlayment to sun and rain, which leads to a leak in no time.
- Curled or Buckled Shingles: As asphalt shingles age, their edges start to curl upwards, or the middle might start to buckle. This breaks the seal to the shingle below it and lets wind-driven rain right underneath.
- Cracked Shingles: Get a close look for hairline cracks, especially on the parts of the roof that get the most sun. They may look small now, but they'll only get wider.
- Missing Granules: See those little sand-like granules on your shingles? They’re not just for color; they’re the shingle’s sunscreen. If you find a bunch of them in your gutters or see dark, smooth patches, your roof's protective layer is wearing away.
A rookie mistake is to only inspect the spot directly above the interior water stain. Water is tricky and can travel a good distance downhill under the shingles before it finds a way into your attic. Always inspect the entire roof plane above and around the interior damage.
Examining High-Stress Areas
Some parts of your roof take more of a beating than others. These high-stress zones are often the first to give out, so they deserve some extra attention during your inspection.
Roof Valleys
A valley is that V-shaped channel where two sloped roof sections meet. It's a waterslide for a massive amount of runoff. Leaves and pine needles love to collect here, which traps moisture against the shingles and flashing, causing them to wear out much faster.
Ridge Caps and Hips
The ridge cap runs along the very peak of your roof, and the hips are the diagonal ridges formed where roof planes join. These shingles are the most exposed to high winds and direct weather. Check them closely for any shingles that are cracked, loose, or missing entirely. Even a small gap up here can channel water directly into your attic.
If you want a good visual of what healthy ridges and hips should look like, you can see some clear examples in these project photos: https://paletzroofing.com/wp-content/uploads/2025/09/thumbnail-25-768×432.jpg. Comparing a well-maintained roof to your own can make problems stand out.
By methodically checking these three areas—penetrations, the shingle field, and high-stress points—you stop guessing and start diagnosing. You’re building a complete picture of your roof's condition, which is the only way to find that leak's true source.
Using a Water Test to Pinpoint the Leak Source
Sometimes, even after a thorough inspection inside and out, the exact entry point of a leak can be maddeningly elusive. Water is a sneaky traveler, and a quick visual check won't always spot the tiny crack or failed seal causing all the trouble. This is where a more hands-on approach comes in: a controlled water test.
This is definitely a two-person job, so find a helper you can easily talk to on the phone. One of you will be outside with a garden hose, and the other will stay inside, keeping a close eye on the spot where you first noticed water damage.
The idea isn't to create your own personal hurricane on the roof. Instead, you'll be isolating and testing small, specific sections one at a time. Blasting the whole roof at once is a rookie mistake that will only leave you guessing as water streams down from everywhere. For this task, patience is your best friend.
How to Run a Methodical Water Test
Always start low and work your way up. Begin by gently soaking the area on the roof just downhill or directly above where the leak appears inside. For instance, if you have a stain on the ceiling near a window, start by wetting the wall and flashing right over that window—don't go straight for the shingles ten feet above it.
Have your partner run water over that one small section for several minutes. It can sometimes take 5-10 minutes or even longer for the water to snake its way through the roof assembly and finally drip down inside.
- Isolate Sections: Focus on one potential problem area at a time, like the flashing around a single vent pipe.
- Wait Patiently: Give the water plenty of time to show up inside after you soak each section.
- Communicate Clearly: The second your spotter inside shouts, "I see a drip!" the person with the hose knows they've found the culprit.
This bottom-up method is critical because it prevents water from higher up on the roof from running down and tricking you into thinking a lower section is the problem. It’s the most reliable way to figure out how to find a roof leak when it’s playing hard to get.
Advanced Detection and Documentation
In some cases, leaks are just plain stubborn. If you’ve tested all the usual suspects without any luck, you might need to widen your search or consider that water is traveling sideways from an unexpected place. Still, this methodical process is your best strategy. While homeowners rely on this tried-and-true technique, the professional industry keeps evolving.
Roof water leak detectors are becoming more common, with the global market for these devices growing at a compound annual growth rate of 1.7% between 2018 and 2022. Sensor technology just keeps getting better. You can discover more about the expanding roof water leak detector market and how it’s changing modern diagnostics.
Once you’ve confirmed the source, documenting everything is the key to a good repair. This infographic breaks down a simple workflow for recording what you find.
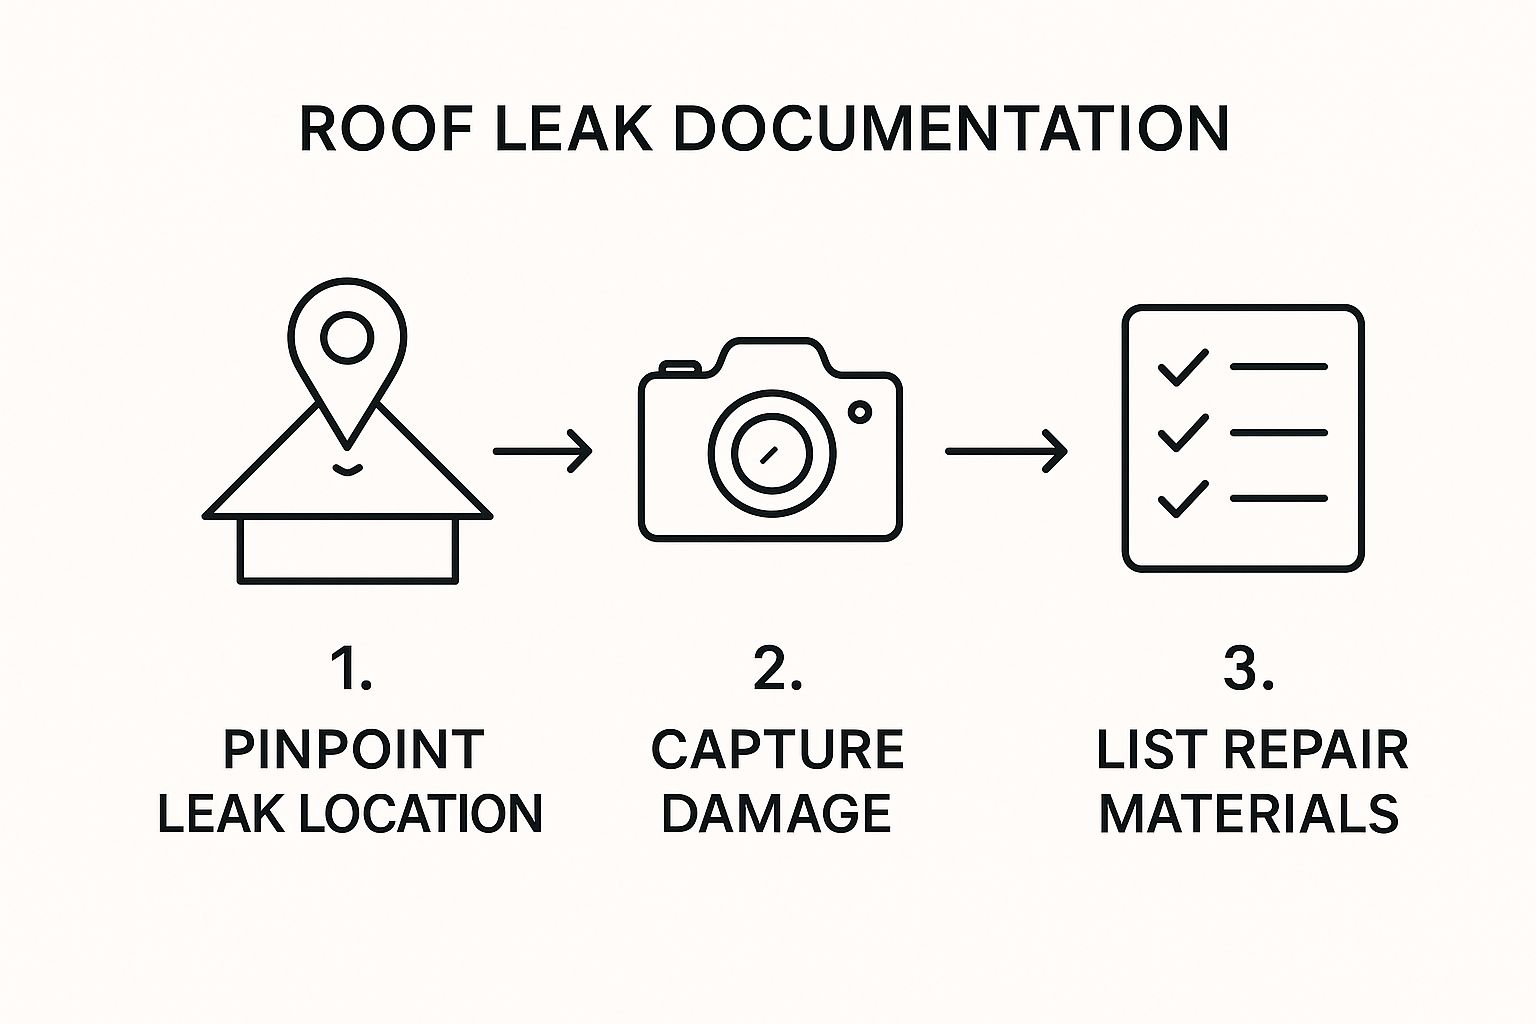
This process ensures you capture the exact location, the specific type of damage, and what you’ll need to fix it, giving you a clear plan of attack.
Key Takeaway: The success of a water test comes down to methodical patience. If you rush it or soak big areas, you’ll just muddy the waters and hide the leak's true origin. Isolate, soak, and wait—that discipline will lead you right to the source.
When you nail it down, mark the spot on the outside of your roof with a piece of chalk or a bright crayon. Take detailed photos from both the outside and the inside. You can even check out our guide on what to expect during a professional roof inspection to see how the pros document their findings. This solid evidence will be invaluable, whether you decide to tackle the repair yourself or call in a professional.
Alright, you’ve found the leak. That’s a huge step forward. Pinpointing the source is often the hardest part of the entire ordeal, moving you from the frustrating mystery phase to the "what's next?" diagnosis. What you do now is critical to protecting your home from more significant—and expensive—damage down the road.
Your absolute first priority is containment. Before you even start thinking about a permanent fix, you need to stop the water in its tracks. Think of it as triage for your house; it’s a necessary stopgap measure to buy you some precious time.
Immediate Temporary Fixes to Prevent Further Damage
If more rain is on the way, you need to get a temporary patch in place immediately. Even a slow, seemingly harmless drip can saturate insulation, turn drywall into mush, and create the perfect damp environment for mold to thrive.
Here are a couple of go-to temporary solutions that work in a pinch:
- Roofing Tar or Cement: For smaller holes or cracks, especially around flashing, you can slather a thick layer of roofing cement on with a putty knife. It's not pretty, but it creates a surprisingly effective temporary seal.
- A Heavy-Duty Tarp: If the damage is bigger, like a section of shingles ripped off by the wind, a tarp is your best friend. Make sure it's a heavy-duty one. Lay it flat over the damaged area, extending it several feet past the leak on all sides. Use 2x4s or sandbags to weigh it down. Whatever you do, don't nail the tarp to your roof—you'll just be creating more holes for water to get through.
These quick fixes aren't meant to be permanent, but they serve one vital purpose: they keep the water out while you figure out a real repair strategy.
Should You DIY the Repair or Call a Professional?
With a temporary fix holding things together, you can now make a calm, clear-headed decision about the permanent repair. This brings us to the classic homeowner's dilemma: Do I tackle this myself, or is it time to call in the pros? The right answer really depends on the leak and your own comfort level.
Before you decide, think through these points:
- The Scale of the Damage: Is it a single cracked shingle or a tiny gap in the flashing? That’s likely a manageable DIY project for a handy homeowner. But if you’re looking at widespread damage, rot in the underlying roof decking, or a leak in a tricky spot like a roof valley, that’s almost always a job for a professional.
- Your Roofing Material: Asphalt shingles are fairly straightforward. If you have slate, tile, or metal roofing, though, the repair process is a different ballgame. These materials are highly specialized and require specific tools and know-how. Trying to fix them without experience can easily make things much, much worse.
- Your Comfort and Safety: This is the big one. Are you genuinely comfortable working on a sloped roof, possibly two or three stories off the ground? If you have even the slightest hesitation about heights or your ability to work safely, the decision is already made for you. Call a professional.
Crucial Takeaway: A botched DIY repair can quickly turn a minor leak into a major headache. If you have any doubt whatsoever about your ability to create a permanent, watertight seal, hiring an experienced roofer is the smarter—and often cheaper—choice in the long run.
Finding and Vetting a Reputable Contractor
If you've decided that calling a professional is the way to go, your next job is to find the right one. Don't just pick the first company that pops up in a search. You need someone qualified, insured, and with a solid reputation. A great place to start is by asking friends and neighbors for local referrals, then cross-referencing those names with online reviews.
When you start getting estimates, pay close attention to the details. A vague, one-line quote is a major red flag. A proper estimate should break down the costs for both materials and labor, clearly specify the work they plan to do, and include warranty information.
And most importantly, ask for proof of their liability and worker's compensation insurance. Never, ever hire a contractor who can't provide it. Taking the time to do this diligence ensures you're not just fixing a leak; you're protecting your entire investment.
Common Questions About Finding Roof Leaks
When you're looking up at a fresh water stain on your ceiling, your mind starts racing with questions. A potential roof leak can feel like a huge headache, but getting straightforward answers can calm the nerves and make the whole process feel more manageable. We've compiled the questions we hear most from homeowners to give you the practical insights you need right now.
Roof Leak or Plumbing Problem?
This is usually the first hurdle: figuring out if the water is coming from the roof or from a pipe. It’s a classic "who done it" mystery in homeownership. The easiest way to tell the difference comes down to timing and consistency.
Roof leaks are almost always connected to the weather. They tend to show up—or get noticeably worse—during or immediately after a rainstorm or snowmelt.
Plumbing leaks, on the other hand, couldn’t care less if it's sunny outside. They’re often constant, or they’re tied directly to your water usage, like when a shower is running upstairs. A plumbing issue can also spring a leak on any floor of your house (usually below a bathroom or kitchen), while a roof leak is almost always a top-floor problem.
Is It Safe to Get on My Roof?
Your safety is the only thing that matters here. You should only ever get on your roof if you have the proper safety gear, a solid, well-placed ladder, and you are completely comfortable working at heights. If there's even a little bit of hesitation, it’s just not worth the risk.
Never, ever attempt a roof inspection in wet, icy, or windy conditions. It’s a recipe for disaster. And if your roof has a steep pitch or is made from a slick material like slate or tile, that job is best left to an insured professional, period.
When in doubt, call a certified roofer. The cost of a professional inspection is minimal compared to the risk of a serious fall. It’s always the smarter, safer choice.
Can a Small Leak Cause Big Damage?
Absolutely. It’s one of the biggest mistakes we see homeowners make—underestimating a slow, minor drip. Over time, that tiny bit of moisture seeps into your home’s structure, creating the perfect environment for some seriously expensive problems.
- Structural Rot: Persistent moisture saturates wood framing, leading to rot that can compromise the integrity of your entire home.
- Mold and Mildew: A dark, damp attic is a five-star resort for mold, which can spread like wildfire and create serious health risks for your family.
- Destroyed Insulation: Once insulation gets wet, it becomes a compressed, useless mat. Your energy bills will climb as your home struggles to stay warm or cool.
Treating every leak with a sense of urgency is critical. What seems like a minor stain today can easily mushroom into a repair job costing thousands of dollars if you let it go.
What Should a Professional Repair Cost?
The cost to fix a roof leak can vary quite a bit. The final price really depends on how complex the repair is, where the leak is located, and the type of roofing material you have.
For a pretty straightforward fix, like resealing the flashing around a vent pipe, you might be looking at a range of $150 to $500. A more involved repair, like fixing a leak in a tricky roof valley or replacing a whole section of damaged shingles, could run you between $500 and $1,500. If that leak has already caused damage to the underlying roof decking, the cost will climb from there. It's always a good idea to get at least two detailed quotes to compare.
If you're facing a leak and need expert help, the team at Paletz Roofing and Inspections has over 30 years of experience pinpointing and repairing leaks across South Florida. Contact us today for a fast, reliable, and professional solution.
Learn more about our roof repair services at https://paletzroofing.com