A roof connection can be asked to resist at least 600 lb of uplift at a single truss end in connector selection guidance for wind loads, which tells you everything you need to know about hurricane strap installation in South Florida. This isn't finish work. It's structural work at the exact point where wind tries to peel the roof away from the walls, and if that connection fails, the damage can move fast through the rest of the house.
In Broward, Miami-Dade, and Palm Beach counties, salt air, moisture, heat, and strict code expectations all raise the standard. We don't install straps just to say they're there. We install them as part of a complete roof-to-wall system that has to be accessible, inspectable, corrosion-resistant, and matched to the framing it's connecting.
Table of Contents
- Why Your Roof Needs a Hurricane Strap Installation
- Gathering Your Tools and Materials
- The Hurricane Strap Installation Process
- Common Mistakes That Compromise Your Roof
- Inspection and Long-Term Maintenance Tips
- When to Hire a Professional Roofer
- Frequently Asked Questions About Hurricane Straps
Why Your Roof Needs a Hurricane Strap Installation
Most homeowners picture hurricane damage starting with broken shingles or flying debris. In practice, one of the most dangerous failure points sits where the roof framing meets the wall framing. Wind doesn't just push on a roof. It pulls upward, and that uplift concentrates at the roof-to-wall connection.
That's why hurricane straps are structural hardware designed to maintain a building's continuous load path. Connector guidance used in the trade explains that a single roof truss may need a tie selected for at least a 600 lb uplift demand at that connection point, not because anyone is overbuilding for fun, but because that's where the roof can separate if the connector, fasteners, or layout are wrong. See the connector selection guidance on continuous load path and uplift demand.
What continuous load path actually means
A continuous load path is the chain that carries wind force from the roof into the walls and then down into the rest of the structure. If one link is weak, the system is weak. Straps matter because they're one of the links that keeps the roof framing tied to the wall framing instead of acting like separate parts during a storm.
South Florida homeowners often hear “clips,” “ties,” and “straps” used like they all mean the same thing. The bigger point is simpler. The connector has to match the actual framing condition, the uplift demand, and the approved fastening pattern. A metal strap nailed wherever there's room is not a structural solution.
Practical rule: If the connection wasn't selected for the load and installed to the specified fastener schedule, don't assume it will perform the way you expect.
Why this matters more near the coast
In our region, corrosion is part of the conversation from day one. Salt air works on metal over time, especially when installers use the wrong fasteners or mix components that don't belong together. That means a roof can look fine from the driveway and still have connection problems hidden at the soffit line, attic edge, or under the roof deck.
A proper hurricane strap installation also isn't a stand-alone fix for every wind issue. It's a major part of the roof-to-wall system, but it has to work with the rest of the structure. If you own a home in South Florida, the right question isn't whether straps sound like a good idea. It's whether your roof-to-wall connection is strong, accessible for inspection, and installed the way the code and engineering require.
Gathering Your Tools and Materials
Preparation separates clean structural work from guesswork. Before we touch a nail, we need to know what framing we're tying, what connector type fits that framing, how we're getting access, and what fasteners the connector and engineer call for.

Choose the connector before you buy nails
Selection is just as important as installation. A single-sided tie such as the Simpson Strong-Tie H2.5A is designed for a specific connection condition and must sit correctly at the top plate and rafter or truss interface. The manufacturer guidance also makes clear that the connector rating depends on the exact fastener type and hole pattern, with examples using galvanized 8d or 10d nails for certain applications in the installation guide for the H2.5A hurricane tie.
Single-sided and dual-sided ties aren't interchangeable just because they look close. The framing layout, member sizes, access, and required load path all affect the right choice. That's one reason we verify the condition in person instead of sending somebody to the supply house with a rough description.
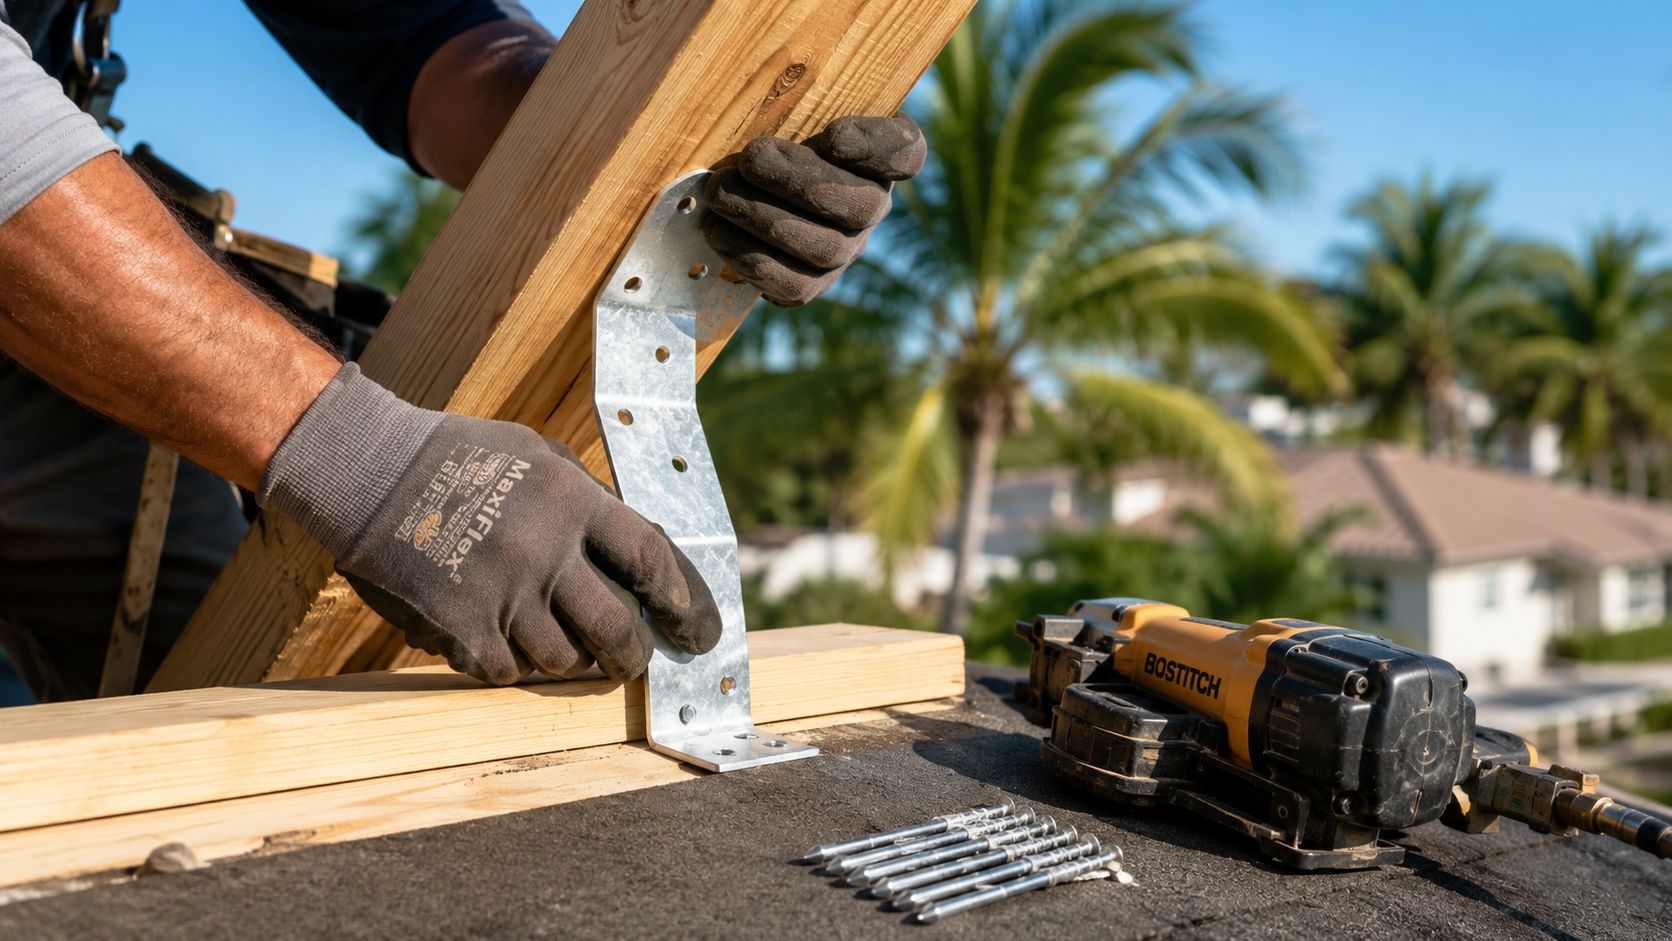
A visual reference can help you understand what the connection area looks like before work begins. This roof framing connection image shows the kind of area we need to assess clearly before any strap gets installed.
What should be on site
You don't need a giant pile of gear, but you do need the right gear.
- Approved connectors: The exact hurricane ties or straps selected for the framing condition and load requirement.
- Specified structural nails: Manufacturer-approved fasteners. In many tie installations that means 8d or 10d galvanized nails where called for by the connector instructions.
- Measuring and marking tools: Tape measure, pencil, and layout tools so the connector lands where it's supposed to.
- Access and removal tools: Pry bar, utility knife, and hand tools for opening soffit or roof areas carefully when needed.
- Driving tools: Hammer or palm nailer, depending on space and access.
- Safety gear: Eye protection, gloves, stable ladder access, and roof safety equipment appropriate to the work area.
A lot of failed retrofit work starts with the sentence, “We used what we had on the truck.” That doesn't work with structural connectors.
The trade-off homeowners should understand
The fastest path is rarely the best path. If we try to avoid opening enough area to verify the connection, we may save a little time and lose the ability to confirm orientation, member contact, or fastening. If we over-open the area, we create more repair work afterward.
Good hurricane strap installation is controlled, not rushed. We expose only what we need, confirm the framing, match the connector, and use the exact fasteners that make the rating meaningful.
If you're hiring this out, ask one basic question: how will the installer confirm the actual roof-to-wall connection before choosing and fastening the tie? If the answer is vague, stop there.
The Hurricane Strap Installation Process
The work has to follow the structure, not the other way around. Professional workflow guidance for hurricane ties starts by exposing the rafter or truss to top plate connection, then placing the tie, then fastening it. It also states that the engineer determines the required fastener count, and the installer follows that schedule exactly, as described in this professional installation workflow for hurricane ties.

A framing access example like this roof connection detail photo gives you a sense of why visibility matters. You can't install what you can't properly see.
Exposing the connection
Some homes give us attic access. Others require soffit access or a small roof-deck opening so we can verify where the truss or rafter meets the top plate. In retrofit work, that access decision is half the job because if we can't inspect the connection directly, we can't responsibly install a structural tie and call it done.
We remove only enough material to expose the interface and surrounding framing. The goal is a clean view of the member, the top plate, and the exact path the connector needs to bridge. Working blind leads to missed holes, crooked straps, and fasteners driven where they shouldn't be.
Positioning the strap correctly
Once the connection is exposed, the tie gets fitted to the framing condition it was chosen for. It must bridge the structural members as designed. It also needs to sit flush. Any bend, twist, offset, or gap that keeps the strap from bearing properly against the wood changes how the load moves through the connector.
Field judgment matters. Sometimes the framing is tight and clean. Sometimes the wood is irregular, crowded by other components, or partially obstructed by existing materials. We don't force the wrong connector into a bad fit and hope the nails make up the difference.
The connector only works as a connector when it actually connects the members the way it was designed to.
Fastening to the engineer's schedule
The most common misunderstanding is that fastening is just filling holes until the tie looks secure. It isn't. The engineer specifies the fastener count and connection details, and we follow that exact schedule. If the tie calls for a certain nail type and a certain number of nails, that's what gets installed.
A careful fastening pass usually includes:
- Confirming the nail type against the connector instructions and approved details.
- Driving nails square and fully seated so the strap stays tight to the wood.
- Filling the required holes only as specified instead of improvising with substitutes.
- Checking alignment after fastening because a tie can shift if the first nails pull it off position.
When we're done, the connection should be inspectable, flush, and consistent with the approved detail. Then the area stays open until the required inspection happens. Closing everything up too early is one of the quickest ways to turn a proper job into a problem.
Common Mistakes That Compromise Your Roof
Most bad hurricane strap work doesn't fail because the metal looked weak. It fails because somebody treated a rated connector like a generic bracket. The danger with that mindset is simple. The job can look complete while the actual connection capacity is nowhere near what the homeowner thinks they paid for.
Engineering guidance is blunt on this point. These connectors are designed for a specific number of specific nails, and leaving out part of the fastener pattern can cause premature failure. The same source also notes that properly used hurricane straps can help resist winds up to 155 miles per hour, while incorrect installation undermines that performance in the engineering guidance on fastening and wind resistance.

Fastener mistakes fail first
Florida exposes every shortcut. If the installer uses the wrong nails, mixes in generic fasteners, or skips holes because access is tight, the connector may no longer perform to its intended rating.
Here's what goes wrong most often:
- Missing required nails: A half-filled hole pattern isn't “close enough.” Connector capacity depends on the full approved fastening schedule.
- Substituted fasteners: If the tie requires a specific structural nail, grabbing another nail that “fits the hole” is a mistake.
- Poorly driven nails: Overdriven, angled, or partially seated nails can leave the strap loose against the framing.
- Non-corrosion-resistant materials: In South Florida, rust is not a cosmetic issue. It's a structural issue over time.
Placement errors weaken the load path
A strap installed in the wrong location doesn't magically create a load path. If it sits too high, too low, out of orientation, or off the framing interface it was designed to bridge, then the roof-to-wall connection is still compromised.
A few field mistakes show up over and over:
| Error | Why it matters |
|---|---|
| Strap not seated flush | The connection can move under wind load before the hardware engages properly |
| Wrong strap type for the framing | The tie may not match the member sizes or connection geometry |
| Bent or damaged connector installed anyway | Deformed hardware doesn't bear the same way as intended |
| Work closed up before inspection | Problems stay hidden until after a storm or resale inspection |
Field reality: A hurricane tie can be present and still be the weak link if the placement, fasteners, or surrounding conditions are wrong.
The biggest difference between amateur work and professional work is discipline. We don't assume the strap alone solves the problem. We make sure the installed connector, the fastener schedule, and the framing condition all agree with each other.
Inspection and Long-Term Maintenance Tips
A hurricane strap installation isn't finished when the last nail goes in. It's finished when the connection has been checked, approved, and protected from the kind of corrosion and hidden deterioration South Florida is known for.
Straps mainly resist uplift, but they don't fix unrelated weak points such as poor sheathing attachment or corroded fasteners elsewhere in the assembly. That's why the better question for homeowners is whether the entire roof-to-wall load path is code-compliant and corrosion-resistant, as explained in this South Florida-focused overview of hurricane straps and load path.

A connection area like this inspection reference image shows the kind of location that deserves periodic attention after installation.
What to inspect before closing up
Before soffits, decking, or finishes cover the work, check the basics carefully.
- Connector fit: The strap should sit where the approved detail shows and bear tightly against the framing.
- Fastener compliance: The installed nails should match the required type and count.
- Visible condition: No bent hardware, torn holes, or obvious gaps.
- Access for inspection: The work should remain visible until the required municipal or project inspection is complete.
Municipal inspectors and wind-mitigation inspectors typically want to see evidence that the connection is real, visible, and correctly executed. If the area is covered too soon, you can create a paperwork problem and a structural uncertainty at the same time.
What to watch over time in South Florida
Salt air and moisture change the maintenance conversation. Even a correctly installed tie deserves periodic review, especially near the coast or in homes with attic moisture issues. Look for rust staining, fastener corrosion, wood deterioration around the connection, or any remodeling work that may have disturbed the area.
For homeowners who like a routine maintenance approach, a practical checklist can help reduce downtime with this template by organizing repeat inspections and repair follow-up in one place. The point isn't paperwork for its own sake. The point is catching small issues before they become hidden structural liabilities.
If you've had reroofing, soffit work, storm repairs, or attic improvements since the straps were installed, it's smart to have those areas rechecked. A strong connector can't compensate for later damage, corrosion, or work that interrupts the load path.
When to Hire a Professional Roofer
A missed strap, the wrong fastener pattern, or a connector installed on the wrong member can break the continuous load path your house depends on in a South Florida storm. That is the point where this stops being a handy weekend project and becomes licensed roofing or structural work.
We tell homeowners to bring in a professional when the connection cannot be fully seen and verified before installation. That includes steep roofs, two-story homes, blocked attic access, tight eaves, and retrofit conditions where soffit removal may expose more than expected. Once we start opening a house, we also have to know when to stop and change course.
Hire a professional roofer if any of these conditions apply:
- Access is unsafe or limited: Fall risk goes up fast on high walls, steep slopes, and cramped attic edges.
- The framing is unclear: If you cannot confirm whether you are tying into a truss, rafter, top plate, or altered framing, you cannot choose the right connector or fastening schedule.
- The home has been modified: Additions, garage conversions, remodeled soffits, and previous storm repairs often interrupt the original load path.
- Permits and inspections are required: South Florida code enforcement is strict for good reason. The work has to match the approved detail, not just look secure.
- Corrosion exposure is a concern: Near the coast, we check connector coatings, fastener compatibility, and surrounding wood condition because salt air changes what will hold up.
- You need documentation: If the work may affect insurance, resale, or a wind-mitigation review, the record of what was installed matters almost as much as the installation itself.
Good roofers do more than nail on metal ties. We check whether the surrounding framing is sound enough to carry the load, whether the hardware matches the application, and whether another trade already weakened the area. Sometimes the right call is a strap retrofit. Sometimes the right call is repair first, then connector installation.
Paletz Roofing and Inspections is one local company homeowners may hear about for roof inspections, repairs, and reroofing-related structural access. The bigger issue is hiring a roofer who is licensed, insured, and used to working under South Florida permit and inspection requirements.
If you run a roofing company or manage field crews, homeowner communication affects whether these jobs get approved and scheduled. This guide on how to Stop missing roofing business opportunities covers practical ways to improve that process.
Frequently Asked Questions About Hurricane Straps
Can hurricane straps be added to an existing home
Yes, many homes can be retrofitted, but access is the deciding factor. We may need attic access, soffit access, or selective opening at the roof deck to verify and reach the roof-to-wall connection before any tie is installed.
Are hurricane straps enough by themselves
No. They are one part of the roof-to-wall load path. If other components are weak, damaged, or corroded, straps alone won't make the whole system reliable.
Do the nails really matter that much
Yes. Connector performance depends on the exact fastener type and count required for that tie and connection. Wrong nails, missing nails, or partial fastening can undermine the installation.
Should I worry about corrosion near the coast
Absolutely. In South Florida, corrosion resistance is part of the job, not an upgrade. Fasteners and connectors need to match the approved installation requirements and hold up in a harsh environment.
Can I install straps during a reroof
Often, yes. In many cases reroofing gives better access to the connection area, which makes verification and inspection easier than trying to retrofit after everything is closed up.
What will an inspector want to see
An inspector typically wants to see a visible, correctly placed connector, the proper fastener pattern, and a connection that matches the approved detail before the area is covered.
If you want a professional evaluation of your roof-to-wall connections, schedule an inspection with Paletz Roofing and Inspections. We serve South Florida homeowners who need clear answers about code compliance, corrosion exposure, reroof access, and whether a hurricane strap installation is the right next step for their home.