The whole game of preventing roof ice dams boils down to one simple, yet crucial, principle: keep your entire roof surface the same cold temperature. That’s it. You have to stop the warm air inside your house from sneaking up into the attic, where it melts the snow from the bottom up and kicks off that destructive freeze-thaw cycle right at the edge of your roof.
How Ice Dams Actually Form On Your Roof
An ice dam isn't just a picturesque icicle hanging from your gutter. It’s a thick, destructive ridge of ice that builds up along the eaves. It effectively creates a barrier that stops melting snow from draining away like it’s supposed to.
When that happens, the trapped water has nowhere to go but backward—forcing its way under your shingles. This leads to some serious problems: leaks, ruined insulation, mold growth, and in the worst cases, even structural damage to your home.
The problem almost always starts inside your house. Warm air from your living space rises and finds its way into the unconditioned attic. This heat transfer is usually a cocktail of three main issues:
- Not Enough Insulation: If the insulation on your attic floor is thin or patchy, it’s like leaving a window open in winter. Heat just pours through into the space below your roof deck.
- Air Leaks: Think of small gaps around can lights, plumbing vents, or the attic hatch as tiny chimneys. They funnel a surprising amount of warm, moist air directly into your attic.
- Bad Ventilation: An attic without proper airflow traps that warm air. This creates hot spots on the roof that melt snow way faster than they should.
The Destructive Freeze-Thaw Cycle
Once that escaped heat warms the underside of your roof sheathing, the snow sitting on top starts to melt. This can happen even when the air outside is well below freezing.
This meltwater trickles down the roof slope until it hits the cold eaves and gutters. Since these areas aren't getting warmed from inside the attic, the water instantly refreezes, starting to build a small wall of ice. As more snow melts and runs down, the dam just gets bigger and bigger, trapping a growing pool of water behind it.
This infographic breaks down the three key steps that lead to a full-blown ice dam.
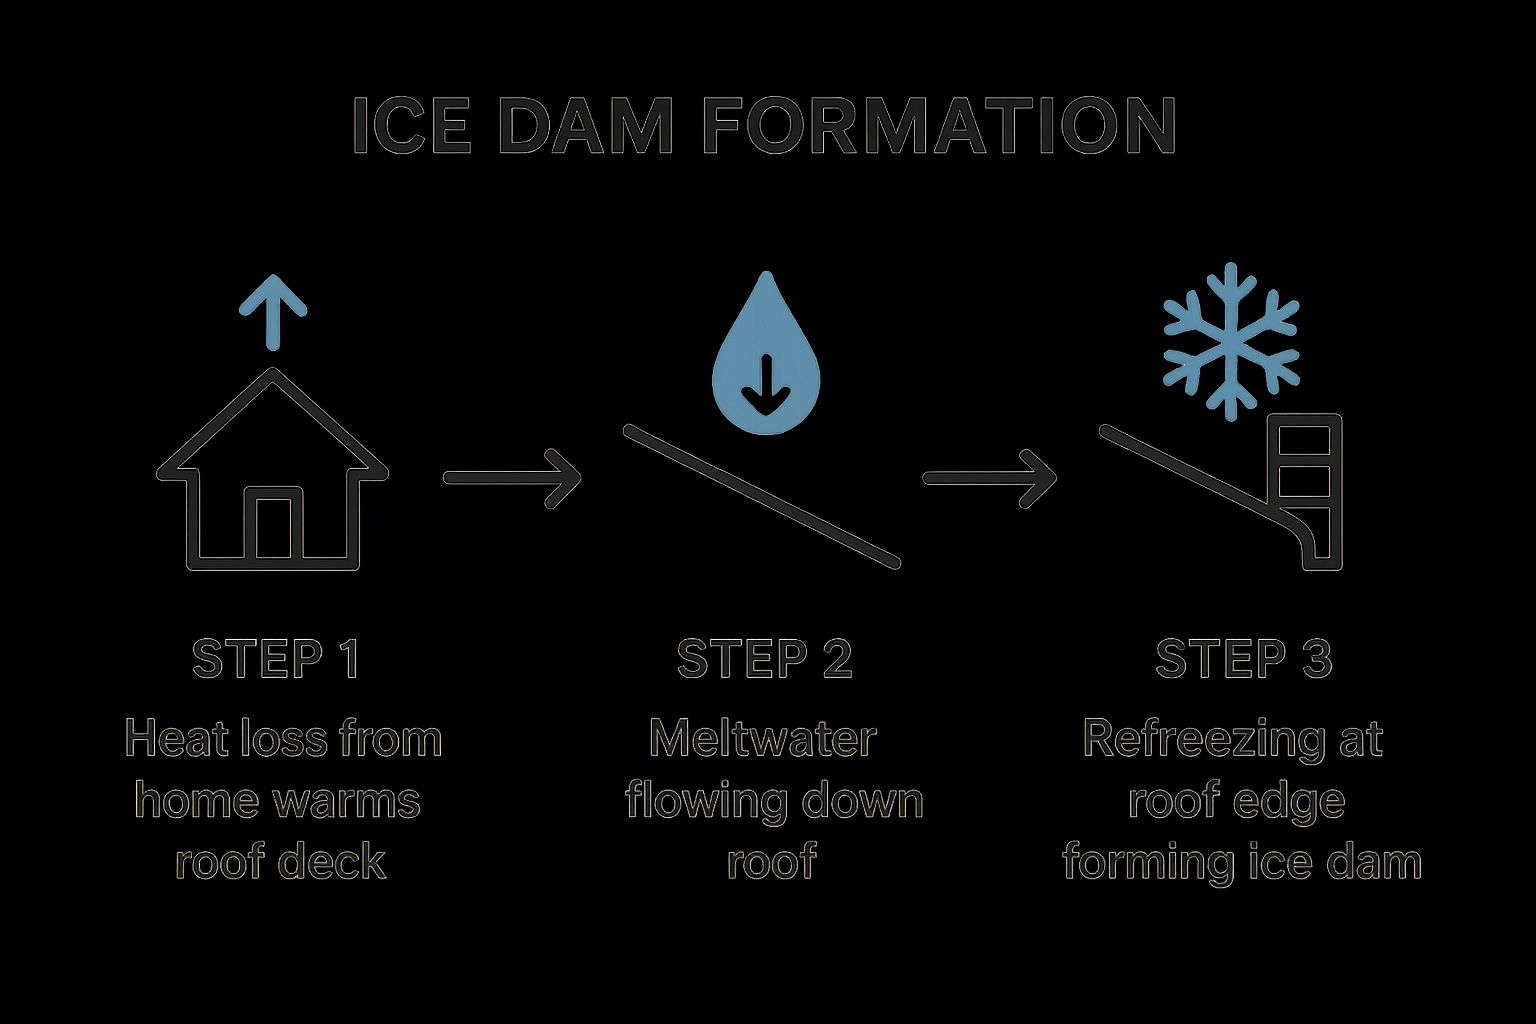
As you can see, the whole chain reaction starts with heat loss from your home. It’s the trigger that ends with a damaging wall of ice sitting on the most vulnerable part of your roof.
For a quick reference, here’s a breakdown of the core issues and their solutions.
Quick Guide to Preventing Ice Dams
| Problem Area | Cause | Primary Solution |
|---|---|---|
| Attic Floor | Heat from living spaces escapes into the attic. | Increase insulation to R-49 or R-60 and seal all air leaks. |
| Roof Deck | Trapped warm air creates hot spots on the roof. | Ensure proper attic ventilation with soffit and ridge vents. |
| Roof Edge | Meltwater refreezes over cold, uninsulated eaves. | Keep the entire roof deck cold to prevent initial snowmelt. |
Ultimately, this table shows how a systems-based approach—addressing insulation, air sealing, and ventilation together—is the only real fix.
Ice dams are a constant headache in northern climates, causing millions in damage every year. We see it all the time: snow melts a bit during a sunny afternoon, only to refreeze hard overnight, making the problem worse. It's why some homeowners in heavy snow regions opt for steeply pitched roofs—they’re much better at shedding snow and ice naturally.
The real culprit behind an ice dam is rarely the roof itself; it's almost always the temperature difference between the upper roof and the eaves. A uniformly cold roof deck is the ultimate goal.
In the end, knowing how to prevent ice dams means you have to understand this cycle. When you tackle the root causes—heat loss and poor ventilation—you can maintain that consistently cold roof deck and stop ice dams before they even get a chance to form. For a good look at how a properly constructed roof should be put together, you can explore examples of expertly installed roofing systems.
Building Your Long-Term Defense Against Ice Dams

While quick fixes can get you through a rough patch, a permanent solution to ice dams means shifting your focus from the roof's edge to the space directly beneath it—your attic. True prevention is all about creating an environment where ice dams simply can't form in the first place.
This means transforming your attic into a cold, well-ventilated buffer zone that mirrors the outside temperature. Think of it as a three-part strategy where insulation, ventilation, and air sealing work together as a powerful defense system. Each piece of the puzzle addresses a different aspect of heat loss, and when you put them all together, you get a permanent fix.
Fortify Your Attic Insulation
Your first line of defense is a thick, uninterrupted blanket of insulation on your attic floor. This barrier is what keeps the warm, conditioned air from your living room from ever reaching the underside of your roof. Without that heat source, the snow on your roof won't melt prematurely.
A common mistake is assuming that any insulation is enough. For colder climates, you need a substantial amount to be effective.
- Check Your R-Value: R-value measures thermal resistance. In regions prone to heavy snow, your attic insulation should be at least R-49, which translates to about 16-18 inches of blown-in fiberglass or cellulose. In the coldest parts of the country, R-60 is the gold standard.
- Look for Gaps and Low Spots: Grab a tape measure and check the depth across your entire attic. Is it consistent? Pay close attention to the areas around the eaves, which are often shallow and notoriously under-insulated.
Proper insulation is the absolute cornerstone of stopping ice dams. It keeps the heat where it belongs: inside your living space. You can learn more about effective roof insulation techniques—even though the focus is on a garage, the principles of maintaining a consistent roof temperature are universal.
I like to think of attic insulation like a good winter coat for your house. If the coat is thin or has unzipped sections, your body heat escapes easily. The exact same thing happens with your home.
Create a Cold Roof with Proper Ventilation
Even with great insulation, some heat can still find its way into the attic. This is where ventilation becomes your second critical component. Good airflow continuously flushes out any residual warm air, keeping the entire roof deck consistently cold. This "cold roof" strategy is essential for anyone serious about preventing ice dams.
The most effective systems rely on a simple, continuous, and passive airflow circuit.
- Soffit Vents (Intake): These are located under the eaves and draw in cool, fresh air from outside.
- Ridge Vents (Exhaust): Located at the very peak of your roof, these allow the slightly warmer attic air to escape naturally as it rises.
This combination creates a convection current that constantly circulates air, preventing hot spots from forming under the sheathing. For this to work, it's absolutely crucial that insulation doesn't block the soffit vents. Baffles must be installed to maintain a clear channel for air to enter. A well-ventilated attic should feel nearly as cold as the outdoors on a winter day.
Hunt Down and Seal Hidden Air Leaks
The final piece of the puzzle is air sealing. This is probably the most overlooked step, but it can be the most impactful. Tiny gaps and cracks in your attic floor act like little chimneys, funneling a surprising amount of warm, moist air directly into your attic. Sealing these leaks is a non-negotiable part of any long-term ice dam prevention plan.
You need to become a heat-loss detective and hunt down these common culprits.
Common Air Leak Hotspots
- Recessed "Can" Lights: Older models are notoriously leaky. They should be covered with airtight, fire-rated boxes.
- Plumbing Stacks and Vents: The gaps where pipes pass through the drywall into the attic are major sources of heat loss.
- Attic Hatch or Pull-Down Stairs: These are often poorly insulated and almost never sealed. Add weatherstripping and a rigid foam cover.
- Wiring Holes and Chimney Chases: Any penetration through the ceiling is a potential pathway for warm air.
Use expanding foam sealant for the smaller gaps and cut rigid foam board to size for larger openings like an attic hatch. When you tackle insulation, ventilation, and air sealing together, you're not just treating a symptom—you're stopping the problem at its source.
To see what a healthy, well-maintained roof system that incorporates these principles looks like, you can review our gallery of completed roofing projects.
Immediate Fixes When an Ice Dam Appears
Long-term strategies like upgrading your attic insulation and ventilation are the real MVPs of ice dam prevention. But let's be honest, they don't do you much good when you’re staring at a frozen waterfall hanging off your gutters. When you've got an active ice dam, you need to act now.
Quick thinking can stop a small ridge from escalating into a full-blown disaster that causes serious leaks and structural harm. The goal here isn’t to chisel away at the ice itself—that's a recipe for a damaged roof and a trip to the ER. Instead, you want to cut off its fuel supply (the snow) and give the meltwater a safe path to escape.
Safely Rake Your Roof Eaves
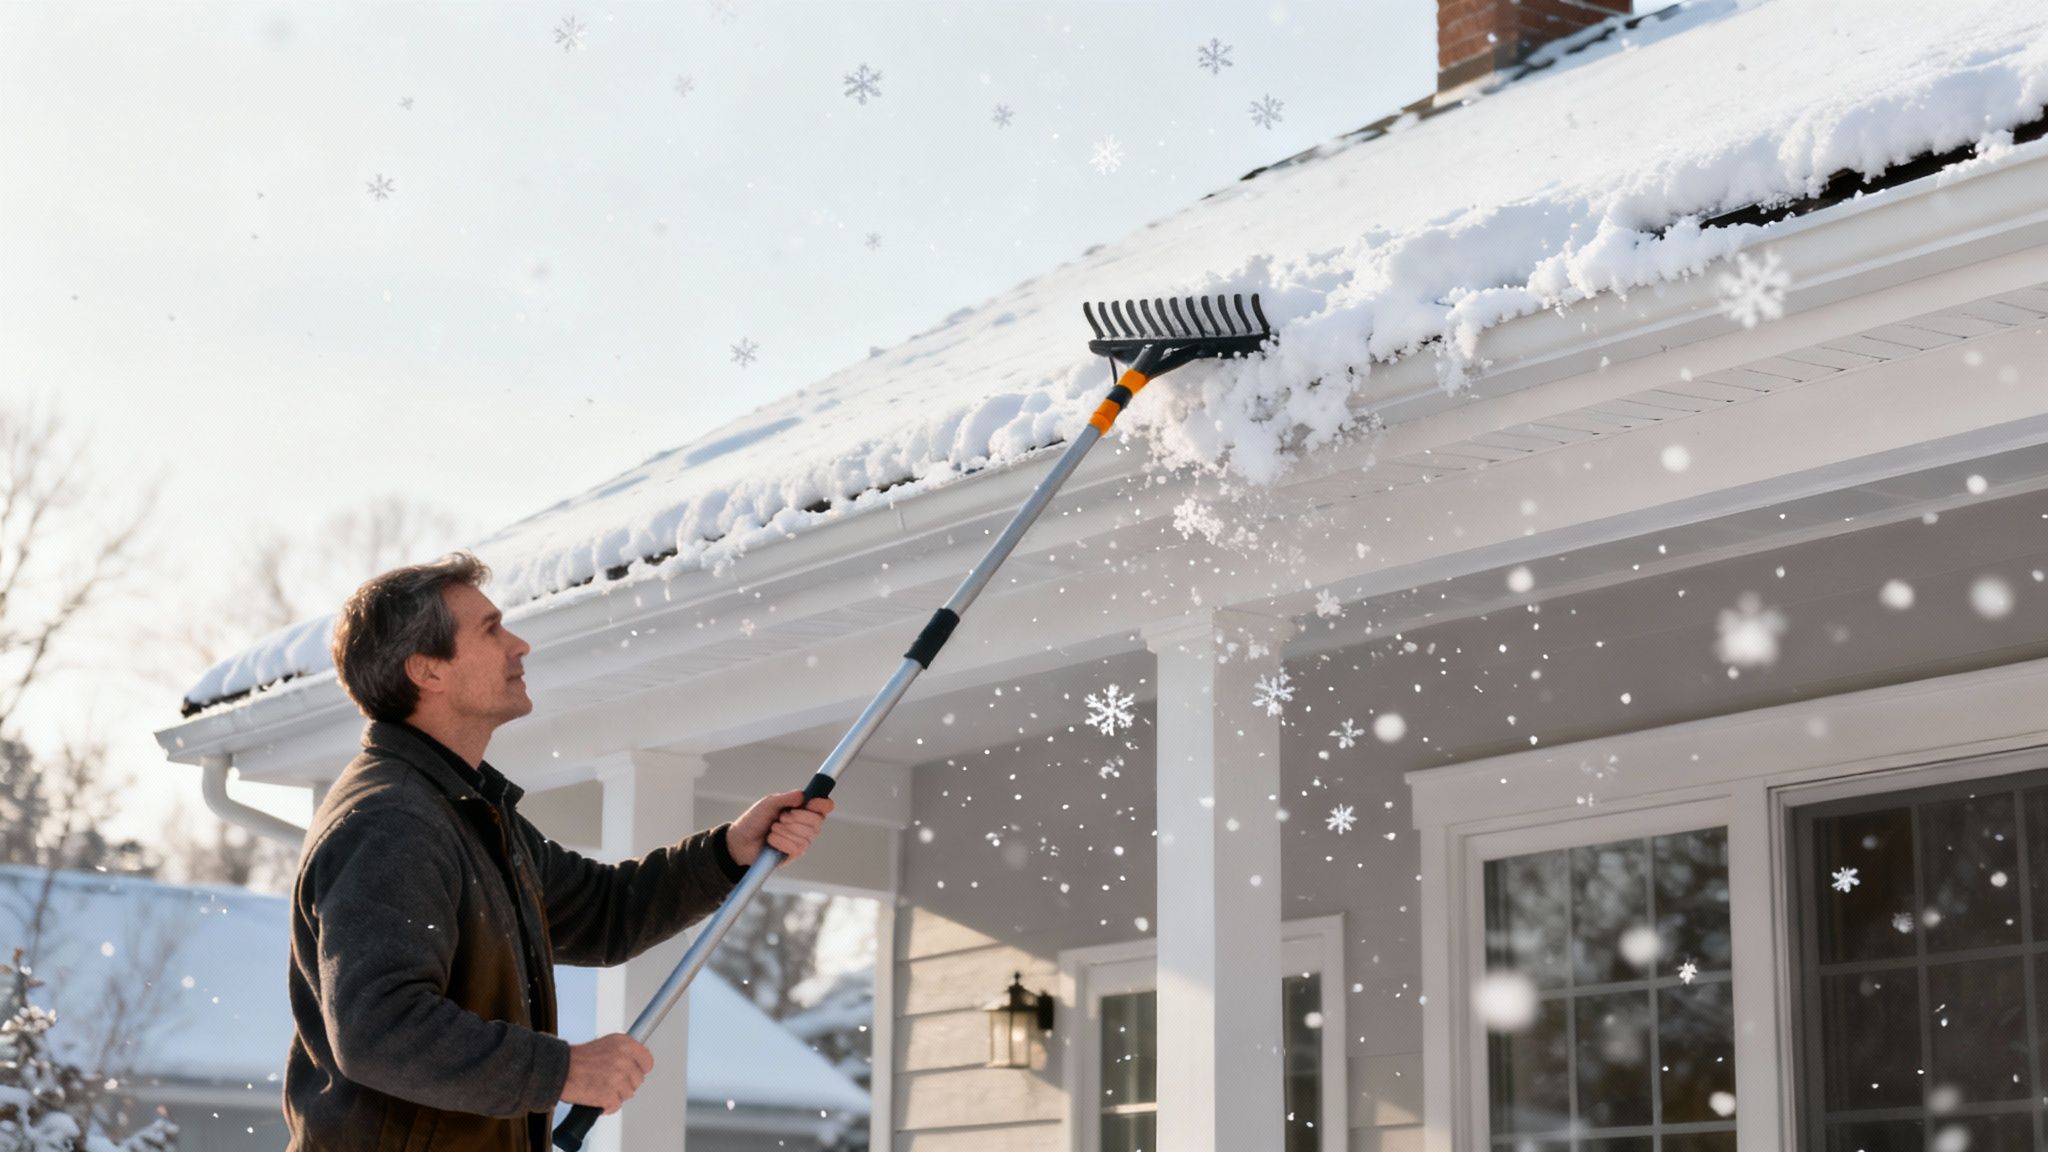
One of the most effective things you can do right away is to clear the snow off the lower part of your roof. For this, you absolutely need a proper roof rake, one with a long, extendable handle designed for the job. By pulling down the snow, you’re starving the ice dam of the meltwater it needs to grow.
Just remember, your target is the snow, not the ice itself.
- Create a Buffer Zone: Standing safely on the ground—never on a ladder—gently pull the snow down from the first three to four feet of your roof's edge.
- Don't Damage Your Shingles: Avoid aggressively scraping the roof. It’s best to leave about an inch of snow behind to protect the shingle granules.
- Work Methodically: Clear the eaves in sections. This creates a snow-free area where meltwater from higher up can drain off instead of hitting the dam and refreezing.
It's a surprisingly simple action that can halt an ice dam in its tracks and significantly lower the risk of water backing up under your shingles.
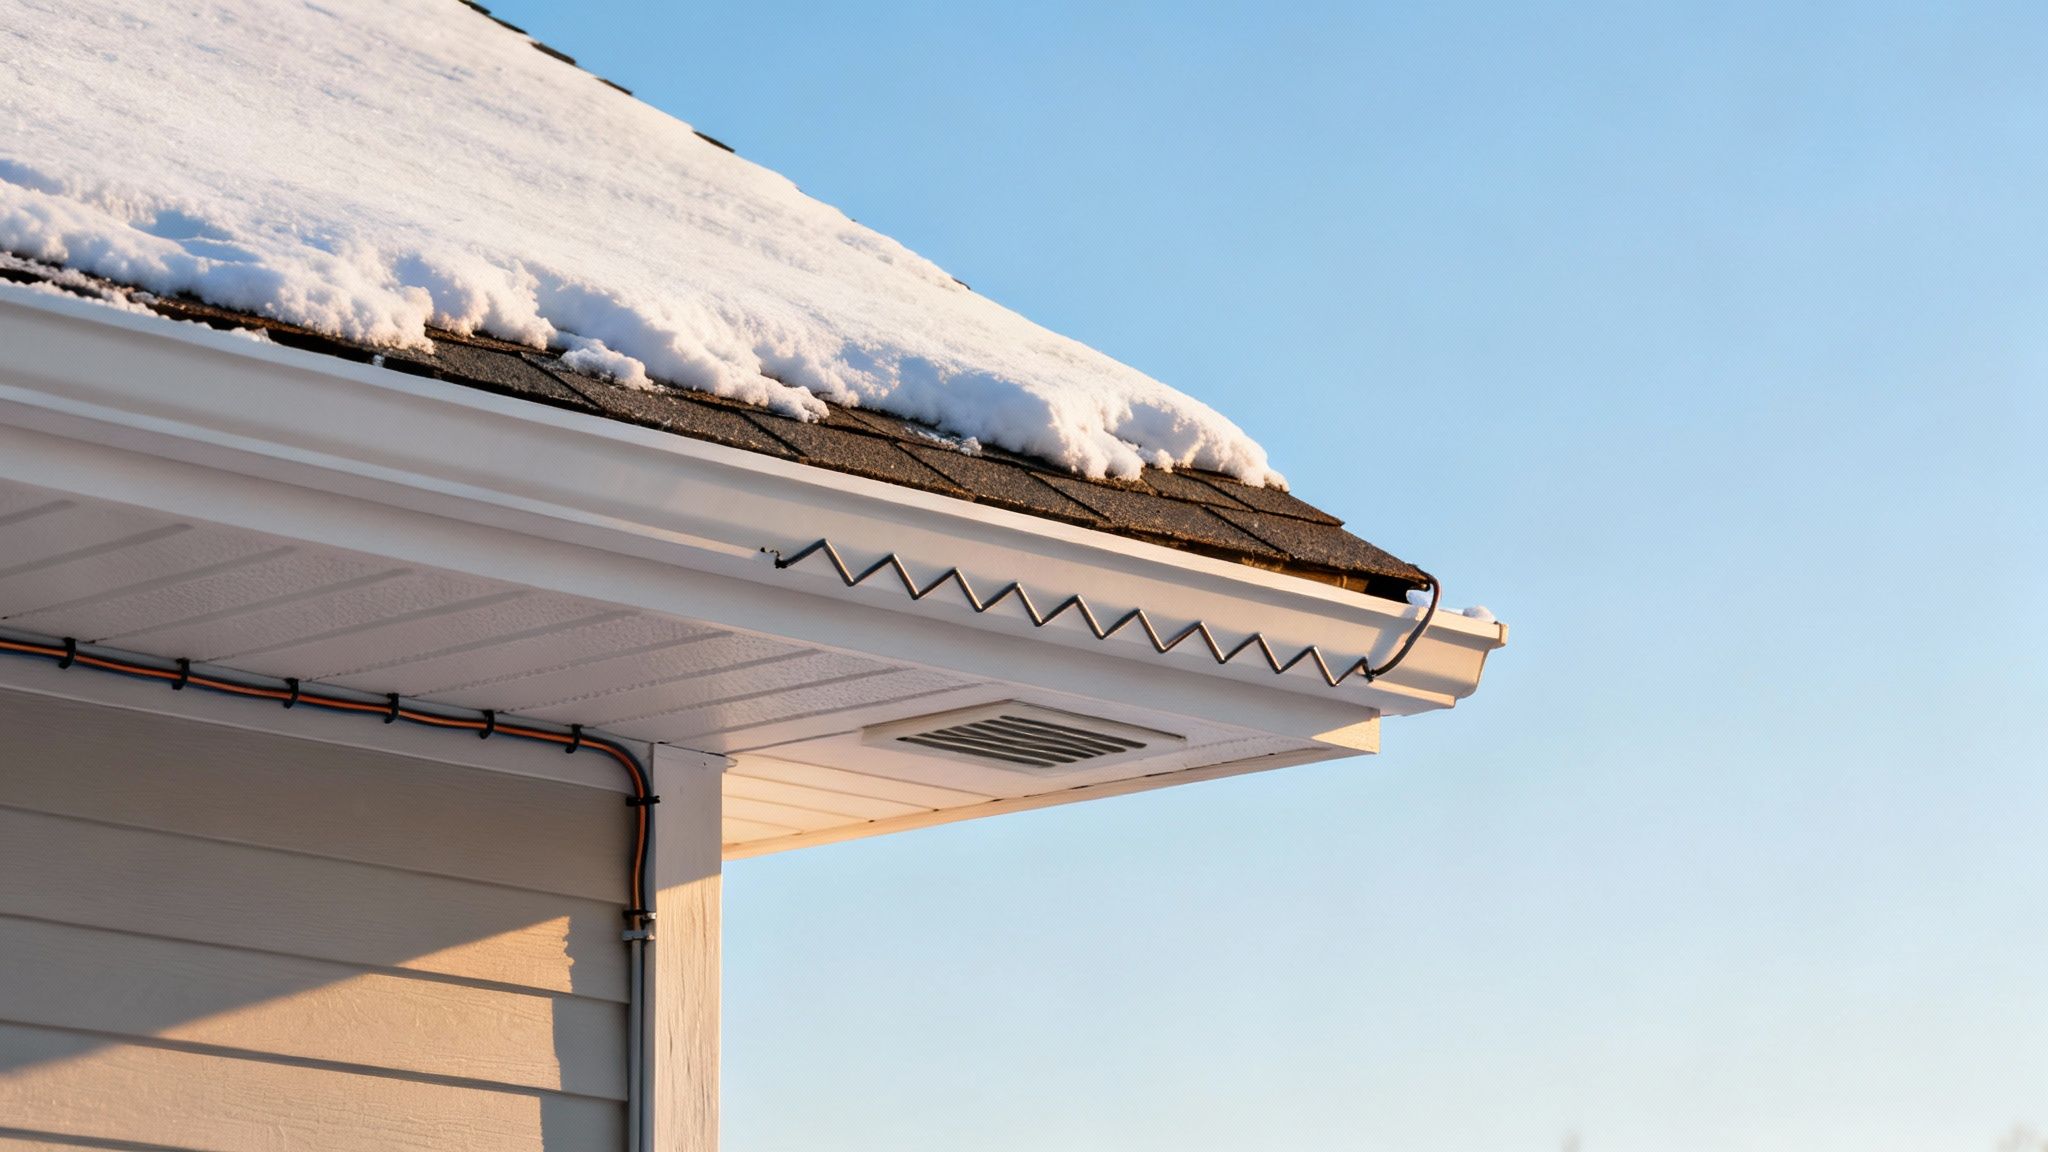
Strategically Use Heated Cables
For those stubborn spots that seem to form ice dams every single year, heated cables (also known as heat tape) can offer some relief. These cables are designed to melt channels through snow and ice, creating pathways for water to flow freely into gutters and downspouts.
Think of heated cables as a targeted treatment, not a cure. They address the symptom—the ice—but don't fix the underlying cause of heat loss from your attic.
Installation is everything when it comes to heated cables. A pro should install them in a zig-zag pattern along the eaves, making sure they extend just past the exterior wall. It’s also critical to run the cable inside your gutters and downspouts; otherwise, they’ll just freeze solid and create a whole new set of problems.
The demand for these systems is growing as more homeowners face ice-related roof damage. The global market for roof and gutter ice melt systems was valued at around $1.5 billion in 2025 and is projected to hit $2.7 billion by 2033. You can find more details on the growth of ice melt systems on archivemarketresearch.com.
Just be aware that these systems run on electricity, so they will add to your winter utility bills. They're a fantastic tool for managing an immediate crisis, but they work best as a temporary measure while you plan for the more permanent solutions.
Ice Dam Solution Comparison
When deciding how to tackle ice dams, it's helpful to compare the immediate fixes with the long-term solutions. Short-term options provide quick relief, but permanent fixes address the root cause, saving you money and stress down the road. This table breaks down the pros and cons of each approach.
| Solution | Type | Effectiveness | Upfront Cost | Ongoing Cost |
|---|---|---|---|---|
| Air Sealing & Insulation | Long-Term | Very High (Prevents dams) | Moderate to High | Low (Energy Savings) |
| Attic Ventilation | Long-Term | Very High (Keeps roof cold) | Moderate | None |
| Heated Cables | Short-Term | Moderate (Manages dams) | Moderate | Moderate (Electricity) |
| Roof Raking | Short-Term | High (Stops growth) | Low | None (Manual labor) |
| Professional Steaming | Short-Term | Very High (Removes dams) | High | High (Per occurrence) |
Ultimately, a combination of strategies is often the most effective. Using a roof rake or heated cables can get you through the winter safely, but investing in proper insulation and ventilation is what will truly solve the problem for good.
Year-Round Maintenance for a Healthier Roof
If you're only thinking about how to prevent roof ice dams when the first snowflakes start to fall, you're already behind. The best defense against winter roof damage isn't a last-minute panic; it's a simple, year-round habit.
A little proactive maintenance creates a strong defense long before the first freeze. These routine tasks are all about making sure your roof can handle whatever winter throws at it, letting meltwater drain efficiently instead of backing up and freezing into a destructive dam. It's about setting your roof up for success from fall all the way through spring.
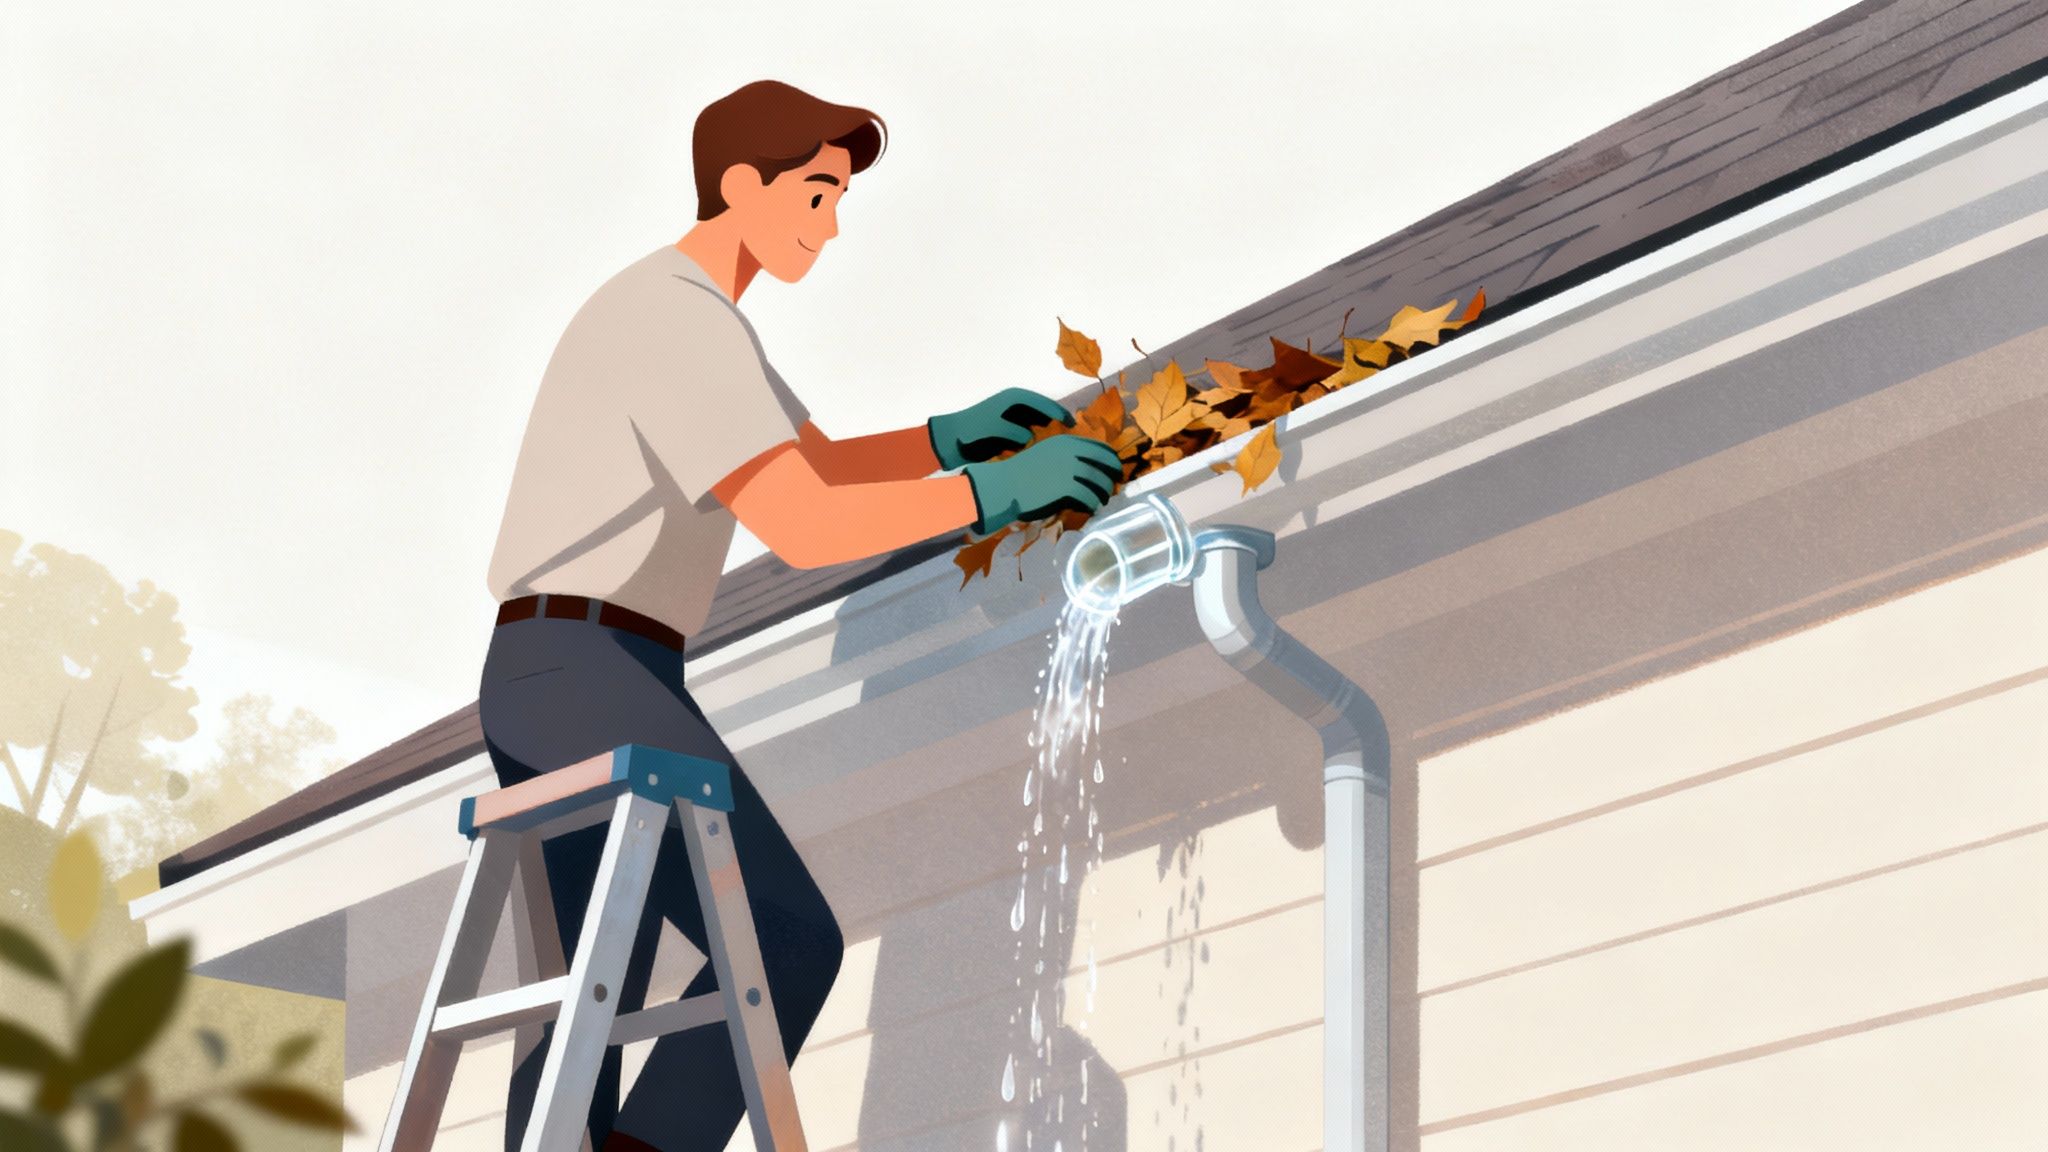
Prioritize Gutter and Downspout Cleaning
If there’s one non-negotiable task on your fall to-do list, this is it. Clogged gutters are the number one accomplice for ice dams. When they’re packed with leaves, twigs, and muck, meltwater has nowhere to go. It pools right at the edge of your roof and quickly freezes, creating the perfect starting point for an ice dam.
A clean gutter system gives water a clear escape route. Here’s what to focus on:
- Thorough Debris Removal: Scoop out all the leaves and sediment by hand or with a gutter tool. Get everything out.
- Flush the System: Once you've cleared the big stuff, run a hose through the gutters and downspouts. This ensures you've flushed out any hidden blockages.
- Check for Damage: As you're cleaning, keep an eye out for loose or sagging sections that could slow down water flow. Get those fixed before winter hits.
This simple chore is probably the single most effective thing you can do to stop ice dams before they even have a chance to form.
A clogged gutter is like a plugged drain in your bathtub. Eventually, the water is going to overflow and cause damage. In this case, the overflow happens under your shingles.
Conduct a Simple Ground-Level Roof Check
You don’t always need to climb a ladder to spot trouble brewing. A quick visual inspection from the ground a few times a year can help you catch small issues before they snowball into major winter headaches. Grab a pair of binoculars for a closer look and scan your roof for any red flags.
You're specifically looking for:
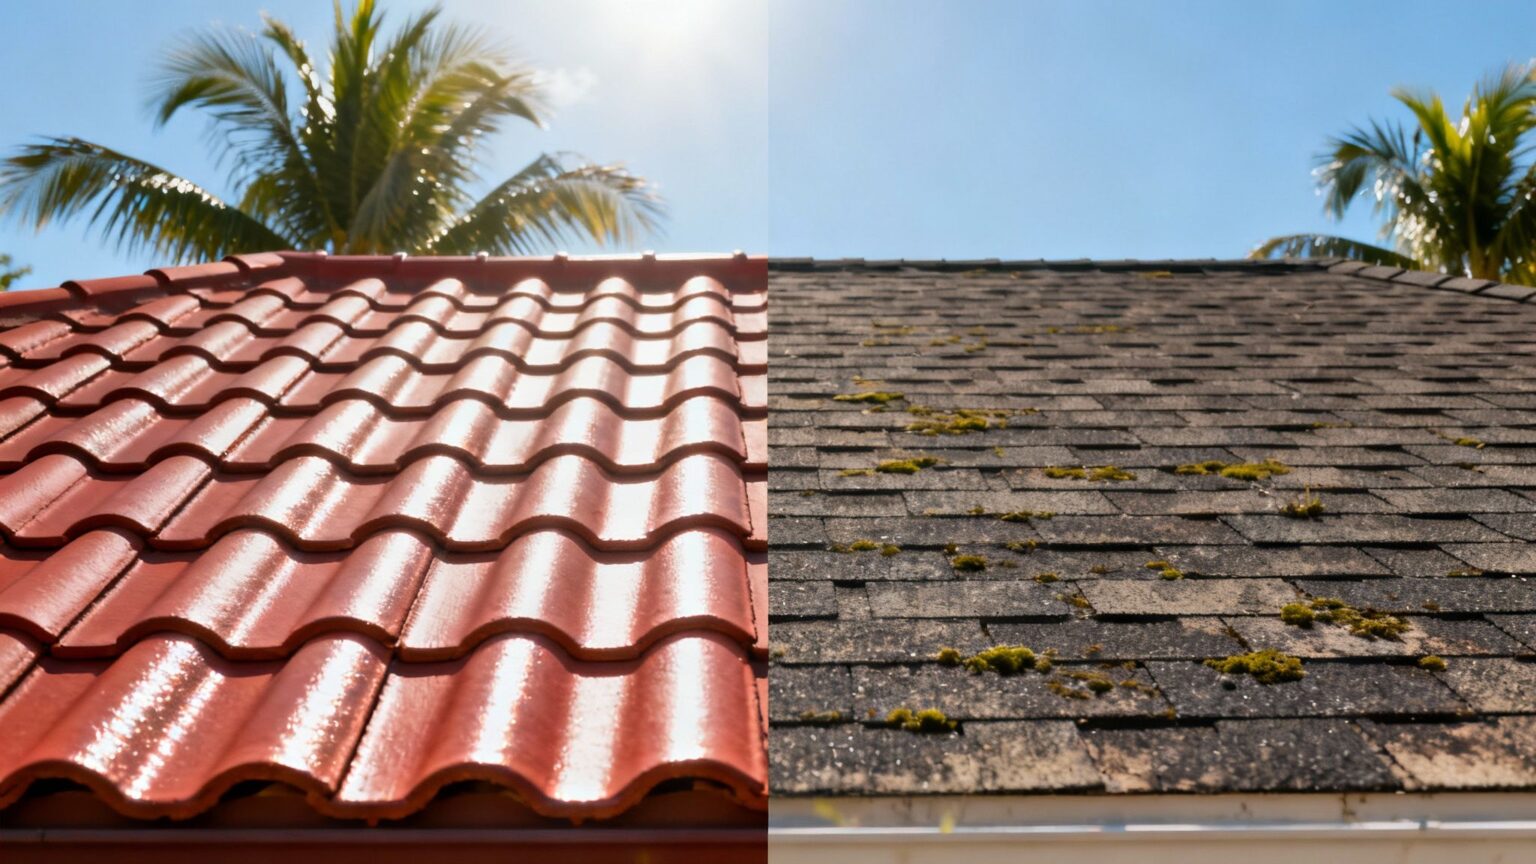
- Missing or Damaged Shingles: Bare spots are weak points where water can easily get in. You can see a visual example of a well-maintained shingle roof to compare against your own.
- Curling or Cracked Shingles: These are telltale signs of aging and mean your roof's protective layer is getting weak.
- Flashing Issues: Check the metal strips around your chimney, vents, and skylights. If you see any lifting or rust, that's a problem area.
For a bigger picture of year-round home care that helps prevent the conditions leading to ice dams, it's worth consulting an essential seasonal home maintenance checklist. These small, consistent efforts really do make a huge difference in making sure your roof is ready for whatever winter brings.
Costly Ice Dam Mistakes You Must Avoid
When you see water dripping down an interior wall, panic sets in fast. That massive ridge of ice clinging to your roof feels like a five-alarm emergency, and that sense of urgency is exactly what leads homeowners to make some truly costly, damaging mistakes.
Before you grab the nearest tool, take a breath. Some of the most common "quick fixes" can cause far more harm than the ice dam itself. These impulsive reactions can easily turn a manageable problem into a catastrophe costing thousands in repairs. Resisting the urge to take immediate, forceful action is the first step.
Why Salt and Chemicals Are a Terrible Idea
Tossing rock salt or chemical de-icers onto your roof might seem like a logical first step. It works on your sidewalk, so why not here? Unfortunately, this is one of the worst things you can do. These products are incredibly corrosive and will cause irreversible damage to your home.
Here’s what you’re up against:
- Shingle Damage: Salt and chemicals will strip the protective granules right off your asphalt shingles. This dramatically shortens their lifespan and, you guessed it, voids your roof's warranty.
- Gutter and Downspout Corrosion: These products will literally eat away at metal gutters, flashing, and fasteners, leading directly to rust and leaks down the line.
- Environmental Harm: All that salty, chemical-laden runoff is toxic to the plants, shrubs, and grass directly below your roofline, potentially killing off your landscaping.
Never use salt or calcium chloride on your roof. The short-term melting effect just isn't worth the long-term destruction it causes to your roofing materials, metal components, and landscaping.
The Danger of Brute Force Removal
Just as tempting is the idea of grabbing an axe, hammer, or shovel to physically smash the ice apart. This is an incredibly dangerous approach, both for you and your roof. Hacking away at a solid block of ice while on a slippery, pitched surface is a recipe for disaster.
You are almost guaranteed to puncture your shingles, creating new leak points that will let water pour in as soon as the ice starts to melt. One misplaced swing can easily gouge the roof deck itself, leading to a much more expensive structural repair than the original ice dam problem.
This method is never worth the risk. Sticking to safe, proven removal and prevention strategies is the only way to protect your property and avoid making a bad situation a whole lot worse.
Got Questions About Ice Dams? We've Got Answers.
After you've done the big-picture planning, it’s the little details that often trip people up. Homeowners I talk to usually have a few lingering questions about the finer points of stopping ice dams.
Let's clear up some of the most common ones I hear. Getting these details right is what separates a temporary fix from a long-term solution that truly protects your home.
Will New Windows Stop Ice Dams?
It’s a logical question. If heat loss is the enemy, then surely new, super-efficient windows have to help, right? In this case, the answer is almost always no—at least not directly. New windows are a fantastic upgrade for your home's comfort and energy bills, but they don't tackle the root cause of ice dams.
Think about it: ice dams are born from heat escaping up through your ceiling and into the attic, which then warms the roof from the underside. Windows, even the old, drafty ones, just don't send a significant amount of heat into the attic space.
Your real focus for ice dam prevention needs to stay on the "hat" of your house: the attic floor. Before you even think about windows for this problem, pour your energy into insulation, air sealing, and making sure your ventilation is working properly.
How Do I Know If My Attic Ventilation Is Actually Working?
This is a big one. You might have vents, but how can you be sure they're doing anything? You don’t need fancy equipment for a quick check. The simplest test is to just go up there on a cold day. Your attic should feel pretty close to the same temperature as it is outside.
If you pop your head up there and it feels noticeably warmer or kind of stuffy, that’s your first red flag. Here’s what I look for during an inspection:
- Blocked Soffit Vents: This is hands-down the most common problem I see. From inside the attic, look down toward the eaves where the roof meets the walls. You should be able to see daylight peeking through the vents. Too often, insulation gets crammed into that space, completely choking off the airflow.
- Frost on the Roof Decking: If you see a layer of frost on the heads of the roofing nails or on the plywood sheathing, that's a dead giveaway. It means warm, moist air from your living space is hitting the cold surface and condensing. It’s a sure sign of both air leaks and poor ventilation.
- Missing or Inadequate Vents: Some older homes just don't have a modern ventilation system. They might have a couple of small gable vents but lack the critical soffit-to-ridge vent combination that creates a continuous, even flow of cold air.
Can I Just Install Heat Cables Myself?
I get the appeal of a DIY project, but this is one I strongly advise against. While stringing up heat cables might look simple enough on YouTube, it involves a dangerous combination of ladders, heights, and electricity—often in wet or icy conditions.
A professional installation is the only way to go here. There’s a science to it.
An expert knows the exact zig-zag pattern and spacing required for your specific roof, taking into account its pitch and overhang length. More importantly, they'll make sure the system is correctly grounded and wired to its own GFCI-protected circuit. This isn't just about effectiveness; it's about preventing a serious fire hazard. A botched installation won't just fail to stop ice dams—it could put your entire home at risk.
If ice dams are a recurring nightmare or you just want a professional to assess your attic's weak spots, don't wait for the next leak to show up. The team at Paletz Roofing and Inspections has over 30 years of experience protecting homes from the top down. Contact us today for a free quote and get your roof ready for whatever winter throws at it.