
That sudden drip…drip…drip is a sound every homeowner dreads. Before you let panic take over, remember your first job is simple containment. Get a bucket under that drip right away to protect your floors and furniture. This one quick move buys you precious time to think clearly and figure out what to do next.
Your First Steps After Discovering a Roof Leak
The second you spot a water stain spreading across your ceiling or hear that tell-tale dripping, your focus needs to shift to two things: damage control and a quick investigation. Acting fast can be the difference between a small patch job and a massive, expensive interior renovation. The goal here is to stop the immediate bleeding while you gather clues for a permanent fix.
Think of this as your emergency response plan. It’s all about turning that initial gut-punch of stress into a methodical process, putting you back in control long before you even think about grabbing a ladder.
Contain the Interior Damage
First things first, protect the inside of your home. Water is incredibly destructive and can ruin drywall, flooring, and furniture in no time, not to mention creating the perfect environment for mold to take hold.
- Place a Bucket: Get a large bucket or waterproof tub directly under the active drip.
- Silence the Drip: To stop that maddening sound, hang a long string from the ceiling stain so it dangles down into the bucket. The water will silently follow the string down instead of echoing through your house.
- Protect Your Floors: Lay down old towels or some plastic sheeting around the bucket to catch any splashes.
- Relieve Pressure (If Needed): If you see the ceiling actually bulging with water, that means a lot of it is pooled up there. Carefully place your bucket underneath and then puncture the very center of the bulge with a screwdriver. This lets the water drain in a controlled way and prevents a much bigger, more destructive ceiling collapse.
Pro Tip: If the leak is small and tough to pinpoint on the ceiling, try taping a piece of dark plastic sheeting to the area. Water droplets will bead up on the plastic, making the entry point much easier to spot.
Uncovering the Common Culprits
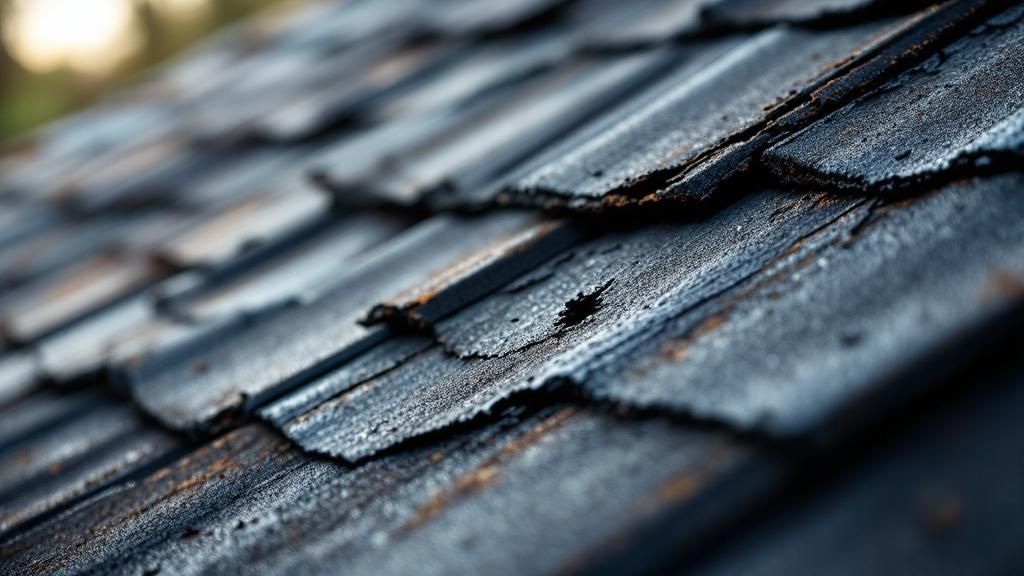
You'll have a much better idea of what you're up against if you know where roofs typically fail. Leaks aren't usually random events; they’re almost always tied to specific weak points on a roof.
The roofing industry is a massive part of the U.S. economy, with contractors on track to bring in $76.4 billion in revenue in 2025. This demand is driven, in part, by an increase in extreme weather that puts every roof to the test. In fact, recent data shows that nearly 31% of homeowners have had to perform roof maintenance in the last three years, which tells you just how common these problems are. For more on this, check out the latest roofing industry trends on thisoldhouse.com.
Before you start your own inspection, it helps to know what the most common trouble spots are. Here’s a quick rundown of the usual suspects.
Quick Guide to Common Roof Leak Sources
| Leak Source | Common Location | Typical DIY Difficulty |
|---|---|---|
| Damaged Shingles | Main roof field, especially on older roofs | Low to Medium |
| Cracked Flashing | Around chimneys, vents, skylights, and valleys | Medium |
| Failed Pipe Boots | Around plumbing vent pipes protruding from the roof | Low |
| Clogged Gutters | Roof eaves and fascia boards | Low |
| Cracked Sealant | Around vents, skylights, and other penetrations | Low |
| Ice Dams | Lower edge of the roof (in cold climates) | Medium to High |
Knowing these common failure points gives you a solid head start. It helps you focus your inspection on the areas most likely to be causing your headache, saving you time and frustration.
How to Pinpoint the Exact Source of the Leak

Finding where water is actually getting into your home is often the trickiest part of the whole repair. Water is sneaky. It can slip through a tiny crack, travel sideways along a rafter, and then decide to show up as a ceiling stain ten feet away from where it started. So, you'll have to play detective before you can play handyman.
Your search needs to be methodical, but most importantly, it has to be safe. Don’t even think about climbing onto the roof without taking precautions. Make sure your ladder is on solid, level ground and that it extends at least three feet above the edge of the roof. Having a spotter on the ground is never a bad idea, either.
Start Your Investigation From Inside
The best place to begin is usually right where you first saw the problem—inside your house. Get up into your attic on a bright, sunny day, armed with a good flashlight. Your mission is to find the water's trail on the underside of the roof deck.
Once you're situated safely in the attic, turn off the lights. Look for any pinpricks of daylight poking through the roof. Those are direct invitations for water. If you don't see any obvious daylight, use your flashlight to scan the plywood for other clues:
- Water Stains: Look for dark spots, streaks, or any discoloration on the wood.
- Soggy Insulation: Gently feel the insulation in the area directly above the interior stain. If it's damp, compressed, or cold to the touch, you’re on the right track.
- Mold or Mildew: Black or dark green splotches are a dead giveaway of a long-term moisture issue.
When you find the evidence, take some measurements. Measure from the spot to the nearest gable wall and then to a landmark like a vent pipe or chimney. These numbers will be your treasure map when you go outside.
Conduct a Systematic Exterior Inspection
With your intel from the attic, it's time to head outside. For this part, a good pair of binoculars can be your best friend. You can get a surprisingly detailed look from the safety of the ground before deciding if you even need to climb up.
Focus your attention on the usual suspects. In my experience, over 90% of roof leaks happen at or near roof penetrations—places where something pokes through the roof.
A common mistake is assuming the leak is from a bad shingle out in the middle of nowhere. While that can happen, you should always check the flashings, boots, and seals around anything sticking out of the roof first. That's where the real trouble usually starts.
Get a close look at these high-risk areas:
- Chimneys: Check the flashing—the metalwork that seals the joint between the chimney and roof. Look for gaps, rust, or any pieces that look loose or pulled away.
- Vents and Pipes: The rubber boot or collar around plumbing vents is a classic failure point. The sun bakes it year after year, causing it to crack and crumble, creating a perfect funnel for rainwater.
- Skylights: Carefully inspect the sealant and flashing around the entire skylight. Look for cracks or areas where the sealant is pulling away from the glass or the frame.
Use Water to Find the Stubbornest Leaks
If you’ve checked everything and still can't find the source, it's time for a controlled water test. You’ll need two people for this: one person on the roof with a garden hose and another inside—either in the attic or watching the ceiling—with a cell phone. Never do this during a rainstorm; you'll never trace the source with water coming from everywhere.
Start low and work your way up the roof slope. Have the person with the hose gently soak a small area, starting just uphill from where the leak appears inside. For instance, if the ceiling stain is on the north side of your living room, begin watering the roof just above it, but down near the eaves.
Isolate one potential culprit at a time. First, soak the downhill side of a vent pipe. Then the sides. Then the top. Your spotter inside needs to be ready to yell the second they see a drip. It can take some time and patience, but this is an incredibly effective way to pinpoint a hidden leak, which is the most critical step toward a proper, lasting repair.
Gathering the Right Tools and Materials
I’ve seen it a hundred times: a well-intentioned DIY repair grinds to a halt because someone’s missing a critical tool. A successful fix for a roof leak doesn't start when you climb the ladder; it begins with a smart shopping list at the hardware store.
Having everything you need on hand before you start is more than just a time-saver. It’s about doing the job right the first time so you’re not back up there in a month. Think of this as your pre-flight checklist. A little prep work here makes a world of difference.
Your Essential Repair Toolkit
Good news—you don't need a professional roofer's entire truck full of gear. For most common leak repairs, from swapping out a damaged shingle to sealing up a vent, a small but well-chosen set of tools will get the job done.
- Flat Pry Bar: This is your key to gently lifting shingles without cracking them. Go for a wider, thinner bar for the best results.
- Hammer or Roofing Nail Gun: A standard hammer is fine, but if you're replacing more than a handful of shingles, a nail gun will make the work go much faster.
- Utility Knife with Hooked Blades: The hooked blade is a game-changer. It’s designed specifically for cutting through old shingles and underlayment cleanly and safely.
- Caulking Gun: A total necessity for applying roofing cement or silicone with any kind of precision.
- Sturdy Work Gloves: Your hands will thank you. Shingle granules are incredibly abrasive, and roofing materials can get hot.
- Safety Harness and Goggles: This is non-negotiable. Your well-being is the top priority when working at any height.
Pro Tip: Before you head up, get your tools organized in a bucket or a tool belt. It keeps everything in easy reach and seriously reduces the risk of dropping something—or, even worse, losing your balance while fumbling for a tool.
Choosing the Right Repair Materials
Picking the right materials is just as crucial as your repair technique. Slapping on the wrong type of sealant or using a mismatched shingle is a recipe for a failed patch and, you guessed it, more leaks. What works best can even vary by location; European markets, for example, often prioritize materials that adapt to diverse climates, while North American trends lean toward energy efficiency. You can see more on how regional trends shape the roofing industry on marketresearchintellect.com.
For your specific project, you'll want to focus on these essentials:
Sealants and Adhesives
- Roofing Cement/Mastic: This thick, asphalt-based goo is the workhorse for most standard asphalt shingle repairs. It's perfect for filling cracks, securing flashing, and bedding new shingles.
- Silicone Sealant: With its superior flexibility and UV resistance, silicone is the ideal choice for sealing around skylights, vents, and metal flashing—anywhere expansion and contraction are a factor.
Replacement Components
- Shingles: Do whatever it takes to find an exact match for your existing roof. The best way is to take a loose or damaged shingle with you to the store. A mismatched shingle sticks out like a sore thumb and, more importantly, might not interlock properly, which just creates a new weak spot.
- Flashing: If your leak is coming from around a chimney, dormer, or vent, you might need to replace the aluminum or galvanized steel flashing. You can also find pre-formed flashing boots for plumbing pipes.
Here’s a final piece of advice: always buy a little more material than you think you’ll need. Having a few spare shingles or an extra tube of sealant on hand is a lifesaver compared to making a second trip to the store mid-job. This level of preparation is the cornerstone of repairing roof leaks effectively and ensuring your fix will last.
A Practical Walkthrough of Common Roof Repairs
Alright, you've tracked down the leak and gathered your tools. It's time to get to work. This is the moment where a bit of confidence and the right technique can save you a world of hurt—and a much bigger repair bill—down the line. Tackling these common roof leaks successfully isn't about some secret, complicated process. It's about knowing which repair to use for which problem and doing it right.
We're going to walk through three of the most frequent fixes I see homeowners handle themselves: swapping out a single bad shingle, fixing leaky flashing, and patching up a simple puncture. Each of these is totally manageable for a homeowner who's ready to be careful and methodical.
How to Replace a Damaged Shingle
A single shingle that's curled up, cracked, or gone missing is probably the most common culprit behind a new leak. The good news? It's also one of the most straightforward repairs.
First, you need to get under the shingle directly above the one you're replacing. Use a flat pry bar to gently break its tar seal. You just need enough room to work, so don't go crazy. Once you're in, you’ll find the nails holding the bad shingle—usually four of them. Carefully pry those out.
With the old shingle gone, slide the new one into place. Make sure it lines up perfectly with its neighbors. You'll then secure it with four 1¼-inch galvanized roofing nails, driving them right back into the original spots. A critical detail here is to nail through the top edge of your new shingle and the shingle just below it.
To finish the job, grab your roofing cement and apply a few dabs under the tabs of the shingle you lifted earlier. This creates a new, watertight seal, just like the original.
A Roofer's Tip: Working in the cold? Asphalt shingles get incredibly brittle and can crack if you look at them wrong. I always recommend using a hair dryer or a heat gun on a low setting to warm them up a bit. This makes them pliable and dramatically cuts down the risk of causing more damage than you're fixing.
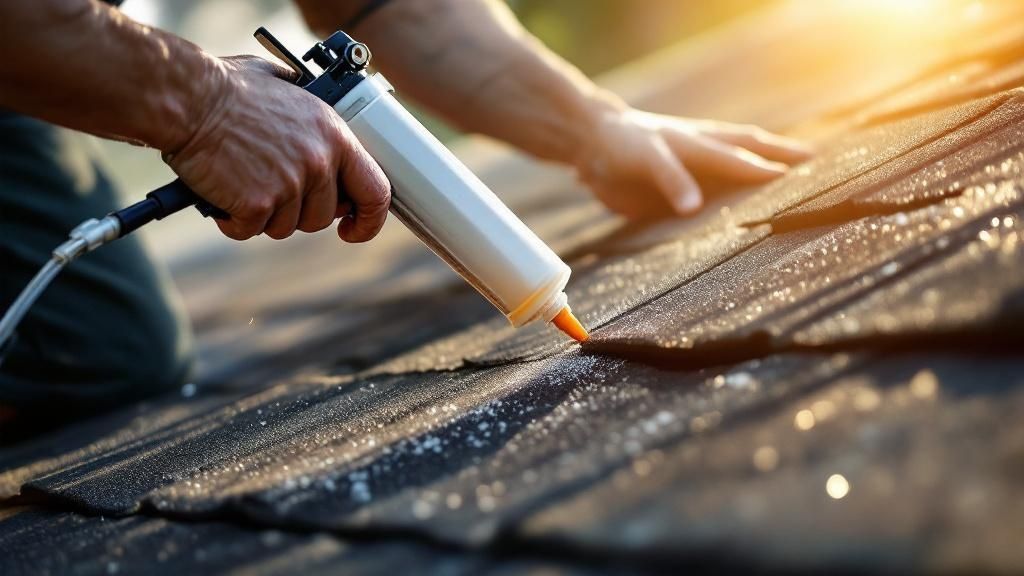
Resealing Compromised Flashing
If there's a problem area on a roof, it's almost always the flashing. This metal sheeting around chimneys, vents, and skylights is a notorious trouble spot. Metal and roofing expand and contract at different rates with temperature changes, causing old sealant to crack, shrink, and pull away. This creates a perfect little highway for water to get in.
Your main goal is to get rid of every last bit of the old, failed sealant. Use a utility knife and wire brush to scrape and scrub away all the old caulk and any rust or debris. You need a perfectly clean, dry surface on both the flashing and the roof for the new sealant to bond properly. Don’t rush this part.
Once it's prepped, apply a generous, continuous bead of high-quality roofing sealant right into the joint. Use your caulking gun to really force it deep into that gap. Then, smooth the bead out with a putty knife or even a gloved finger. You're looking for a smooth, clean seal with no gaps or air bubbles.
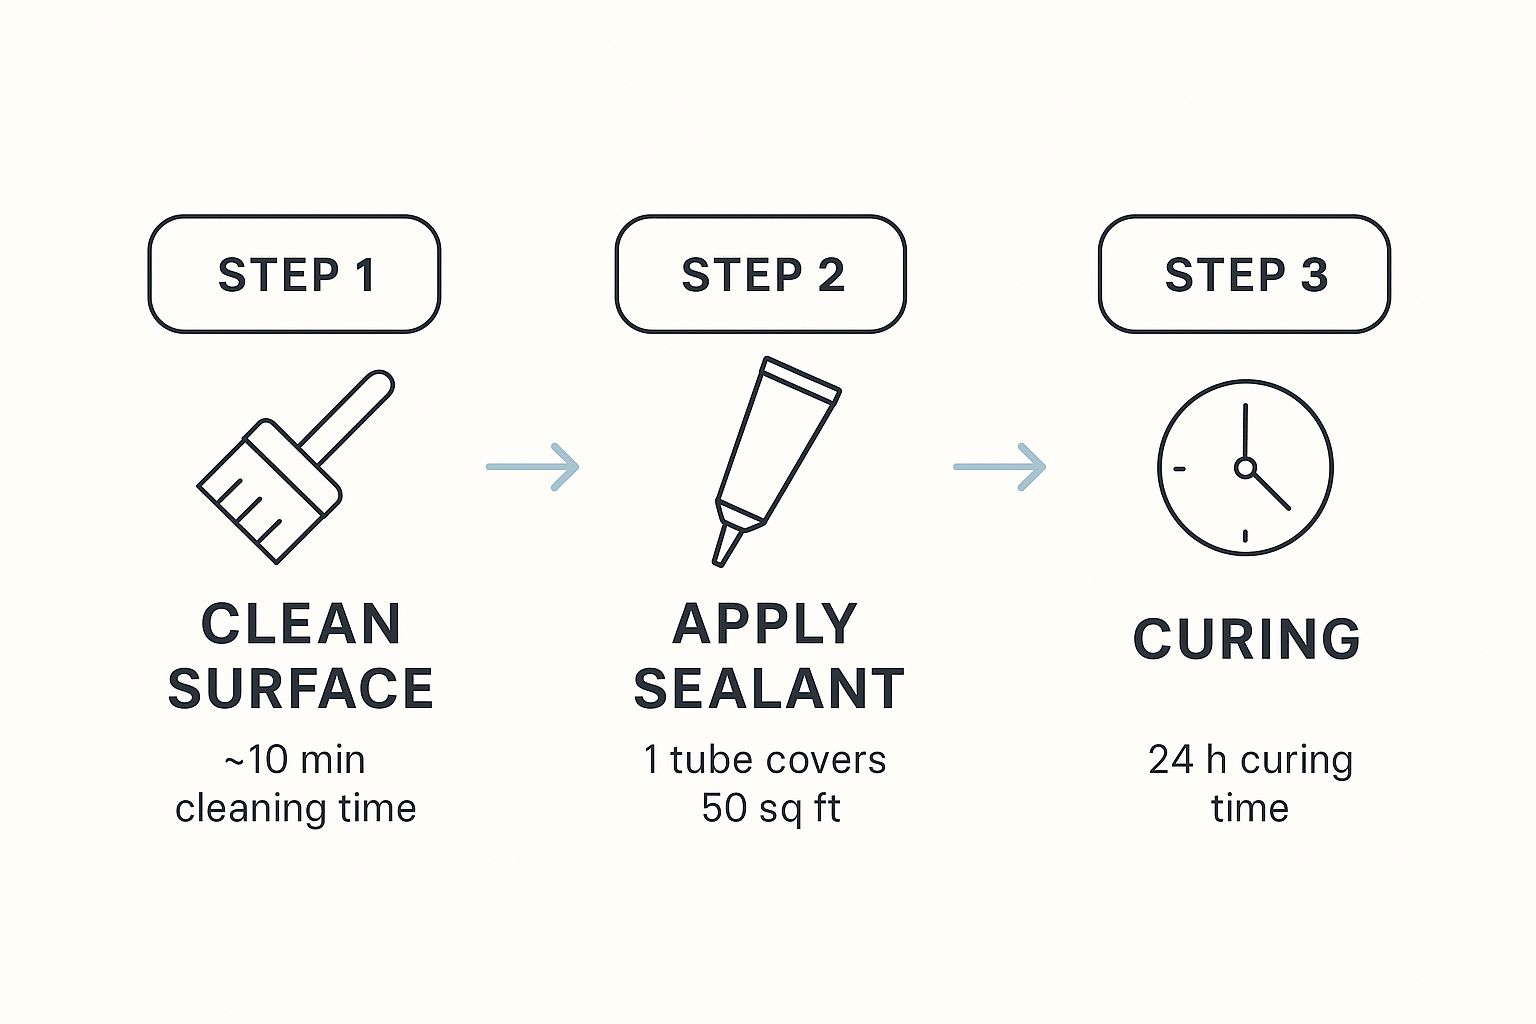
This image really drives home the point: a lasting repair is all in the prep work. A successful seal depends just as much on the cleaning and curing as it does on applying the sealant itself.
Patching Small Punctures or Holes
Sometimes the leak isn't a shingle or flashing issue at all. It might just be a small puncture from a fallen branch or an old screw hole from a satellite dish mount that was removed. Patching these is simple, but it has to be done right to avoid problems later.
First, clean the area around the hole completely. Get rid of any dirt, moss, or loose shingle granules. For tiny holes (less than a half-inch), you can often get away with just filling them directly with a good dab of roofing cement. For anything bigger, you'll want a more robust patch.
Here’s a bulletproof method I've used countless times for a sturdy patch:
- Lay Down a Base: Trowel a layer of roofing cement over and around the hole, extending it about two inches in every direction.
- Add Reinforcement: Cut a piece of roofing fabric or fiberglass mesh that’s just a bit larger than the area you covered with cement. Press this fabric down firmly into the cement.
- Apply the Top Coat: Spread another layer of roofing cement right over the top of the fabric. Make sure you cover it completely and feather the edges out smoothly so it blends with the roof surface.
This "sandwich" technique creates an incredibly durable, waterproof patch that will hold up for years. Just be patient and let it cure fully, which can take anywhere from 24 to 48 hours, depending on the weather.
When to DIY and When to Call a Pro
Figuring out if a leak is something you can handle or if it's time to call in a professional can be a tough call. It's often the difference between a quick fix and a major headache.
To help you decide, I've put together a simple decision matrix. It's a quick guide to help you size up the situation based on what you're seeing and what the likely cause is.
DIY Repair vs Professional Hire Decision Matrix
| Leak Symptom | Potential Cause | Recommended Action (DIY or Pro) | Why |
|---|---|---|---|
| A single, slow drip from the ceiling | One damaged shingle or a cracked vent boot | DIY | This is a very localized, low-complexity fix. It’s the perfect kind of job for a confident homeowner. |
| Water stains appearing around a chimney | Failed flashing sealant | DIY | Resealing is a straightforward task, as long as the metal flashing itself is still in good shape. |
| Multiple leak spots in the same room | Widespread shingle damage or failing underlayment | Professional | Multiple leaks almost always point to a systemic issue. You need an expert eye to find the true source. |
| A sagging or soft spot on the roof | Structural rot from a long-term, hidden leak | Professional | This is a major safety hazard and a structural problem. It absolutely requires a pro to assess and repair. |
| A leak near a roof valley or at the edge | Complex flashing failure or an ice dam issue | Professional | Valleys and edges are high-risk areas. An improper repair here can easily make the leak much, much worse. |
At the end of the day, successfully repairing roof leaks yourself comes down to one thing: knowing your limits. While the fixes I've outlined here are very manageable for most, you should never hesitate to call a pro if you feel unsafe or the job looks bigger than you first thought. Your safety and the integrity of your home are what matter most.
Stop Roof Leaks Before They Start: A Proactive Maintenance Guide
Let's be honest, the best way to deal with repairing roof leaks is to never have them in the first place. It sounds simple, but shifting from a reactive "uh-oh, there's a drip" mindset to one of proactive care is the single most effective way to protect your home and your bank account. A simple, consistent maintenance routine can catch those tiny issues before they become a full-blown crisis soaking your drywall.
This isn't just a good idea; it's a major trend. The global market for roof repair, valued around $12.5 billion in 2024, is projected to climb past $20.3 billion by 2033. A huge part of that growth comes from homeowners finally realizing that a little prevention avoids the massive cost of a full replacement.
Your Biannual Roof Health Checklist
A thorough roof inspection doesn't need to be some complicated, all-day affair. Just setting aside a couple of hours twice a year—once in the spring after winter's thaw and again in the fall before it sets in—is all you really need to stay ahead of most problems. Think of it as a quick check-up for the most important shield your home has.
Your main goal here is to spot trouble brewing. Grab a pair of binoculars and scan your entire roof surface from the safety of the ground. You're looking for anything that just doesn't look right:
- Shingle Condition: Are any shingles curling up at the edges, cracked, or just plain missing?
- Granule Loss: See any dark, "bald" patches? That's where the protective granules have worn off, leaving the shingle vulnerable.
- Flashing Integrity: Check the metal strips around your chimney, vents, and skylights. Look for rust, gaps, or sealant that's cracked and pulling away.
This quick visual scan can honestly alert you to 90% of the common issues that lead to leaks, giving you a chance to fix them while they're still small and manageable.
A critical spot people often forget is where additions meet the roof. Improperly sealed installations are a classic source of leaks. For example, knowing the right way of installing a rooftop junction box for solar panels or other equipment can prevent a slow, hidden leak that many homeowners don't discover until it's caused major damage.
The Non-Negotiables of Roof Maintenance
Beyond just looking, a few hands-on tasks are absolutely essential. These actions directly combat the most common—and most preventable—causes of roof leaks.
Clear Your Gutters and Roof Surface
Clogged gutters are public enemy number one for a healthy roof. When leaves and muck stop water from draining, it has nowhere to go but up and under your shingles. This water backup can quickly rot the wooden sheathing underneath. You have to clear them out completely, at least twice a year. While you're up there, sweep off any leaves, pine needles, or debris sitting on the roof itself. Damp gunk sitting on your shingles will speed up their decay.
Trim Overhanging Tree Limbs
This one is so simple, but so important. Overhanging branches aren't just dropping leaves in your gutters. In high winds, they can scrape against your roof, wearing away those protective shingle granules. And in a serious storm, a falling limb can puncture your roof, causing a massive, immediate leak. Keep all branches trimmed back several feet from your roofline. It's a no-brainer.
Knowing When to Repair vs. When to Replace
Even the best-maintained roof has a limited lifespan. At some point, continuing to pour money into repairing roof leaks on an old, failing system is just throwing good money after bad. Learning to spot the signs of a roof at the end of its life helps you plan for a replacement instead of being ambushed by a catastrophic failure.
An asphalt shingle roof, for example, typically lasts 20-25 years. If your roof is getting up there in age and you're seeing widespread problems—like extensive granule loss all over, cracked shingles on every slope, or new leaks popping up in different spots—it's time to start calling for replacement quotes. A new roof is a big investment, but it's far cheaper than the endless cycle of patching and repairing the interior damage a failing roof will inevitably cause.
Common Questions About Repairing Roof Leaks
Once you've tracked down that pesky leak and started thinking about the fix, it's completely normal to have a few more questions pop into your head. Your roof is your home's main line of defense, so you want to feel confident you're making the right moves. We've gathered some of the most common questions we hear from homeowners dealing with roof leaks.
The goal here isn't to give you textbook answers, but real-world advice to help you move forward. Whether you're curious about how long your DIY patch will hold up or trying to figure out what a professional repair should cost, this should clear things up.
How Long Will a DIY Roof Patch Last?
This is the big one, and the honest-to-goodness answer is: it all comes down to the quality of your work and the materials you use. A well-done patch for a small problem—like replacing one bad shingle or properly resealing flashing with a top-shelf silicone—can absolutely last for years. When you do it right, it becomes a solid part of your roofing system.
On the other hand, a quick glob of cheap roofing tar smeared over a dirty, damp spot might not even make it through the next thunderstorm. The lifespan of your repair is directly linked to your prep work. You need a clean, dry surface to get a strong bond that will actually last.
Expert Insight: Think of a DIY patch as a long-term fix for a small, specific problem. It is not, however, a solution for an old, worn-out roof. If your roof is over 20 years old and springing leaks in multiple spots, patching is just putting a band-aid on a much bigger issue.
Can I Repair My Roof in the Rain or Winter?
Trying to fix a roof in the middle of a downpour is not just incredibly dangerous—it's also a recipe for failure. Nearly all roofing adhesives and sealants require a completely dry surface to cure properly and create that waterproof seal. Slapping sealant on a wet roof is like trying to put a bumper sticker on a car in a carwash. It's just not going to stick.
Winter repairs come with their own set of headaches.
- Brittle Shingles: When the temperature drops, asphalt shingles get stiff and brittle. Try to lift one, and it's likely to crack or snap right off.
- Sealant Issues: Most sealants have a minimum temperature for application, usually around 40°F (4°C). If you use them when it's colder, they won't cure correctly, leaving you with a weak bond that's bound to fail.
- Safety Risks: This should go without saying, but ice and snow on a rooftop create a treacherous, slippery hazard. It's a risk no one should ever take.
If you've got an emergency leak during bad weather, your best bet is to manage it from the inside with buckets and place a tarp securely over the exterior of the roof until conditions are safe for a proper repair.
How Do I Know if I Need a Replacement Instead of a Repair?
This is the million-dollar question for a lot of homeowners. It's incredibly frustrating to feel like you're throwing good money after bad with one repair after another. You know it's time to shift from "repair mode" to "replacement planning" when you start seeing signs of systemic failure, not just isolated problems.
Keep an eye out for these tell-tale signs:
- Widespread Cracking: You're seeing cracked, curling, or cupping shingles across many different areas of the roof.
- Major Granule Loss: Your gutters are full of shingle granules, or you see large "bald spots" on the shingles. This means the protective layer is gone.
- Age: An asphalt shingle roof that's pushing 20-25 years old is living on borrowed time. Frequent leaks are its way of telling you it's tired.
- Multiple Leaks: One leak might be a fluke. Two or three leaks popping up in different locations strongly suggests the underlying structure and materials are failing.
If you're nodding along to this list, it’s time to start getting quotes for a full roof replacement. Yes, it's a bigger upfront cost, but it's far more economical than an endless cycle of patching and paying for the interior water damage that follows.
What Is a Reasonable Cost for a Professional to Fix a Minor Leak?
The cost for a pro to fix a minor leak can vary depending on where you live and how tricky the fix is, but there's a general ballpark. For a straightforward repair—like sealing a leaky vent or replacing a handful of shingles—you can typically expect the cost to be somewhere between $300 and $1,000.
What pushes the price up or down? A few things:
- Roof Pitch: A steep, high-pitched roof is more dangerous and time-consuming to work on. It requires more safety gear and time, so the labor cost will be higher than for a low-slope, easily walkable roof.
- Leak Location: Fixing a leak around a chimney, with its complex flashing, is a lot more involved than popping a new shingle over a nail hole.
- Material Type: Repairing a slate or tile roof will cost more than working on standard asphalt shingles. The materials are more expensive and require a roofer with specialized skills.
Remember, most professional roofing companies have a minimum service fee just to get a truck and an experienced technician to your home. That charge usually covers the first hour or two of work, which is why even a quick, simple fix has a baseline cost. You're paying for their expertise, insurance, and time.
When in doubt, the safest and most effective solution is to call in a trusted expert. For homeowners in South Florida, Paletz Roofing and Inspections has over 30 years of experience diagnosing and permanently fixing leaks of all sizes. Don't let a small drip turn into a major disaster. Contact us today for a free, no-obligation quote.