
Thinking of tile roof maintenance as just another chore is a common mistake. In reality, it’s one of the smartest investments you can make to protect your home’s structure and value. A proactive approach is what stops a small issue, like a single cracked tile, from spiraling into a nightmare of interior water damage and structural rot, especially after a big storm.
Why Proactive Tile Roof Maintenance Matters
Your roof is arguably the most critical shield your home has, yet it's often a classic case of "out of sight, out of mind" until a dreaded water spot appears on the ceiling. This mindset can be especially damaging for tile roofs. While they’re famous for their durability and long life, they aren't invincible.
Let's be clear: tile roof maintenance isn't just a box to check. It's a fundamental part of responsible homeownership that pays for itself over and over again.
Consistent upkeep prevents the kind of catastrophic failures that turn a simple repair into a full-blown, wallet-draining renovation. Picture this: a single tile shifts just a fraction of an inch during a windy afternoon. It seems harmless, right? But that tiny gap is now a direct invitation for water. Over months or years, that slow drip can rot the wooden deck underneath, ruin your insulation, and create a hidden mold factory inside your walls—all from one forgotten tile.
Protecting Your Investment and Curb Appeal
A well-maintained tile roof does more than just keep your family dry. It’s a huge factor in your home’s curb appeal and, by extension, its market value. A clean, complete tile roof sends a powerful signal to potential buyers: this home has been properly cared for.
On the flip side, a roof showing obvious signs of neglect can be a major deal-breaker.
- Property Value: A roof with cracked, missing, or algae-stained tiles can instantly lower your home's perceived value. It's one of the first things people notice.
- Insurance Claims: If a storm hits, having a documented history of regular maintenance can be a game-changer when filing an insurance claim. It shows you've been a responsible steward of your property.
- Longevity: With proactive care, your tile roof can easily meet or even sail past its expected 50+ year lifespan. This saves you from the massive headache and expense of a premature replacement.
This isn't just anecdotal advice. There's a growing global market for roof maintenance services, valued at around USD 12.5 billion and projected to climb. This trend is fueled by a wider understanding that routine inspections are non-negotiable for preserving a building’s structural integrity, especially with today's unpredictable weather patterns.
The Community Impact of Good Maintenance
The condition of your roof doesn't just affect you—it can impact your entire neighborhood. This is especially true in planned communities or those governed by a Homeowners Association (HOA). In these areas, maintaining collective property values is a shared responsibility.
Many communities have detailed rules for exterior upkeep. For more on this, check out these helpful HOA common area maintenance tips to see how your roof fits into the bigger picture.
When you reframe tile roof maintenance as an investment rather than an expense, your entire perspective shifts. You move from putting out fires to preventing them in the first place. This simple change in mindset saves money, reduces stress, and keeps your home beautiful and safe for decades.
Your Annual Tile Roof Maintenance Checklist
To stay on top of things, it helps to have a clear schedule. This checklist breaks down the essential tasks and how often you should be thinking about them, making it easy to stay proactive and organized.
| Maintenance Task | Recommended Frequency | What to Look For |
|---|---|---|
| Visual Ground Inspection | Quarterly & After Storms | Missing, cracked, or slipped tiles; debris buildup. |
| Gutter & Downspout Cleaning | Semi-Annually (Spring/Fall) | Clogs, blockages, standing water, and loose sections. |
| Professional Inspection | Annually or Bi-Annually | Loose flashing, underlayment issues, hidden damage. |
| Debris Removal | As Needed | Leaves, branches, and anything trapping moisture. |
| Algae/Moss Treatment | When Growth Appears | Green or black streaks, fuzzy patches on tiles. |
| Minor Repair Checks | Semi-Annually | Damaged mortar, sealant gaps, or loose ridge caps. |
Sticking to a simple schedule like this is the most effective way to catch small problems early. It empowers you to protect your investment without feeling overwhelmed, ensuring your tile roof continues to do its job for a lifetime.
How to Perform a Safe Visual Roof Inspection

Consistent tile roof maintenance starts with a simple, safe habit: regular visual inspections from the ground. You don't need to be a professional roofer or own specialized gear to spot the early warning signs of trouble. In fact, doing these checks yourself is one of the best ways to catch small issues before they snowball into costly repairs.
The best part? It's something you can do safely without ever setting foot on a ladder. All you really need is a keen eye and maybe a pair of binoculars to get a closer look. This simple routine can save you thousands down the road.
Your Ground-Level Inspection Checklist
To get a good look, walk the entire perimeter of your home, observing the roof from different angles. Take your time. Pay close attention to the following areas, as they're often the first to show signs of wear and tear.
- Slipped or Crooked Tiles: Look for any tiles that seem out of alignment. Even a single slipped tile can break the interlocking seal of your roof, creating a direct path for water to get in.
- Cracked or Broken Tiles: Scan for obvious cracks, chips, or completely broken pieces. This kind of damage is common after a major storm or from falling debris like tree branches.
- Debris Buildup: Make a note of any accumulation of leaves, pine needles, or branches. This is especially important in the valleys where different roof planes meet, as trapped debris holds moisture right against the tiles and underlayment.
- Organic Growth: Keep an eye out for dark streaks (algae), green fuzzy patches (moss), or lichen. While often just a cosmetic issue, heavy growth can trap water and speed up the wear on your tiles.
Documenting what you find is critical. Use your phone to take clear, dated pictures of any problem spots. This creates a valuable record you can use to track changes over time or show to a professional if you need to bring one in.
A ground-level inspection isn't about diagnosing the problem yourself; it's about gathering intelligence. Your photos and notes give a professional a clear, objective starting point, helping them understand the situation before they even arrive.
Scrutinizing the Details with Binoculars
While a general walk-around is great, binoculars are your secret weapon for a more detailed look from a safe distance. They let you get a "close-up" view of critical components without the risk of climbing onto the roof itself.
Focus your attention on these key spots:
- Flashing: This is the metal stripping around chimneys, vents, and skylights. Look for any signs of rust, lifting, or gaps in the sealant. Failed flashing is one of the most common culprits behind roof leaks.
- Ridge Caps: These are the special tiles that cover the very peak of your roof. Make sure they are all present, intact, and appear securely mortared in place.
- Gutter Line: Check the area where the tiles meet the gutters. Look for tile fragments in the gutters themselves—it’s a dead giveaway that there's breakage somewhere higher up on the roof.
The global roofing tile market, now valued at over USD 13.88 billion, is growing fast. This boom is fueled by renovations and re-roofing projects, making it clear that a tile roof is a significant investment. Knowing how to properly inspect it helps you protect that investment.
Knowing When to Call for Professional Help
A visual inspection empowers you, but it's vital to recognize its limits. There's a clear line between what you can safely check from the ground and what requires a professional, hands-on evaluation.
Your job is to spot potential issues. A professional's job is to get on the roof safely, assess the underlayment, and perform the necessary repairs. For a more advanced and safe visual inspection, especially for hard-to-reach areas, drones offer detailed aerial views. You can learn more by exploring some of the Top Drones for Industrial Inspection available today.
Never, ever attempt to walk on your tile roof. Clay and concrete tiles can be extremely brittle and slippery when wet. Improper foot traffic is a leading cause of breakage. If your ground-level check reveals any of the "red flag" issues below, it's time to call a licensed and insured roofing company.
Red Flags That Demand a Professional Call:
- Numerous cracked or missing tiles across different sections of the roof.
- Visible sagging or dipping in the roofline.
- Large patches of discoloration that suggest widespread moisture problems.
- Evidence of leaks inside your home, like water stains on the ceiling.
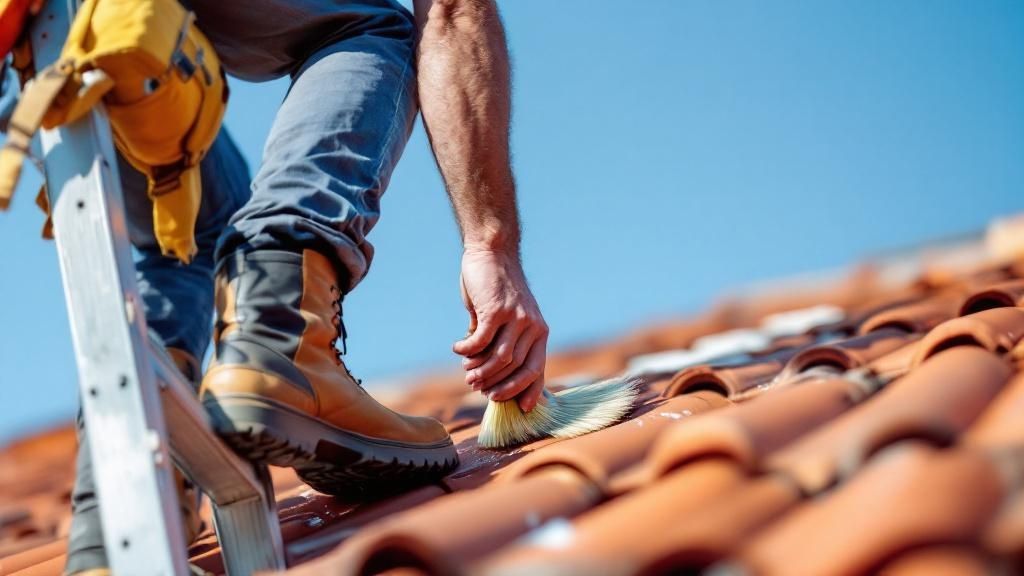
Effective Tile Roof Cleaning Without Causing Damage
Let’s be clear: blasting your tile roof with a high-pressure washer is one of the fastest ways to cause expensive, irreversible damage. While it might look like a quick fix for grime, that aggressive approach can easily crack tiles, strip away protective glazes, and force water straight under the roof system. The underlayment—your roof's last line of defense—doesn't stand a chance.
Proper tile roof maintenance calls for a much more thoughtful and gentle strategy.
A clean roof isn't just about curb appeal; it's about function. The first step is to figure out what kind of cleaning you’re dealing with. Are you just clearing away some loose leaves, or are you fighting stubborn organic growth? Each job requires a completely different approach to protect your tiles.
Starting With Debris Removal
The simplest cleaning job involves getting rid of loose debris like leaves, twigs, and pine needles. This stuff loves to collect in the roof’s valleys and around chimneys. When it’s left to sit, it basically turns into a sponge, trapping moisture against the tiles and creating the perfect damp spot for rot and mildew to take hold.
For this kind of work, all you really need is a leaf blower or a garden hose with a standard nozzle.
- Leaf Blower: Use it to gently blow debris off the roof. The key is to always aim downward, toward the gutters. Never point the air stream upward, as you can easily lift tiles and push debris right underneath them.
- Garden Hose: A gentle rinse is often enough to wash away dirt and smaller debris. Again, always spray down the slope of the roof—never up against the edges of the tiles.
Here's a pro tip: Never, ever use a metal rake or a stiff-bristled brush on your tiles. These tools will scratch, chip, or even break clay and concrete tiles in a heartbeat. You'll turn a simple cleaning task into a much more expensive repair job. The goal is to get the debris off, not damage the surface it's sitting on.
Tackling Algae, Moss, and Mildew
If your roof is showing those telltale dark streaks (algae) or fuzzy green patches (moss), a simple rinse isn’t going to cut it. This kind of organic growth has roots, and if you don’t kill it completely, it will be back in no time. This is where a chemical solution is necessary, but it has to be applied the right way.
The image below really drives home the kind of careful work required on a tile roof, whether you're cleaning or replacing a single tile.
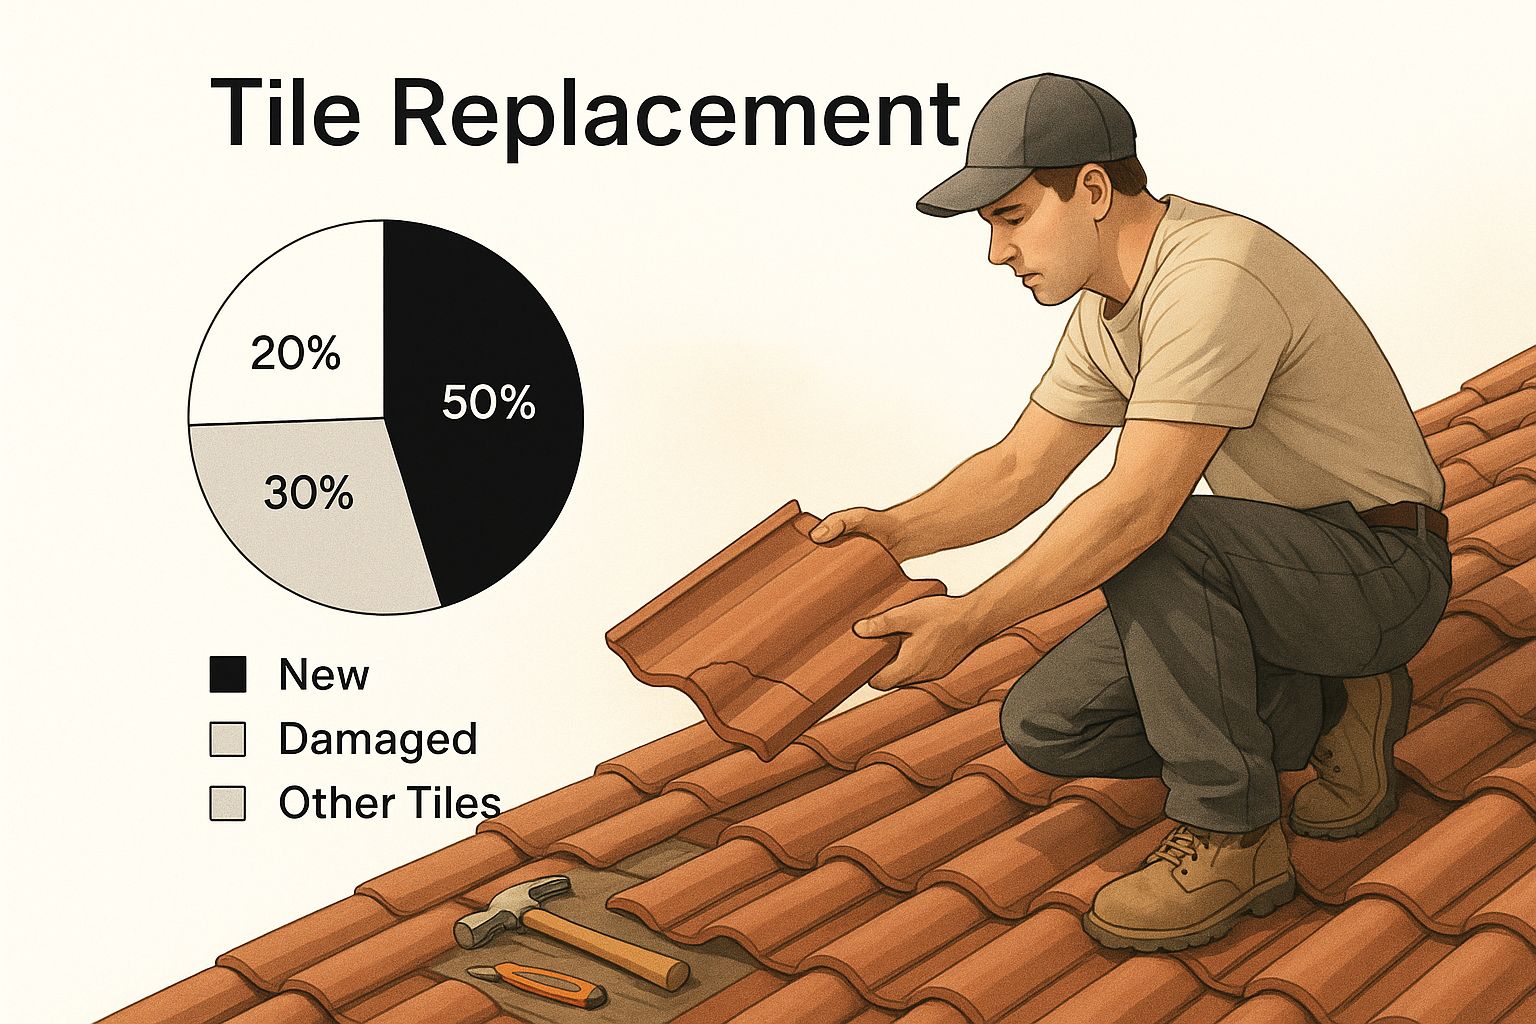
This just goes to show that every single action you take on a tile roof needs to be done with precision to avoid causing a chain reaction of damage.
Your best bet here is a specialized, eco-friendly roof cleaning solution made specifically for tile. Many of these products use sodium hypochlorite (the active ingredient in bleach) or other agents that effectively kill organic growth without harming the roofing material.
Here’s a breakdown of the safest way to tackle this:
- Protect Your Landscaping: Before you even think about spraying, give all the plants, shrubs, and grass around your home’s foundation a good watering. For an extra layer of protection from any chemical runoff, cover them with plastic sheeting.
- Mix the Solution: Always follow the manufacturer’s instructions for diluting the cleaning concentrate. A stronger mix won't work better; it will just increase the risk to your plants and potentially the roof itself.
- Use a Low-Pressure Sprayer: This is where most people get it wrong. You want to apply the solution with a simple garden pump sprayer or a chemical injector system attached to a low-pressure washer. We’re talking a "soft wash" setting of no more than 500-600 PSI.
- Let It Dwell: Give the solution time to work its magic. Let it sit on the roof surface for the recommended dwell time, which is usually around 15-20 minutes. This allows the chemicals to penetrate and break down the algae and moss. Just don’t let it dry completely.
- Rinse Thoroughly: Once the dwell time is up, gently rinse the entire roof from the top down using clean water from your garden hose. Make sure all the solution and the now-loosened gunk are washed away into the gutters.
Even in a mild climate like South Florida, tile roofs can soak up and hold onto moisture, especially during our cooler, wetter months. This prolonged dampness is exactly what algae and mildew need to thrive. A proper cleaning doesn't just get rid of the ugly stains; it helps the roof dry out more efficiently, which in turn protects the all-important underlayment beneath.
Remember, a successful cleaning is one that leaves your tiles looking fantastic without causing any harm. A patient, low-pressure approach is always the key to safe and effective tile roof maintenance.
Managing Minor Repairs and When to Call a Professional
Once you’ve finished a thorough inspection, you might find a few small problems. Knowing what you can realistically fix yourself—and more importantly, what you can't—is the mark of a truly responsible homeowner. Handling a minor repair isn't just about saving a few bucks; it's about taking ownership and protecting your biggest investment.
Something like a single slipped or cracked tile often falls within the realm of a confident DIY-er. But let's be clear: this isn't a task to take on lightly. Safety has to be your number one priority, and you absolutely must have the right tools and materials before you even think about climbing that ladder. Never attempt these fixes without proper safety gear, including a securely placed ladder, safety ropes, and shoes that grip.
How to Fix a Slipped Tile
A slipped tile is exactly what it sounds like—one that has slid down but is still in one piece. This is a common headache, usually caused by the old mortar or adhesive giving up the ghost. Your goal is simply to get it back in its proper spot and secure it.
What You'll Need:
- A flat trowel or a small pry bar
- Roofing adhesive or tile-specific mortar in a caulk gun
- A stiff brush to clean away debris
- Safety gloves and eyewear
First, you need to gently lift the overlapping tile just above the one that slipped. Use your pry bar with a delicate touch to create just enough room to maneuver. Once you have access, give the area a good cleaning. Brush away all the old, loose mortar and any debris from both the underside of the tile and the roof deck where it sits.
Next, apply a generous, S-shaped bead of roofing adhesive to the spot where the tile belongs. Carefully slide the tile back up into position, making sure it interlocks correctly with the surrounding tiles. Press down firmly to create a good, solid bond. That adhesive is now the new anchor, locking it in place.
Replacing a Single Cracked Tile
Swapping out a broken tile is a bit more involved, but it’s still a job you can tackle. The real trick here is to work slowly and deliberately to avoid causing a domino effect of cracked neighbors.
- Get the Broken Tile Out: First, carefully lift the overlapping tile just enough to work. Then, using a hammer, gently tap the center of the broken tile to break it into smaller pieces. This relieves the pressure and makes it much easier to pull out the fragments without disturbing the good tiles around it. Use a pry bar to clean out any stubborn pieces and old nails.
- Prep the Area: Clean the empty space thoroughly. You want to remove any old nail remnants, dust, and loose debris from the underlayment. A clean surface is key.
- Set the New Tile: Slide your replacement tile into the gap. Make sure its top edge tucks neatly under the tile above it and that it interlocks properly on the sides. It should sit perfectly flush and level with its neighbors.
- Secure It: Here’s a pro tip: instead of trying to nail the new tile down and risk puncturing your underlayment, apply a dab of roofing adhesive to the underside of the overlapping tile's nose. When you lower it back down, it will pin the top of the new tile in place, no nails required.
Remember, even in South Florida's warm climate, tiles can get brittle with age and temperature swings. This is especially true on cooler mornings when thermal shock makes them more likely to crack under pressure. Always handle old tiles with care to avoid turning one small repair into three.
The global market for roof restoration services is growing for a reason: proactive maintenance is far more cost-effective than a full-blown replacement. Focusing on cleaning and repairing individual tiles can extend a roof's lifespan by years, saving homeowners a fortune. You can learn more about this trend in the global roof restoration services report on archivemarketresearch.com.
The Red Flag Checklist: When You Absolutely Must Call a Professional
Knowing your limits is a sign of wisdom, not weakness. A DIY repair is a great idea only when the problem is small and isolated. Trying to tackle widespread or deep-rooted issues on your own is not just risky for your roof—it’s downright dangerous for you.
If you spot any of these "red flags" during your inspection, put down your tools, get off the roof, and call a licensed roofing professional immediately.
Call a Pro If You See:
- Widespread Damage: If you're counting more than 3-5 broken or slipped tiles in one section or scattered all over, it’s a symptom of a much bigger problem.
- A Sagging Roof Deck: Do you see any noticeable dip, bow, or "soft spot" in the roofline? This is a structural emergency. It's a huge red flag that the underlying wood decking is likely rotted and compromised.
- Major Leaks: If water is actively dripping into your attic or you have spreading water stains on your ceilings, the problem is already past the tiles and has breached your underlayment. A pro is needed to trace the leak to its source and figure out the full extent of the damage.
- Damaged Flashing: The metal strips around chimneys, vents, and in roof valleys are your roof's most important defenders. If they look rusted, are pulling away from the roof, or have obvious gaps, they need professional repair to prevent a massive water intrusion.
- Exposed Underlayment: If you can see the black paper or membrane beneath because a whole section of tiles is missing, your roof is critically exposed. This is an urgent issue that needs an expert, fast.
Think of it like this: fixing a single tile is like changing a lightbulb. But if half the lights in your house are flickering, you've got a systemic electrical issue that demands an electrician. Your roof works the same way. The most important skill in successful tile roof maintenance is knowing the difference between a simple fix and a symptom of a larger illness.
Maintaining Your Gutters and Flashing
A tile roof is more than just a collection of tiles—it's a complete system designed to manage water. While the tiles are the main line of defense, the gutters and metal flashing are the unsung heroes that channel water safely away from your home's foundation and structure. If you ignore them, you're asking for serious, expensive trouble.
Effective tile roof maintenance isn't just about the tiles themselves; it's about making sure these supporting players are doing their jobs. When gutters get clogged or flashing fails, water gets trapped. It has nowhere to go but backward and underneath your tiles, leading to wood rot in the roof deck, a compromised underlayment, and eventually, a leak in your living room.
Keeping Gutters Clean and Free-Flowing
Your gutters have one simple but crucial job: catch every drop of rainwater and guide it to the downspouts. But when they're choked with leaves, pine needles, and other gunk, they can't do it. Water pools along the edge of your roof, turning into a stagnant, heavy mess.
This standing water is a menace. It can:
- Soak the fascia board (the wood trim your gutters are attached to), causing it to rot and weaken.
- Become so heavy that it pulls the gutters right off the house.
- Most critically, it allows water to wick its way up and under the first row of tiles, getting to the underlayment it was supposed to protect.
You absolutely have to clean your gutters at least twice a year, usually once in the late spring and again in the late fall after the trees have shed their leaves. Here in South Florida, if your home is surrounded by lush trees, you might even need to do it quarterly. Just scoop out the debris (wear gloves!) and give the gutters and downspouts a good rinse with a garden hose to make sure they’re clear.
A rookie mistake I see all the time is people only cleaning the horizontal gutter runs. You have to check the downspouts. A clogged downspout backs up the entire system, making your cleaning efforts pointless.
Inspecting and Resealing Your Flashing
Flashing is the thin sheet metal that protects the most vulnerable spots on your roof—anywhere a surface meets the roof, like around a chimney, a dormer wall, or a vent pipe. It's also in the "valleys" where two different roof planes meet. Its purpose is to create a waterproof barrier in these seams.
But over time, both the metal and the sealant that holds it in place can break down. When you’re doing your routine checks, you need to look closely at all the flashing. Keep an eye out for:
- Rust or Corrosion: Any rust is a red flag. It means the protective coating is gone, and the metal is weakening.
- Gaps or Lifting: See if the flashing is pulling away from the wall or the roof deck. Even a small gap is a welcome mat for water.
- Deteriorated Sealant: The caulk used along the edges of the flashing gets baked by the sun. It will eventually dry out, crack, and peel away.
A tiny gap in the flashing can turn into a major leak during one of our classic Florida downpours.
The good news is that if you find small areas of cracked or missing sealant, it's a very manageable DIY fix. After cleaning the old, failed sealant and debris out of the joint, just apply a fresh bead of a high-quality, weatherproof roofing sealant with a caulk gun. Make sure you get a product made for outdoor use that stays flexible after it cures; this allows it to expand and contract with the temperature changes without cracking.
This simple bit of proactive maintenance is one of the most effective things you can do. By sealing those small gaps, you’re shoring up your roof’s weakest points and stopping a leak before it ever gets a chance to start. It’s that kind of hands-on care that preserves the integrity of your whole roof.
Common Questions About Tile Roof Care
After covering the basics of inspection, cleaning, and repairs, a lot of homeowners still have questions about what it’s really like to live with a tile roof. Getting a handle on these details is a huge part of good tile roof maintenance. Let’s go through some of the most common questions we get from property owners, with practical answers to help you feel confident about your roof.
Knowing what's what turns you from a worried homeowner into someone who can proactively care for their property. From whether you can walk on your tiles to what those weird white stains are, we'll clear things up.
Can I Walk on My Tile Roof?
The short answer? It's a really bad idea. Clay and concrete tiles, especially older ones, can be deceptively brittle.
I can't tell you how many times we've traced a mystery leak back to a single cracked tile caused by a misplaced footstep. You might not even hear the crack, but months later, water finds its way in. It’s one of the most common, and avoidable, causes of damage we see.
Professionals who work on tile roofs are trained to walk on very specific spots—usually the bottom third of the tile, where it overlaps the one below it. This is the strongest point. They also know how to distribute their weight to minimize stress. For the average homeowner, the risk of causing hundreds or thousands of dollars in damage just isn't worth it.
Our professional rule of thumb: If a task requires getting up on your tile roof, it's a job for a pro. Stay on the ladder or use a good pair of binoculars for your inspections.
How Long Should a Tile Roof Realistically Last?
A well-maintained tile roof has an incredible lifespan, which is a big reason people choose them in the first place. You’re making a long-term investment in your property.
Here's what you can generally expect:
- Concrete Tiles: A realistic lifespan is 40 to 50 years.
- Clay Tiles: These are the real marathon runners, often lasting 50 to 100 years or even more.
But here’s the critical part most people miss: those numbers depend entirely on two things—a quality installation and consistent maintenance. The tiles themselves might outlive you, but the underlayment won't. The underlayment is the waterproof barrier under the tiles, and it typically only lasts 20 to 30 years. Keeping your tiles in perfect condition is what protects that vital layer and allows your entire roof system to last as long as it should.
What Effect Does Weather Have on Tiles?
Even here in South Florida, where we don't have to worry about the freeze-thaw cycles that destroy roofs up north, our weather still puts tiles to the test. Our intense sun followed by sudden downpours creates its own set of challenges.
Tiles expand just a little in the blazing heat and shrink when they cool down at night or during a rainstorm. This constant, tiny movement is called thermal shock. Over decades, this process can put stress on the tiles and any mortar holding them, sometimes leading to hairline cracks.
On top of that, our humid, wetter seasons mean that tiles can stay damp for long stretches. This slows down evaporation and creates a perfect breeding ground for algae and mildew, which holds even more moisture against the roof and puts long-term stress on that all-important underlayment. Regular cleaning and making sure your roof drains properly are key to fighting back against these effects.
What Are Those White Stains on My Concrete Tiles?
If you have concrete tiles and see a chalky white film appearing, don't panic. You're almost certainly looking at efflorescence.
This is a completely natural and generally harmless process. It happens when mineral salts inside the concrete are drawn to the surface by moisture. When the water evaporates, it leaves these salt deposits behind. While it might not look great, it’s just a cosmetic issue and doesn't mean your tiles are failing. In almost every case, normal weathering and rainfall will wash it away over time. We almost never recommend aggressive cleaning to remove it.
How Do I Know If My Tiles Need Resealing?
We get this question a lot. Homeowners hear about sealants and wonder if it's something they should be doing. While a sealant can add a layer of protection against moisture and algae, it’s not always necessary and needs to be approached with caution.
When you might consider sealing:
- Older, Porous Tiles: If your tiles are decades old and seem to soak up water like a sponge, staying dark for a long time after rain.
- Chronic Algae Growth: If you’re having to clean algae and moss off far too often, a sealant can help.
- For a Color Refresh: Certain coatings are designed to bring back the original, vibrant color of faded tiles.
Before you ever have a sealant applied, you need a professional opinion. Using the wrong product is a disaster waiting to happen. Some sealants can trap moisture inside the tile, causing it to degrade from the inside out—a much bigger problem than what you started with. An expert can tell you if a high-quality, breathable sealant is a smart move for your specific roof.
Feeling uncertain about a cracked tile or a stubborn leak? Don't leave your biggest investment to chance. The certified professionals at Paletz Roofing and Inspections have over 30 years of experience keeping South Florida homes safe and dry. We handle everything from minor repairs to full-scale replacements with the expertise you can trust. Protect your home and get peace of mind by scheduling your free, no-obligation inspection today.