
Even the most durable concrete tile roofs need attention now and then. While they're built tough and can easily last for 50 years or more, they aren't completely immune to the forces of nature, falling tree limbs, or just the slow march of time. A small repair now can prevent a massive headache later.
Why Your Concrete Tile Roof Needs Repair
Concrete tiles are a fantastic choice for homeowners, and for good reason—they offer incredible longevity and resilience. When installed correctly, they provide decades of solid protection. But that impressive lifespan doesn't mean you can just set it and forget it. Knowing what causes them to break down is the first step toward keeping your roof in top shape.
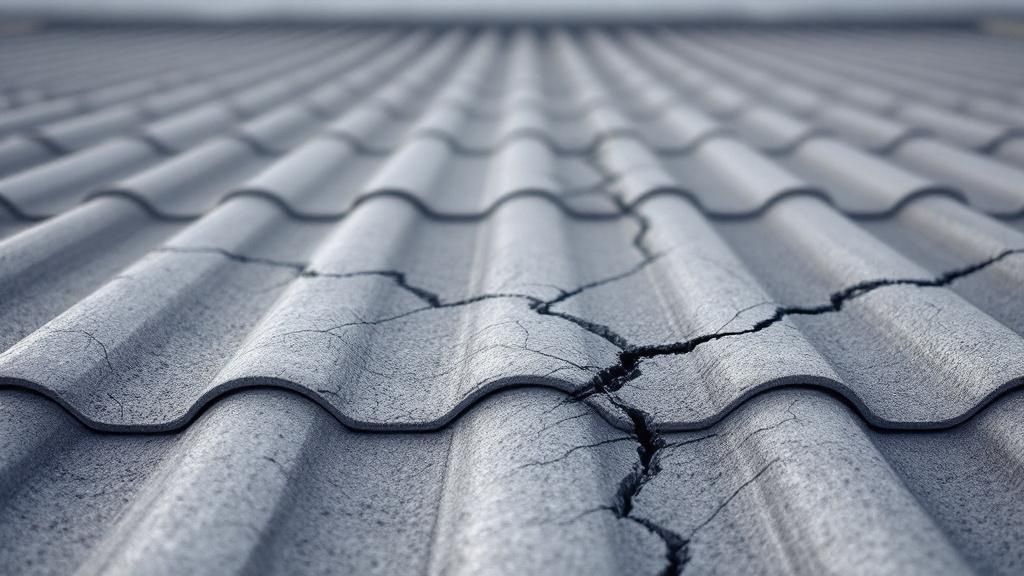
The very elements your roof is designed to block are its biggest enemies. Years of relentless sun can weaken the tile's surface, while driving rain can find its way into tiny, unseen cracks. A severe hailstorm is a more obvious culprit, capable of fracturing tiles on impact. And you can't forget high winds, which can lift tiles just enough to break the interlocking seal that keeps your home dry.
Common Culprits Behind Tile Damage
It’s not always a dramatic storm that causes problems. Sometimes, the damage is subtle and builds up over many years.
- Foot Traffic: This is a big one. Walking on a concrete tile roof incorrectly is a surefire way to cause cracks. Stepping right in the middle of a tile’s curve puts pressure where there’s no support, and snap—you’ve got a problem.
- Debris Buildup: Piles of leaves and twigs, especially in the valleys of your roof, are moisture traps. This constant dampness can wear down the tiles and encourage moss or algae growth, which holds even more water.
- Aging Underlayment: What’s underneath the tiles is just as important. The waterproof underlayment is a critical barrier, but after 20-30 years, it can become brittle and fail. Your tiles might look perfect, but a failed underlayment can lead to sneaky leaks.
- Thermal Expansion: Like any material, concrete expands and contracts with temperature changes. Over countless seasons of heating up and cooling down, this constant movement can create tiny stress fractures in the tiles.
Before we go on, it's helpful to have a quick-reference guide for diagnosing these common issues. This table summarizes the most frequent problems I see in the field.
Quick Guide to Common Concrete Tile Roof Problems
| Problem | Common Causes | Recommended First Step |
|---|---|---|
| Cracked or Broken Tiles | Foot traffic, hail, falling debris | Isolate the area and replace the individual tile. |
| Slipped Tiles | High winds, fastener failure, improper installation | Carefully reposition the tile and secure it with adhesive. |
| Moss or Algae Growth | Debris buildup, high humidity, lack of sunlight | Gently clean the area with a roof-safe solution. |
| Leaks with No Visible Damage | Failed underlayment, cracked flashing | Schedule a professional inspection to check beneath the tiles. |
This table should give you a good starting point, but remember that a proactive approach is always best.
A single cracked tile is a simple fix today. But if you ignore it, you’re inviting water to seep under the tiles and saturate the underlayment. That can lead to widespread damage, mold, and even structural repairs that are far more expensive.
The popularity of this roofing material isn't slowing down. The global market for concrete roof tiles was valued at around USD 5.2 billion and is projected to hit about USD 8.1 billion by 2033. This growth shows just how many homeowners are making this significant investment, and why upkeep is so important. You can dig into more concrete roof tile market trends on verifiedmarketreports.com.
Catching these problems early means you can perform a targeted repair on your concrete tile roof instead of staring down the barrel of a full-blown replacement. That saves you a whole lot of time, money, and stress.
Before you even think about grabbing tools to repair your concrete tile roof, you have to know exactly what you’re up against. A thorough—and more importantly, safe—assessment is the first real step of any successful repair. I’ve seen homeowners rush this part and either miss critical damage or, even worse, create new problems by walking on the roof incorrectly.
Your inspection should always start from the safest place possible: the ground. A good pair of binoculars will be your best friend here. From a distance, you can often spot the most common and glaring issues without ever having to set foot on a ladder.
Methodically scan your entire roof, section by section. You’re looking for a few key things:
- Missing or Displaced Tiles: These are usually the easiest to spot. They’re a dead giveaway of wind damage or failed fasteners.
- Obvious Cracks: Look for large, visible fractures in the tiles. This is common after a hailstorm or if a heavy branch came down.
- Color Discrepancies: Is one tile much darker or lighter than the ones around it? That could signal a tile holding moisture or a poorly matched replacement from a past job.
This ground-level check gives you a solid starting point. If you only spot one or two minor issues and you’re comfortable with heights, you might decide to go up for a closer look. However, if you see widespread problems, this is usually the moment to put the ladder away and call a professional.
Preparing for an On-Roof Inspection
If you do decide to get on the roof, safety can’t be an afterthought. Never, ever attempt an on-roof inspection if it’s wet, icy, or windy. Wait for a dry, calm day—it's non-negotiable.
Your ladder placement is just as critical. Make sure it’s on stable, level ground and extends at least three feet above the roofline. This gives you a secure handhold when getting on and off. Always follow the 4-to-1 rule: for every four feet of height you climb, the base of the ladder needs to be one foot away from the wall.
Expert Tip: You can’t just walk anywhere on a concrete tile roof. The center of the tile—the high point of the curve—is its weakest spot and will almost certainly crack under your weight. You must step on the bottom third of the tile, where it overlaps the one below it. This is the only area directly supported by the wooden battens underneath.
Your Detailed Roof Inspection Checklist
Once you’re safely on the roof, it’s time to get down to business. Move slowly and deliberately. Your goal here is to document the damage, not add to it.
- Tile Integrity: In the problem area, gently check individual tiles. Look for hairline cracks you couldn't see from the ground. Take note of any tiles that feel loose or shift even with minimal pressure.
- Underlayment Check: If you find a missing or shattered tile, carefully inspect the exposed underlayment beneath it. Is it brittle, torn, or does it look saturated with water? A compromised underlayment is a serious problem that goes way beyond a simple tile replacement.
- Flashing and Penetrations: Pay close attention to the metal flashing around chimneys, vents, and skylights, as these are common failure points. Look for gaps, rust, or sealant that has dried out, cracked, and is pulling away from the surface.
- Debris in Valleys: Don't forget to check the valleys where two roof planes meet. An accumulation of leaves, pine needles, and other gunk can trap moisture against the tiles and underlayment, causing them to rot and decay much faster.
This isn’t just a quick glance; it's a crucial diagnostic step. The information you gather here will guide every decision you make next, from the materials you’ll need to the repair techniques you’ll use. The growing emphasis on proper roof maintenance reflects its importance, with the roof maintenance and repair sector now a USD 16.74 billion industry that's projected to grow. This trend really highlights how much homeowners are focusing on sustainable and safe roofing practices. You can read more about the growth of the roof maintenance market on wiseguyreports.com.
By taking the time to assess the damage correctly, you’re not just getting ready to repair your concrete tile roof—you’re making sure the repair you do is the right one and will actually last.
Gathering the Right Tools and Materials
Trying to fix a concrete tile roof without having everything you need on hand first is a recipe for disaster. It’s like trying to cook a gourmet meal without the right ingredients—you’ll get frustrated, and the results will be a mess. Before you even think about setting foot on a ladder, you need to assemble a specific set of tools and materials.
Walking into a repair unprepared is the fastest way to waste a whole afternoon and, worse, compromise the quality and safety of your work. Let’s go over exactly what you’ll need to pull this off smoothly and successfully.
Your Essential Safety Gear
Safety is the one area where you simply can't cut corners. Working on a roof is dangerous business, and the right gear is your first and best defense against a serious injury.
- Safety Harness and Rope: This is absolutely non-negotiable. Even on a roof with a gentle slope, a harness tied off to a secure anchor point can prevent a life-altering fall.
- High-Grip Footwear: You need soft-soled, high-traction boots or shoes. The goal is to grip the tile surface firmly without cracking it. Heavy, hard-soled work boots are a definite no-go.
- Durable Gloves: A solid pair of work gloves will save your hands from sharp tile edges, rough concrete, and all the sticky roofing adhesives you'll be handling.
The Right Tools for the Job
With your safety locked down, you'll need a few specific tools to get the broken tiles out and the new ones in. Thankfully, most of this stuff is easy to find at any local hardware store.
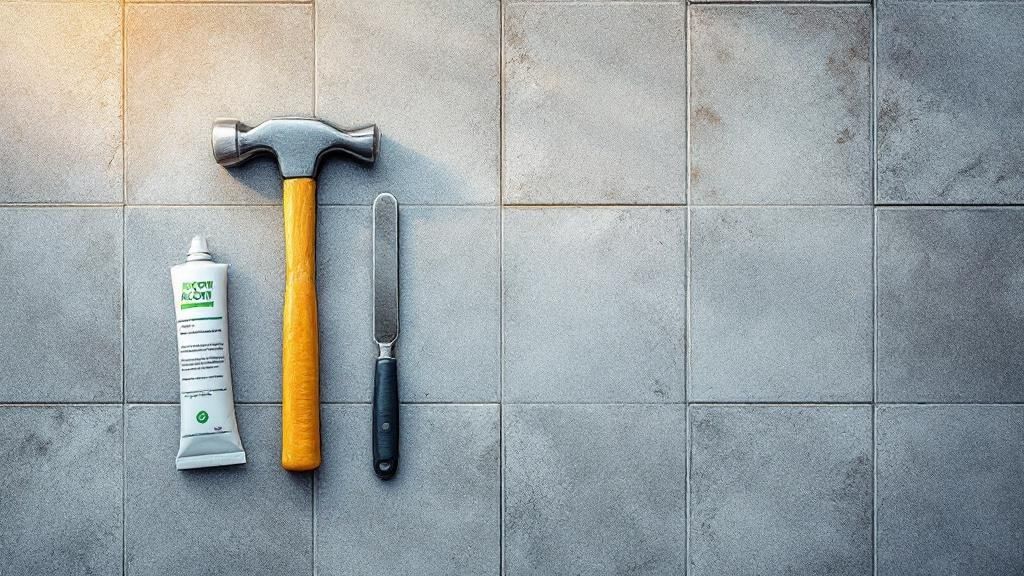
You'll absolutely need a small, flat pry bar or, even better, a roofer’s slate ripper to gently lift the tiles surrounding the one you're replacing. You'll also want a hammer for carefully tapping out broken pieces and a sturdy trowel for applying roofing cement. A good caulk gun is also a must for applying sealant exactly where it needs to be.
I’ve seen homeowners try to make do with a big, clunky crowbar, only to crack two or three neighboring tiles in the process. A dedicated, thin pry bar gives you the control you need to work in those tight spots without causing expensive collateral damage.
Sourcing Your Replacement Materials
Honestly, this can be the trickiest part of the whole job. Finding a perfect tile match and using the right adhesives is what makes the difference between a lasting, invisible repair and one that fails in a year and sticks out like a sore thumb.
Matching the Concrete Tile
Getting an exact match for your existing tiles is critical, not just for looks but for function. If the new tile doesn't interlock perfectly, you’re creating a new weak spot for water to get in. And frankly, a mismatched patch looks awful.
My Pro Tip: A photo won't cut it. Carefully remove a large, intact piece of a broken tile and take it with you to a dedicated roofing supply house—not a big-box store. The experts there have seen it all and can identify the specific profile, color, and manufacturer to get you a perfect match. Profiles can be flat, low, or high "S" tiles, and even a tiny variation will cause problems.
Choosing the Right Adhesives
The glue you use is just as important as the tile itself. I've seen too many repairs fail within a single season because the wrong product was used.
- Roofing Cement/Adhesive: You need a high-quality, polyurethane-based roofing adhesive made specifically for tile. This is the stuff that will actually hold the new tile down.
- Sealant: A flexible, UV-resistant sealant is what you'll use for any small hairline cracks or for sealing around the edges of your new tile to add another layer of water protection.
- Underlayment Patch: It's always smart to have a small piece of self-adhering underlayment patch material on hand. If you pull up the broken tile and find a small tear in the underlayment, this stuff provides an instant waterproof seal before you lay the new tile.
Always think about your local climate when you're buying these. If you're in a hot, sunny place like South Florida, get products with the highest UV resistance. If you get a lot of rain, superior waterproofing is your top priority. By getting all this stuff together before you start, you're setting yourself up for an efficient, professional-grade repair on your concrete tile roof.
Replacing Broken Concrete Roof Tiles
Now we’re getting to the heart of the matter. You've assessed the damage and have your tools ready, so it’s time to actually replace that tile. This part is all about precision and patience. Trust me, rushing this is the fastest way to cause more damage, turning a simple one-tile fix into a multi-tile headache. We’ll walk through this methodically, focusing on the techniques that protect the rest of your roof and guarantee a watertight seal.
The popularity of concrete tiles isn't just a local trend; they represent nearly 47% of the global roofing tile market. Here in North America, especially in places like Canada, demand is growing at about 7% annually thanks to new construction and the push for energy-efficient homes. This widespread use just goes to show how many homeowners will eventually face this exact repair task. Keeping your investment secure means knowing how to handle these small fixes. You can find more details on the growing global demand for concrete tiles on mordorintelligence.com.
This process can feel intimidating, but it really boils down to three key stages.

As the visual shows, a successful repair always comes down to careful removal, prepping the area correctly, and a meticulous installation.
Carefully Removing the Damaged Tile
Your first move is getting the broken tile out without disturbing its neighbors. Since concrete tiles interlock, you can't just yank one out. The trick is to create a little bit of wiggle room.
Start by gently lifting the overlapping tiles in the row directly above the broken one. A thin pry bar is perfect for this. Once they're lifted, slide a couple of small wooden wedges underneath to hold them up by about half an inch. This takes the pressure off the broken tile below, making it much easier to work with.
With the pressure off, you can now deal with the broken tile itself. Use your hammer to carefully tap and break it into smaller, more manageable pieces you can pull out by hand. Be gentle here. Aggressive hammering can send vibrations through the roof deck and crack other tiles. Definitely have your gloves and safety glasses on, as small, sharp fragments will almost certainly fly out.
Preparing the Exposed Underlayment
Once all the broken pieces are gone, you'll see an exposed patch of underlayment. This is a critical checkpoint. Do not skip this inspection. Look for any tears, punctures, or signs of water staining on the felt or synthetic barrier.
If the underlayment is damaged, you absolutely must patch it before moving on. A small tear is an easy fix with a piece of self-adhering underlayment patch material. Just cut a piece that extends at least two inches beyond the damaged area on all sides, peel off the backing, and press it down firmly. This quick step is essential for maintaining your roof's secondary water barrier.
A new tile on top of torn underlayment is a false sense of security. The tile is the primary shield, but the underlayment is the fail-safe. If you neglect it, you're setting yourself up for the very leak you're trying to prevent.
Now is also the time to clean everything up. Use a brush to sweep away any lingering dust, grit, or concrete fragments. You need a clean, stable surface to make sure the new tile seats correctly and the adhesive can form a strong bond.
Repair Technique Comparison Cracked vs Slipped Tiles
While we're focused on a broken tile, it's helpful to see how this repair differs from another common issue: a slipped tile. The approach is quite different, as one requires removal and replacement while the other often just needs repositioning and securing.
| Repair Aspect | Fixing a Cracked Tile | Fixing a Slipped Tile |
|---|---|---|
| Primary Goal | Remove damaged material and install a new, intact tile. | Reposition the existing tile and secure it in place. |
| Removal Process | Tile is broken into pieces for removal. | Tile is carefully lifted and slid out whole, if possible. |
| Tools Needed | Hammer, pry bar, trowel, safety gear. | Pry bar, trowel (for adhesive). Hammer is not needed. |
| Use of Adhesive | Applied to the back of the new tile. | Applied under the existing tile to re-secure it. |
| Underlayment Check | Essential, as cracks can lead to hidden water damage. | Still important, but less likely to be damaged. |
| Material Cost | Requires purchasing a replacement tile. | No new tile needed, just adhesive. |
Understanding these distinctions helps you diagnose problems correctly and apply the right fix, saving you time and preventing future issues.
Installing and Securing the New Tile
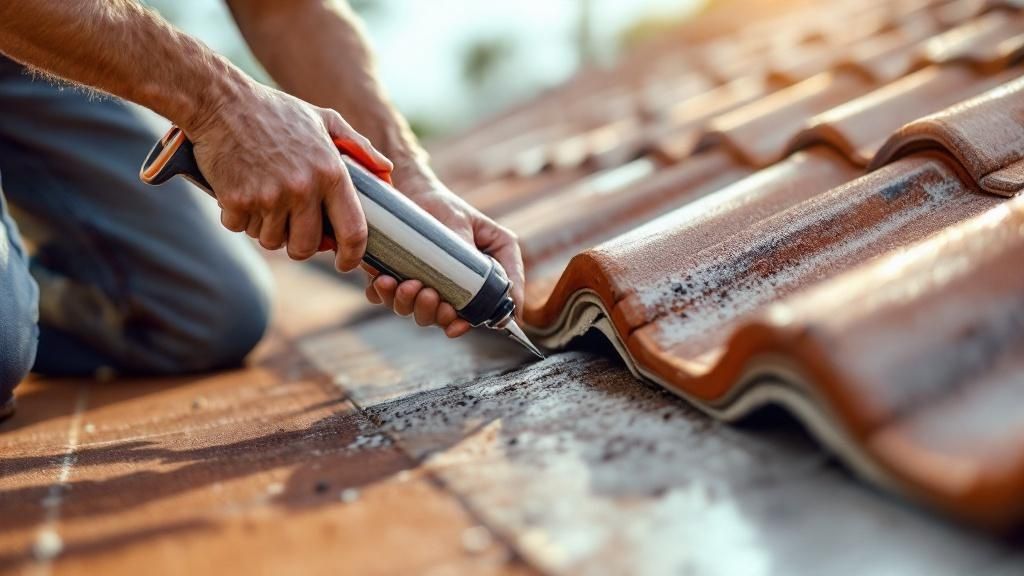
With the area prepped, you're finally ready to install the replacement. Use your trowel to apply a generous S-shaped bead of polyurethane roofing adhesive to the back of the new tile. This pattern gives you excellent coverage and holding power once it cures.
Carefully slide the new tile up into position. Make sure its bottom edge interlocks correctly with the course of tiles below it. The tile should sit flush and feel snug, not wobbly, and it must align perfectly with the others in its row. A tile that's even slightly off-kilter will not only look wrong but will disrupt the flow of water, potentially creating a dam.
Once the tile is perfectly positioned, gently remove the wooden wedges from the row above. This will allow those tiles to settle back down over the top edge of your new tile, creating the primary weatherproof seal.
For an extra layer of security, especially in high-wind areas like we have in South Florida, you can apply a small dab of roofing cement to the underside of the overlapping tiles where they touch your new tile. This helps secure them against wind uplift. Lastly, clean up any excess adhesive with a rag and some mineral spirits before it has a chance to cure.
Of course, here is the rewritten section.
Fixing Leaks and Sealing Hairline Cracks
Not every problem you spot during a roof walk-through calls for a full tile replacement. More often than not, the issues are subtler—but no less critical. Fine hairline cracks and those mysterious leaks that appear without a single broken tile in sight are two of the most common headaches you'll face with a concrete tile roof.
Getting these repairs right is non-negotiable. A tiny hairline crack can easily widen over a few seasons of Florida heat, eventually turning into a major fracture. And that small, untraceable leak? It's a ticking time bomb, slowly rotting your roof's sheathing and creating a mess in your attic. Let's walk through how to become a better leak detective and crack sealer.
How to Seal Hairline Cracks
Spotting a hairline crack on a concrete tile can feel like a small victory. It’s usually a problem you can fix yourself without needing to swap out the entire tile. However, the repair has to be done right to create a permanent, waterproof bond that can actually stand up to the elements.
The secret to a lasting fix comes down to two things: the right sealant and proper prep work.
- Clean the Surface Thoroughly: First things first, you have to get the area around the crack perfectly clean. Grab a stiff-bristled brush (not a wire one—that’s too aggressive and can scratch the tile) and scrub away all the dust, moss, and any loose bits of concrete. If it’s grimy, a little mild detergent and water will do the trick. Just make sure the tile is bone dry before you move on.
- Pick the Right Sealant: This is no time for generic caulk. You need a high-grade, polyurethane-based exterior sealant. These products are specifically designed to stay flexible after they cure, which is essential for allowing the tile to expand and contract with temperature changes. They also offer top-notch UV resistance, a must-have here in South Florida.
- Master Your Application: Using a caulk gun, apply a very fine, steady bead of sealant directly into the crack. The goal here is to fill the void completely, not to smear a thick layer of sealant all over the tile’s face. As soon as you’ve applied the bead, use a small putty knife or even a gloved fingertip to gently tool the sealant, pressing it firmly into the crack and smoothing the surface to be flush with the tile.
Wipe away any excess sealant right away. A clean, precise application will be practically invisible from the ground and give you a durable, long-lasting repair.
A common mistake I see is people grabbing a rigid silicone caulk meant for a bathroom. It will crack and peel away within a year under the sun's harsh rays, leaving you right back where you started. Always invest in a quality polyurethane product.
Tracing Leaks Without an Obvious Source
This is one of the most frustrating things to deal with as a homeowner. You’ve got a water stain spreading on your ceiling, but when you go look at the roof right above it, the tiles look perfectly fine. So, what gives?
More often than not, the real culprit isn't a failure of the tiles themselves, but a breach in the roof's secondary lines of defense.
- Failed Underlayment: Your tile is the armor, but the underlayment is the waterproof shield sitting just beneath it. If this material gets old, brittle, or torn, water can slip right through, even if your tiles are in perfect condition.
- Compromised Flashing: The metal strips around chimneys, vents, and skylights are notorious leak magnets. Over time, the sealant used to waterproof these joints can dry out, crack, and pull away, creating a direct highway for rainwater.
The best way to play detective is to head into your attic on a rainy day. Armed with a good flashlight, you can often trace the path of dripping water right back to its entry point. Look for damp spots on the roof sheathing, dark water trails running down the rafters, or wetness around any pipes or vents. Remember, water can travel a good distance along a rafter before it finally drips, so the stain on your ceiling might be several feet away from the actual roof breach.
Once you’ve pinpointed the general area from inside, you can go inspect the corresponding section on the roof's exterior. Focus your attention on flashing and any roof penetrations. Often, the fix is as simple as scraping away the old, failed sealant and applying a fresh, thick bead of high-quality roofing cement to reinforce these vulnerable spots. This proactive strategy solves a huge number of mystery leaks and is a crucial part of any comprehensive concrete tile roof repair.
Knowing When to Call a Roofing Professional
While this guide gives you the confidence to tackle common concrete tile roof issues, the smartest part of any DIY project is recognizing your limits. Trying a repair that’s beyond your skill level or comfort zone can quickly turn a small, fixable problem into a full-blown, costly disaster. Honestly, knowing when to put the tools down and pick up the phone is just as critical as knowing how to replace a tile in the first place.
A successful DIY repair on a concrete tile roof is usually small and contained. Swapping out one or two cracked tiles? That’s often a manageable weekend project. But if your inspection uncovers widespread damage across different sections of your roof, that’s a clear sign you need backup. It usually points to a bigger, systemic issue—like damage from a serious hailstorm or just the advanced age of the materials—that demands a professional eye and a comprehensive solution.
Red Flags That Demand a Professional
Some situations are just non-negotiable. Trying to tackle these yourself isn't just risky; it can be downright dangerous and might even void your material warranties.
- Significant Underlayment Damage: You pop off a tile and see large rips, brittle sections, or widespread dampness in the underlayment. This is no longer a simple tile swap. Replacing underlayment is an extensive job that involves removing large sections of tile, and it has to be done perfectly to prevent future leaks.
- Signs of Structural Sagging: If you notice any dip, bow, or sag in your roofline, it's a major structural red flag. This isn't a roofing issue; it's a problem with the underlying roof deck or rafters that needs immediate assessment by a professional. Don't wait on this one.
- Multiple, Persistent Leaks: One leak is a problem. Leaks popping up in several different rooms? That’s a strong signal your entire roofing system is failing. A pro can perform a thorough water test to trace every single point of entry and figure out the real source of the failure.
Hiring a qualified professional isn't admitting defeat; it’s a smart investment in your home's future. A licensed roofer brings the right safety gear, years of on-the-job experience, and the proper insurance to handle complex jobs safely and correctly.
Vetting Your Roofing Contractor
Once you’ve decided to call in a pro, choosing the right one is absolutely essential. Don’t just hire the first company that comes up in a search. You need to look for established, local companies with a solid reputation in South Florida, like us here at Paletz Roofing and Inspections.
When you start talking to a contractor, always ask for proof of their license and insurance—this is non-negotiable. Check their online reviews and ask for a few local references from recent jobs. A reputable roofer will have this information ready and will be happy to share it.
Finally, when you get a quote, make sure it’s a detailed, itemized document, not just a single number scribbled on a notepad. You should know exactly what materials are being used and what the labor costs are. This protects you and ensures everyone is on the same page.
Of course. Here is the rewritten section, formatted to match the provided human-written examples.
Got Questions About Your Roof Repair?
Even after going through the steps, you probably still have a few questions buzzing around. It's only natural. Here are some quick, no-nonsense answers to the most common things we hear from homeowners dealing with concrete tile roof repairs.
Can I Walk on My Concrete Tile Roof?
Technically, yes, but I strongly advise against it unless you have the right experience and safety gear. It's incredibly risky. If you absolutely have to get up there, only step on the bottom third of the tiles—the "headlap" where they overlap the tile below. That’s the strongest point because it's supported by both the underlying batten and the tile beneath it.
Never, ever step on the high part of a tile's curve or hop from one tile to the next. That’s the weakest spot and a surefire way to hear a crack, turning a simple look-see into a whole new repair job.
How Long Will a Concrete Tile Roof Repair Last?
A professionally done repair, using top-shelf materials, should last for many years—often for the rest of the roof's life. The two things that make or break a repair are using the right polyurethane-based adhesive and making sure the new tile is seated perfectly. A solid repair creates a bond that’s just as tough, if not tougher, than the original installation.
Is It Cheaper to Fix the Roof Myself?
For a tiny, isolated job, like swapping out one or two broken tiles, you can definitely save a few hundred bucks on labor. That's assuming you already own a good, sturdy ladder and the basic tools.
But the moment you need to buy specialized safety equipment like a harness, or if you find the damage is more widespread, those savings start to disappear. You have to weigh the money saved against the very real risks of working at heights. Your safety is always worth more than a professional service call.
When a repair starts to feel too big or the risks seem too high, don't second-guess it—call in the professionals. For dependable, expert concrete tile roof repairs in South Florida, you can trust the licensed and insured team at Paletz Roofing and Inspections. Contact us today for a free, no-obligation quote.