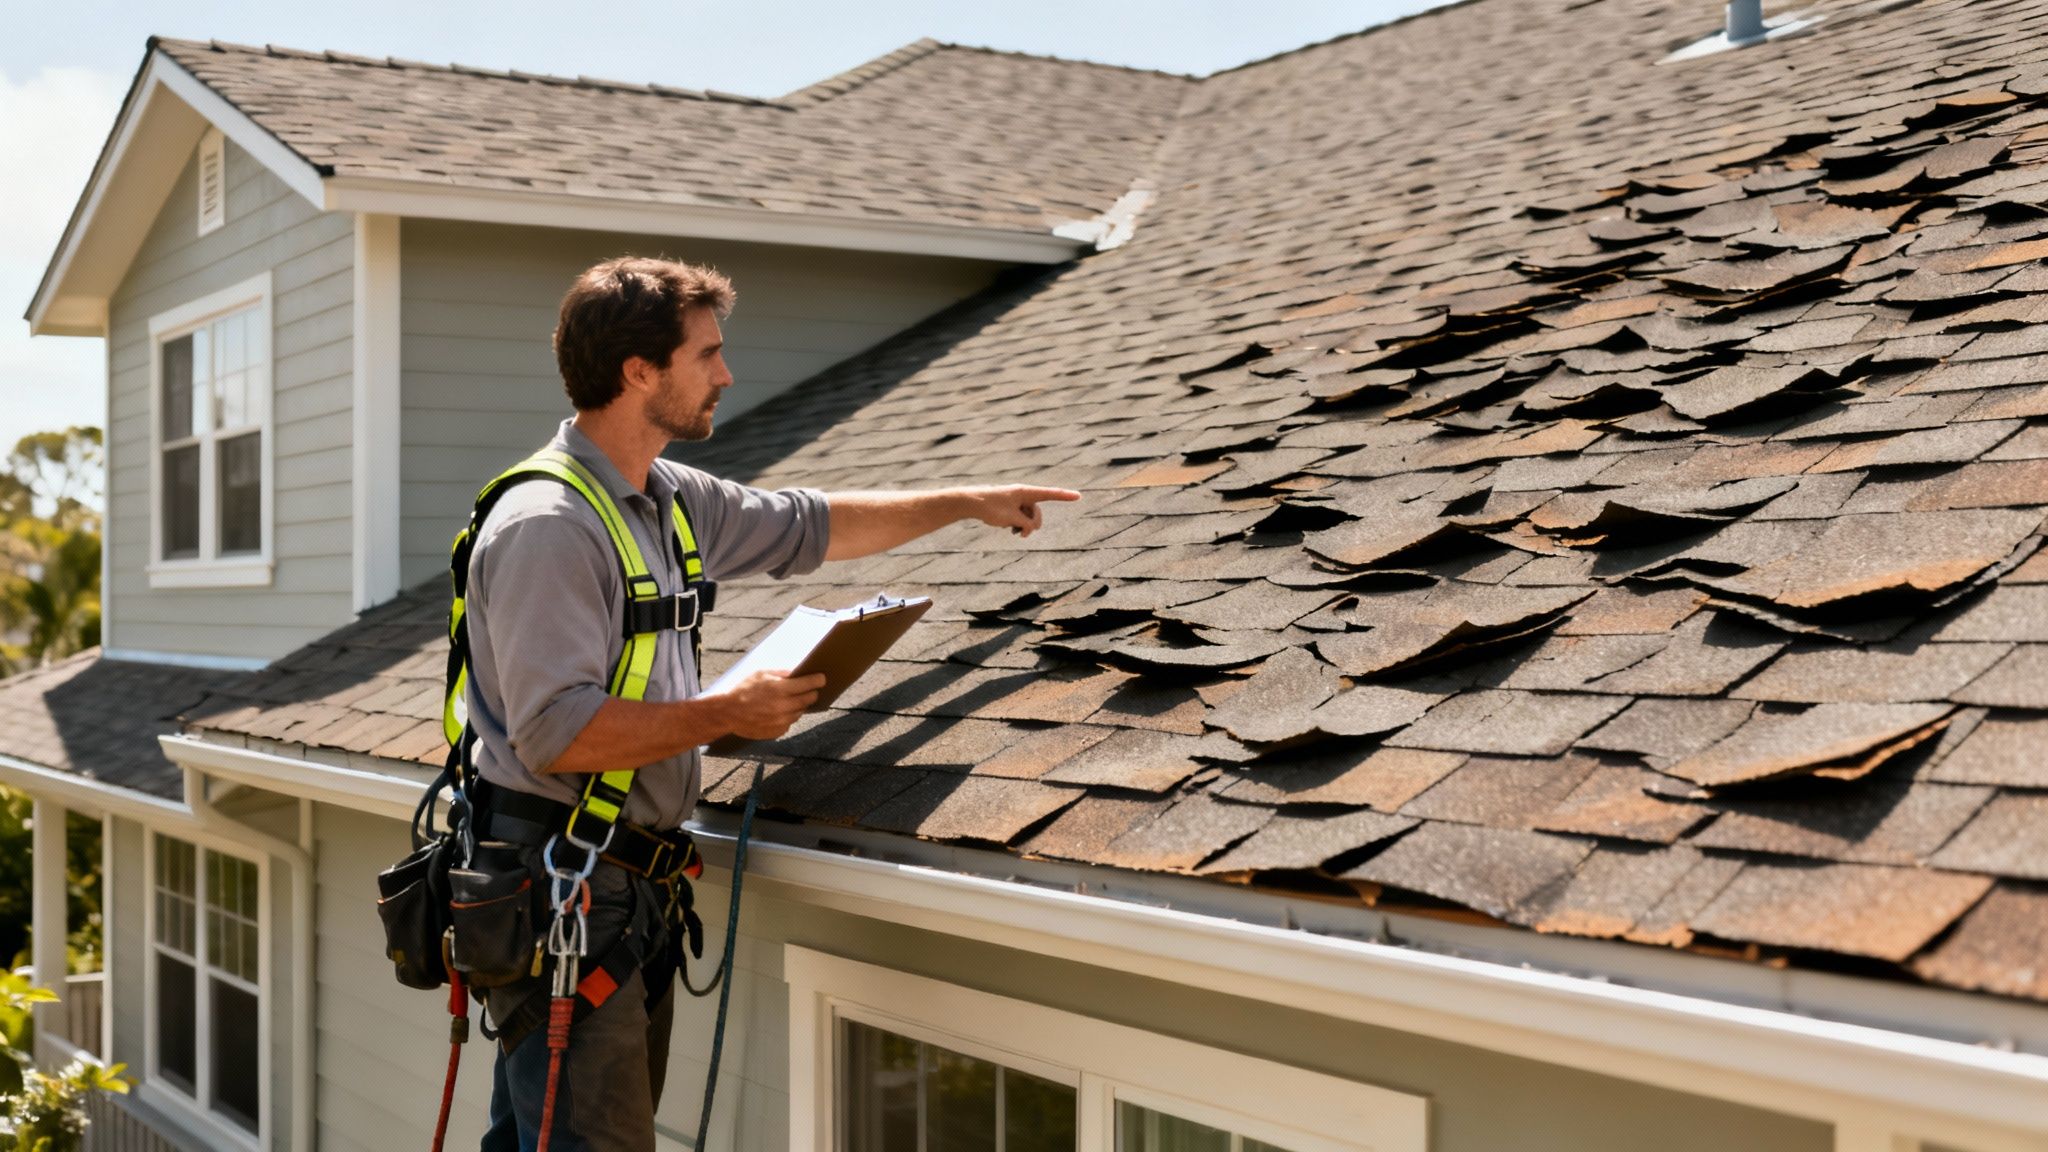
Have you spotted wavy, ridged lines running across your roof? Those are buckled shingles, and they're more than just an eyesore. Think of them as a warning flare, signaling that your roof's structural integrity is at risk, especially with Wellington's unpredictable climate. This isn't just normal wear and tear; it often points to a deeper issue.
Why Your Wellington Shingles Are Buckling
Before you can even think about a repair, you have to put on your detective hat. Buckled shingles are a symptom, not the disease. Left unchecked, the underlying cause can lead to serious water damage. In Wellington, we see a few common culprits that turn a solid roof into a weak point.
One of the most frequent offenders is poor attic ventilation. When hot, humid air gets trapped up there, it bakes the roof decking from the inside out. This heat and moisture cause the wood to expand and shift, literally pushing the shingles up from below and creating that unmistakable wavy pattern.
Installation Mistakes and Aging Materials
Even a brand-new roof can start buckling if the installation was rushed or sloppy. Shingles require precise fastening. If the roofer used the wrong nails, placed them incorrectly, or skimped on the number of fasteners, those shingles won't lie flat. It creates just enough wiggle room for buckling to start.
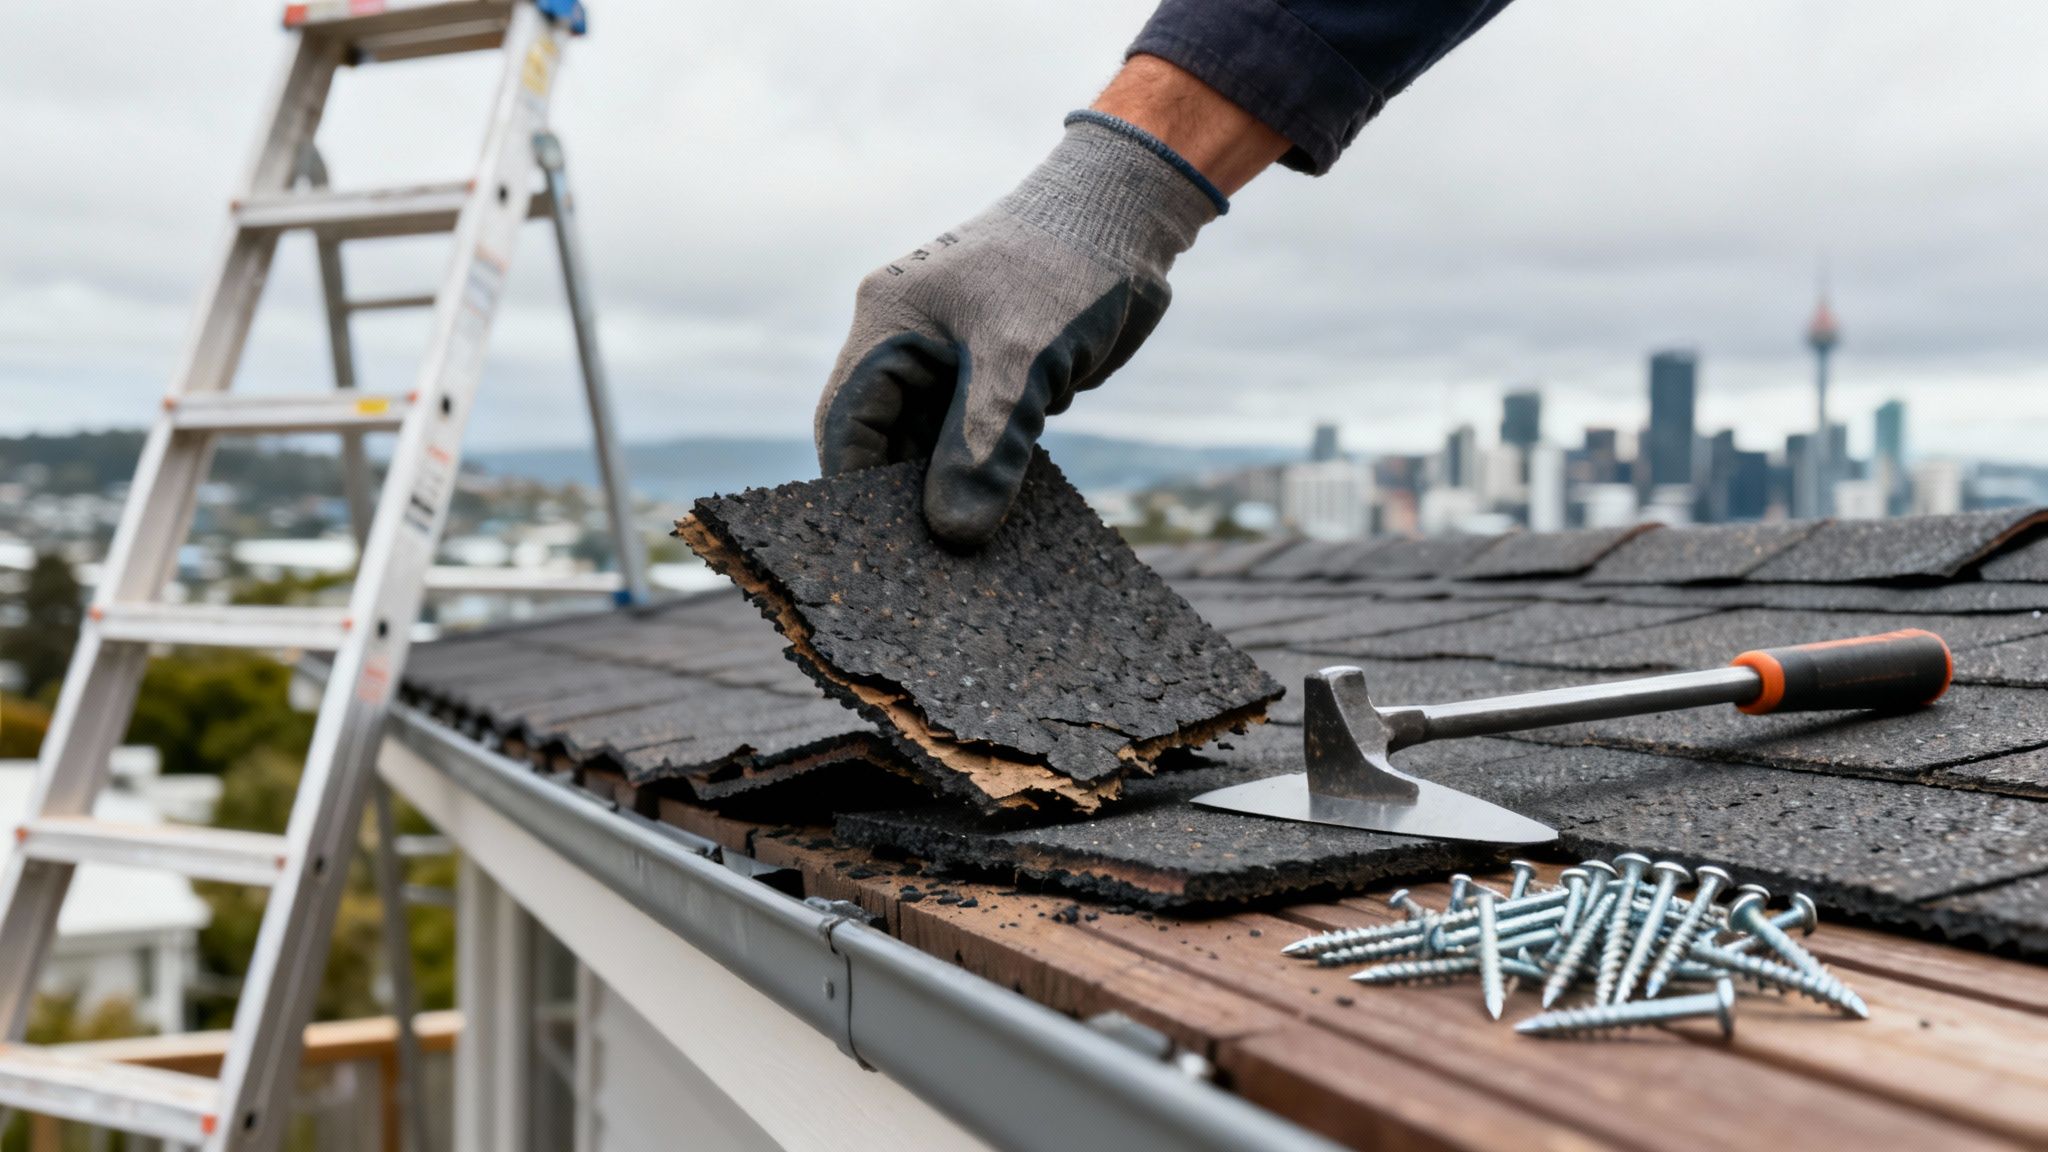
Age is another factor. Over time, asphalt shingles dry out and lose the essential oils that keep them flexible. They become brittle, struggling to expand and contract with Wellington's temperature swings. An older roof is always more susceptible to stress, showing it through buckling, curling, and cracking. If you're seeing this, it might be time to review the signs of a failing roof. You can get a better idea by checking out these visual examples: https://paletzroofing.com/wp-content/uploads/2025/11/thumbnail-8-1024×576.jpg.
Wellington’s Unique Environmental Pressures
Living in Wellington adds another layer to the puzzle. The region's seismic activity, even the subtle tremors we barely notice, can cause tiny shifts in a home's frame. That stress gets transferred right up to the roof deck, which can eventually manifest as buckled shingles. These issues are often a hint of a bigger problem, requiring a solid understanding of the complete building envelope.
Key Takeaway: Shingle buckling is rarely just about the shingles. It’s almost always a sign that something is wrong with the roofing system as a whole—be it ventilation, installation, or the underlying structure.
The issues we see with asphalt shingles in the Wellington region are well-known among local roofers. Often, the problem starts with the roof decking itself. If the plywood or OSB sheets were installed without the necessary 1/8-inch expansion gap, they have no room to swell with moisture. They push against each other, creating the upward force that makes shingles buckle.
This is a problem made worse by Wellington's climate and unique ground conditions in certain hazard zones, which can amplify any structural movement.
To figure out what might be happening on your roof, it helps to connect the visual signs to the most likely cause.
Quick Guide to Shingle Buckling Causes
This table can help you diagnose the problem at a glance and figure out your next move.
| What You See | Most Likely Cause | What to Do First |
|---|---|---|
| Wavy lines across the entire roof | Poor attic ventilation | Check if attic vents are blocked or insufficient. |
| Buckling is random or in patches | Improper shingle fastening | Look for improperly placed or missing nails. |
| Buckling along the seams of the plywood | Roof deck expansion (no gaps) | This requires a professional inspection to confirm. |
| Shingles are also brittle and cracking | Old age and material failure | It's likely time to start planning for a roof replacement. |
No matter the cause, buckled shingles compromise your roof's ability to shed water. Addressing the root problem quickly is the only way to prevent a small issue from turning into a major, expensive headache.
The Tools You’ll Actually Need for a Shingle Repair
Trying to fix a roof without the right gear is a recipe for disaster. You’ll end up with a messy, unreliable patch job that won't hold up. When you're dealing with buckled shingles in Wellington, having a specific set of tools isn't just for show—it’s about doing the job safely and making sure your repair actually lasts. A good repair always starts on the ground, with everything you need laid out and ready to go.
Before you even think about setting up that ladder, get your toolkit in order. The last thing you want is to be climbing up and down because you forgot something. A little prep work makes the whole process go a lot smoother and safer.
Your Core Toolkit
The most important tool for this job, hands down, is a flat pry bar. Forget trying to use a claw hammer; its thick claws will just crack the surrounding shingles you're trying to save. A flat pry bar has a thin, wide edge that lets you slide it under the shingles and gently break that old sealant without causing any collateral damage. That precision is everything.
Of course, you'll need a good hammer. But the hammer is only as good as the nails you pair it with. Grab a box of 1 ¼-inch galvanized roofing nails. Galvanization is a must-have feature, as it's your primary defence against rust from Wellington’s relentless rain. Check that the nails have a wide head—this helps hold the shingle down securely without punching a hole right through it.
One of the most common mistakes I see DIYers make is grabbing whatever nails or screws they have lying around. Roofing nails are specifically designed to hold shingles flat against the decking and fight wind uplift—something we get plenty of around here.
Lastly, a sharp utility knife is non-negotiable. You'll need it to make clean cuts on the old shingle or to trim a new one to size. A dull blade will just tear and mangle the shingle, creating weak spots that are practically an invitation for water to sneak in.
The Right Materials and Safety Gear
Having the right materials is just as critical as having the right tools. You’ll need a tube of high-quality roofing sealant (sometimes called asphalt roofing cement). Make sure you get one that’s rated for all-weather application. You need something that will stay flexible and waterproof whether it's baking in the summer sun or getting soaked in the winter. This sealant is what creates that all-important watertight bond under the shingle tabs.
And look, none of this matters if you don't stay safe. Your safety gear is not optional. Here’s your checklist:
- A solid, well-placed ladder: Make sure it’s on level ground and extends at least a metre past the roofline for stability.
- Non-slip shoes: Good grip is your best friend up there, especially on a pitched roof.
- Safety glasses: Granules and debris can fly off shingles unexpectedly. Protect your eyes.
- Heavy-duty work gloves: Shingles have sharp edges, and roofing surfaces are abrasive. Your hands will thank you.
With this kit assembled, you're not just ready to do the job—you're ready to do it right, and more importantly, to do it safely.
How to Properly Replace a Buckled Shingle
Alright, time to get your hands dirty and fix that ugly buckle. Swapping out a damaged shingle is a job you can definitely handle, but doing it right is what matters for standing up to Wellington's weather. The real goal isn't just replacing the shingle; it's doing it without wrecking its neighbours, so you end up with a seamless, watertight repair.
Working with asphalt shingles takes a bit of a gentle touch. They can get pretty brittle, especially on a cooler day. Here's a pro tip I've learned over the years: let your replacement shingle sit out in the sun for a bit before you even think about taking it up on the roof. This warms it up, makes it more flexible, and way less likely to crack when you're working with it.
Safely Lifting the Surrounding Shingles
First things first, you need to get to the nails holding that buckled shingle down. The trick is, they're hidden under the shingle directly above it. You'll have to carefully break the factory sealant that glues the upper shingle to the one you're replacing.
Grab your flat pry bar and slowly work it under the edge of the shingle above the buckled one. A little back-and-forth pressure should be all you need to feel the seal pop. You'll need to do the same for the shingles on either side, since their edges overlap the one you're pulling out.
Crucial Tip: Whatever you do, don't force it. If you hear a cracking sound, stop right there. Rushing this step is the fastest way to turn a one-shingle repair into a three-shingle headache. Trust me.
Removing the Damaged Shingle and Preparing the Area
With the seals broken, you can now lift the shingle above to expose the nails in the damaged one. You'll usually find four nails in each shingle. Use your pry bar to get under the nail head and gently pry it up. Do this for all the nails holding the buckled shingle in place.
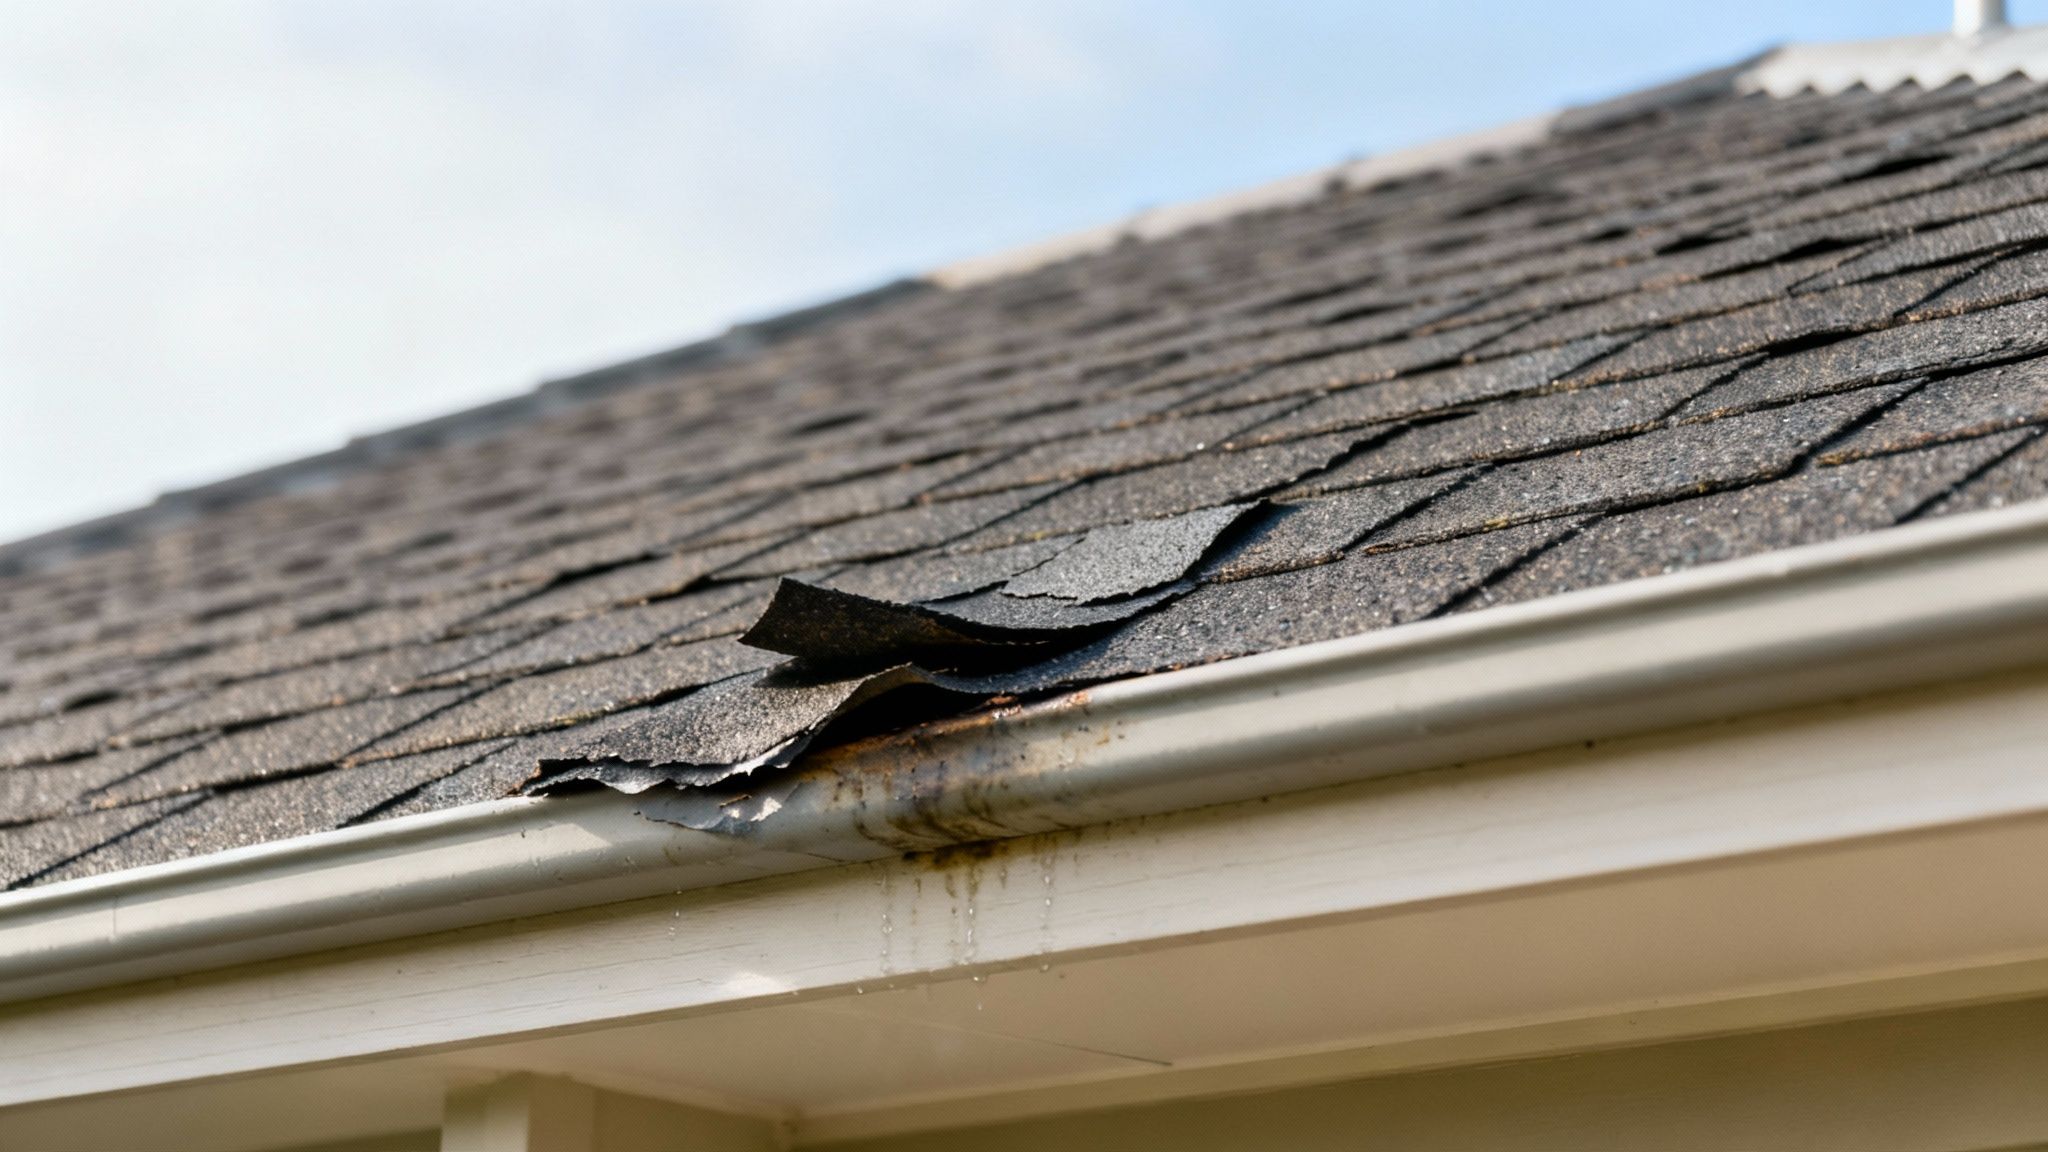
Once all the nails are out, the old shingle should slide out without much fuss. Now, take a second to look at the exposed underlayment. Is it dry? Are there any tears or weird wrinkles? A small problem here can ruin your whole repair, so make sure the surface is clean, dry, and perfectly flat before you move on. For a good visual on what you're looking for, this guide on common roof issues can be a real help: https://paletzroofing.com/wp-content/uploads/2025/11/thumbnail-9-1024×576.jpg.
This infographic breaks down the essential toolkit you'll need, from safety gear to the actual tools and materials.
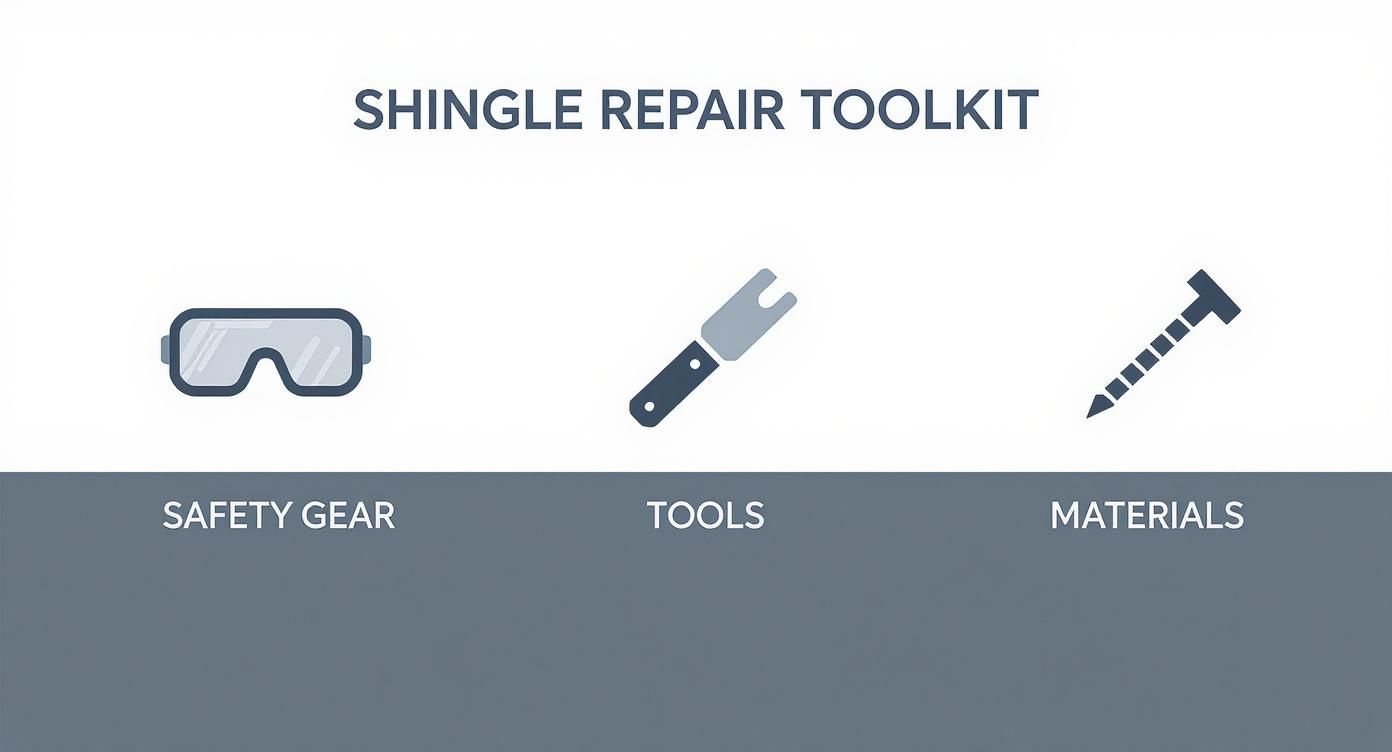
Think of it this way: a successful repair is a process. It starts with safety and ends with the right materials, not just a quick slap-dash fix.
Nailing and Sealing the New Shingle
Slide the new shingle into position, lining it up perfectly with the shingles next to it. The top edge should tuck neatly right under the course above it.
Now for the most important part: the nailing. Use four 1 ¼-inch galvanized roofing nails for the shingle. You'll want to place them about an inch above the cutouts and an inch in from each side.
- Nail Placement: Never drive nails through the tar strip. Always place them just above it.
- Nail Depth: The nail head should sit flush with the shingle's surface. If you drive it too deep, you'll tear the shingle. Too shallow, and it will push up the shingle above it.
The last step is creating that waterproof seal. Put a few dabs of roofing sealant under the tabs of the shingle you just replaced. Don't forget to put a little under the tabs of the shingles you lifted earlier, too. Press everything down firmly to get a good, strong bond. This seal is your main defense against wind-driven rain—a constant battle when you're dealing with buckled shingles here in Wellington.
Solving the Root Cause of Shingle Buckling
Just slapping a new shingle over a buckled spot without figuring out why it buckled is a classic rookie mistake. It's like patching a tire without pulling out the nail—you’re guaranteed to be dealing with the same problem again, and probably sooner than you think. To really fix the buckled shingles Wellington homeowners see, you have to play detective and get to the root of the problem.
This is where you shift from simply reacting to a problem to proactively maintaining your roof's health. Most of the time, buckling traces back to one of three culprits: your attic can't breathe, the underlayment is wrinkled, or the roof deck itself has issues. A little investigation now saves you a ton of hassle and money later on.
Checking for Poor Attic Ventilation
One of the most common reasons I see for widespread shingle buckling is an attic that’s basically suffocating. When hot, moist air gets trapped up there, it bakes the underside of your roof deck. That combination of heat and moisture makes the wood sheathing expand, which then pushes the shingles up from below, creating those ugly wavy buckles.
You can often spot this problem from inside your attic. Pop your head up there on a cool day and keep an eye out for these tell-tale signs:
- Condensation: Look for any dampness or actual water droplets on the underside of the roof sheathing or on the trusses.
- Frost in Winter: If it’s cold out, you might even see a light layer of frost up there. That's a dead giveaway for trapped moisture.
- Muggy Air: It should feel dry in your attic, not like a steam room. If the air is thick and humid, you've got a ventilation issue.
If you suspect poor ventilation, the first place to look is your vents. Soffit vents, located under the eaves, get clogged all the time with dust, debris, and blown-in insulation. Your ridge or gable vents at the top could be blocked, too. Just clearing these out to create an open airflow path can often solve the problem.
Pro Tip: Real attic ventilation is a system. It needs both intake vents (like soffits) to pull cool, dry air in and exhaust vents (like a ridge vent) to push hot, moist air out. If you only have one without the other, it just doesn't work right, leading to the kind of moisture buildup that causes buckled shingles and even wood rot.
Dealing with Wrinkled Underlayment
Sometimes, the shingles are fine, and the attic is breathing perfectly. The problem is actually the layer of roofing felt underneath the shingles. If that underlayment was installed while it was damp, or if it wasn't pulled taut and secured properly, it can wrinkle up as it dries and settles over time. These wrinkles create ridges that push up on the shingles from below, forcing them to buckle.
This is an easy one to diagnose once you've lifted the damaged shingle. If you see a big, obvious wrinkle in the felt paper right where the buckle was, you've found your culprit.
For a smaller wrinkle, you can usually fix it without tearing everything up. Take a sharp utility knife and carefully slice along the top of the ridge. This will release the tension and allow the felt to lay flat. Nail down the two flaps with a few roofing nails, then trowel a layer of roofing cement over the cut to seal it before you lay down the new shingle.
Inspecting the Roof Deck for Issues
This is the one you hope you don't find. The most serious cause of buckled shingles is an issue with the roof deck itself—the plywood or OSB sheathing that acts as your roof's foundation. If the builders didn't leave the required 1/8-inch expansion gap between the sheathing boards, summer heat can cause them to expand, butt up against each other, and warp upwards along the seam.
You'll need to get back in the attic for this one. Look up at the underside of the roof deck. Are there dark water stains? Does the wood feel soft or spongy when you push on it? Do you see any noticeable sagging between the rafters? These are all signs of a much bigger problem that replacing one shingle won't solve. Knowing the root causes of buckled shingles is crucial, especially when you're thinking about your home's overall health and value. For more on what improvements matter most, check out this guide on essential home repairs before selling. A compromised roof structure is always a top priority.
When to Call a Professional Wellington Roofer
Fixing one or two buckled shingles can feel like a win—a straightforward DIY job you can knock out on a Saturday. But it’s just as important to know when to put the tools down and pick up the phone. What looks like a small cosmetic flaw can sometimes be the tip of the iceberg, hinting at a much bigger problem lurking underneath.
Ignoring these red flags is a classic homeowner mistake that can quickly turn a simple repair into a full-blown—and expensive—roof replacement.
One of the biggest giveaways is the scale of the problem. If you’re seeing buckled shingles scattered across different sections of your roof, that’s not a random fluke. It almost always points to a systemic issue, like poor ventilation turning your entire attic into an oven or widespread movement of the roof deck itself. Slapping a patch on one shingle won't cure the underlying disease.
Another major warning sign is what you feel under your feet. If you’re carefully walking the roof and notice any soft, spongy, or bouncy spots, get down immediately. That’s a tell-tale sign that moisture has already gotten past the shingles and is rotting the wooden decking below. This isn’t just a leak anymore; it's a serious structural concern.
Obvious Signs You Need an Expert
Some issues are just undeniable calls for professional help. If you spot any of the following, don't hesitate to call a roofer. These problems almost always mean the damage has gone far beyond a simple shingle fix.
- Significant Granule Loss: Are your gutters filled with what looks like coarse black sand? Those are the protective granules from your shingles. A heavy loss means your shingles are at the end of their life and can no longer shield your home.
- Interior Water Damage: See those tell-tale brown spots on your ceiling or streaks down your walls? The leak has already made its way through every layer of your roofing system. A pro is needed to trace the water's path back to the source and fix all the compromised layers.
- A Sagging Roofline: This is a big one. Any noticeable dip, swag, or sag in your roof is a structural emergency. It could indicate failing rafters or trusses, and it's absolutely not safe for a DIY approach.
A professional roofer doesn’t just stick a bandage on the problem; they diagnose the root cause. They have the experience to tell if your buckled shingles Wellington are from bad ventilation, deck movement, or something else entirely, ensuring the fix is a real solution, not just a temporary patch.
Safety First and Finding the Right Roofer
Let's be practical. Your safety should always be the top priority. If your home is more than one story high or has a steep pitch, the risk of a fall skyrockets. No repair is worth a life-altering injury.
Once you decide to call in a professional, choosing the right one is key. Always ask to see their license and proof of insurance—no exceptions. A reputable Wellington roofer will give you a detailed, written quote that clearly outlines the scope of work, addressing both the symptom (the buckled shingle) and the cause they've identified.
Make sure you understand their process by asking for a detailed inspection report. You can learn more about what a proper assessment involves with our guide on a professional roofing inspection. It's a small step that confirms you're hiring a true expert.
Your Top Shingle Repair Questions Answered
Over the years, I've heard just about every question a Wellington homeowner can have about their roof. When you're staring up at buckled shingles, a lot of practical concerns come to mind. Here are the straightforward answers to the questions I get asked most often.
How Long Can I Leave Buckled Shingles?
It's tempting to push this repair to the bottom of the to-do list, I get it. But trust me on this one: dealing with buckled shingles as soon as you spot them is always the smartest play. A single buckled shingle might not cause a gusher in your living room overnight, but it's a major chink in your roof's armour.
Think of that raised shingle like a little sail. It’s just waiting for a strong gust of wind to catch it and rip it clean off. Even worse, it creates a perfect channel for rainwater to flow right underneath the shingle and onto your roof decking. Here in Wellington's damp climate, that small issue can quickly escalate into a much bigger headache involving saturated wood and rot.
My Advice: Don't wait until you see a water stain spreading across your ceiling. Treat a buckled shingle like an urgent problem. The faster you fix it, the simpler—and cheaper—the job will be.
Can I Repair Shingles in Any Weather?
Definitely not. The weather is a massive factor in both the safety and success of a shingle repair. You absolutely want to avoid working on your roof if it's wet, excessively windy, or too cold. Safety is priority number one, and a wet or frosty roof is dangerously slick.
Beyond safety, the materials themselves are sensitive to temperature. Shingles get brittle in the cold and can easily crack or snap when you try to lift them. On the flip side, a scorching hot day can make them soft and gummy, meaning you can easily damage them with your tools or even your boots. The sweet spot for a repair is a mild, dry, and preferably overcast day.
Is It Possible for New Shingles to Buckle?
Unfortunately, yes. It’s incredibly frustrating to see buckles on a roof that's only a few years old, but it does happen. When it does, the problem almost always traces back to an improper installation.
One of the most common culprits is when the installer doesn't leave the proper 1/8-inch expansion gaps between the sheets of roof decking. As the wood expands with temperature and humidity changes, it has nowhere to go but up, pushing the shingles into a buckle. Other installation mistakes, like nailing the shingles down too tightly or laying them over a wrinkled underlayment, can also cause it. It’s a textbook example of why hiring a skilled, reputable roofer from the start is so important.
What Is the Average Repair Cost in Wellington?
The cost to fix buckled shingles in Wellington can really vary. If it's a simple, isolated issue affecting just a handful of shingles, a professional might charge a few hundred dollars for a service call. That usually covers the labour and materials for a quick and easy patch.
However, the game changes if that initial inspection uncovers a deeper problem. If the buckling is just a symptom of poor attic ventilation or widespread water damage to the decking, the scope of work expands significantly. You have to fix the root cause, not just the buckle. That kind of project will, of course, cost a lot more. Always insist on a detailed quote that breaks down exactly what work is being proposed and why.
If you're dealing with roofing problems and need an expert eye, Paletz Roofing and Inspections provides professional assessments and repairs to keep your home protected. Schedule your free consultation today at https://paletzroofing.com.