That gut-wrenching feeling you get when you spot a water stain spreading across your ceiling is a familiar nightmare for homeowners. It’s especially common when you’re dealing with a flashing around chimney leaking West Palm Beach homes know all too well, thanks to our relentless rainy seasons. Your first instinct might be to panic, but the immediate priority is damage control. You need a solid plan to protect your home's interior before you even think about getting on the roof.
Your Chimney Is Leaking—Now What?
Finding a fresh water stain growing from your chimney is unnerving, but don't get overwhelmed. Before you do anything else, focus on a few practical steps to manage the situation and minimize the damage inside. Leave the roof for later; your first moves are all about what’s happening inside your house, where you can work safely.
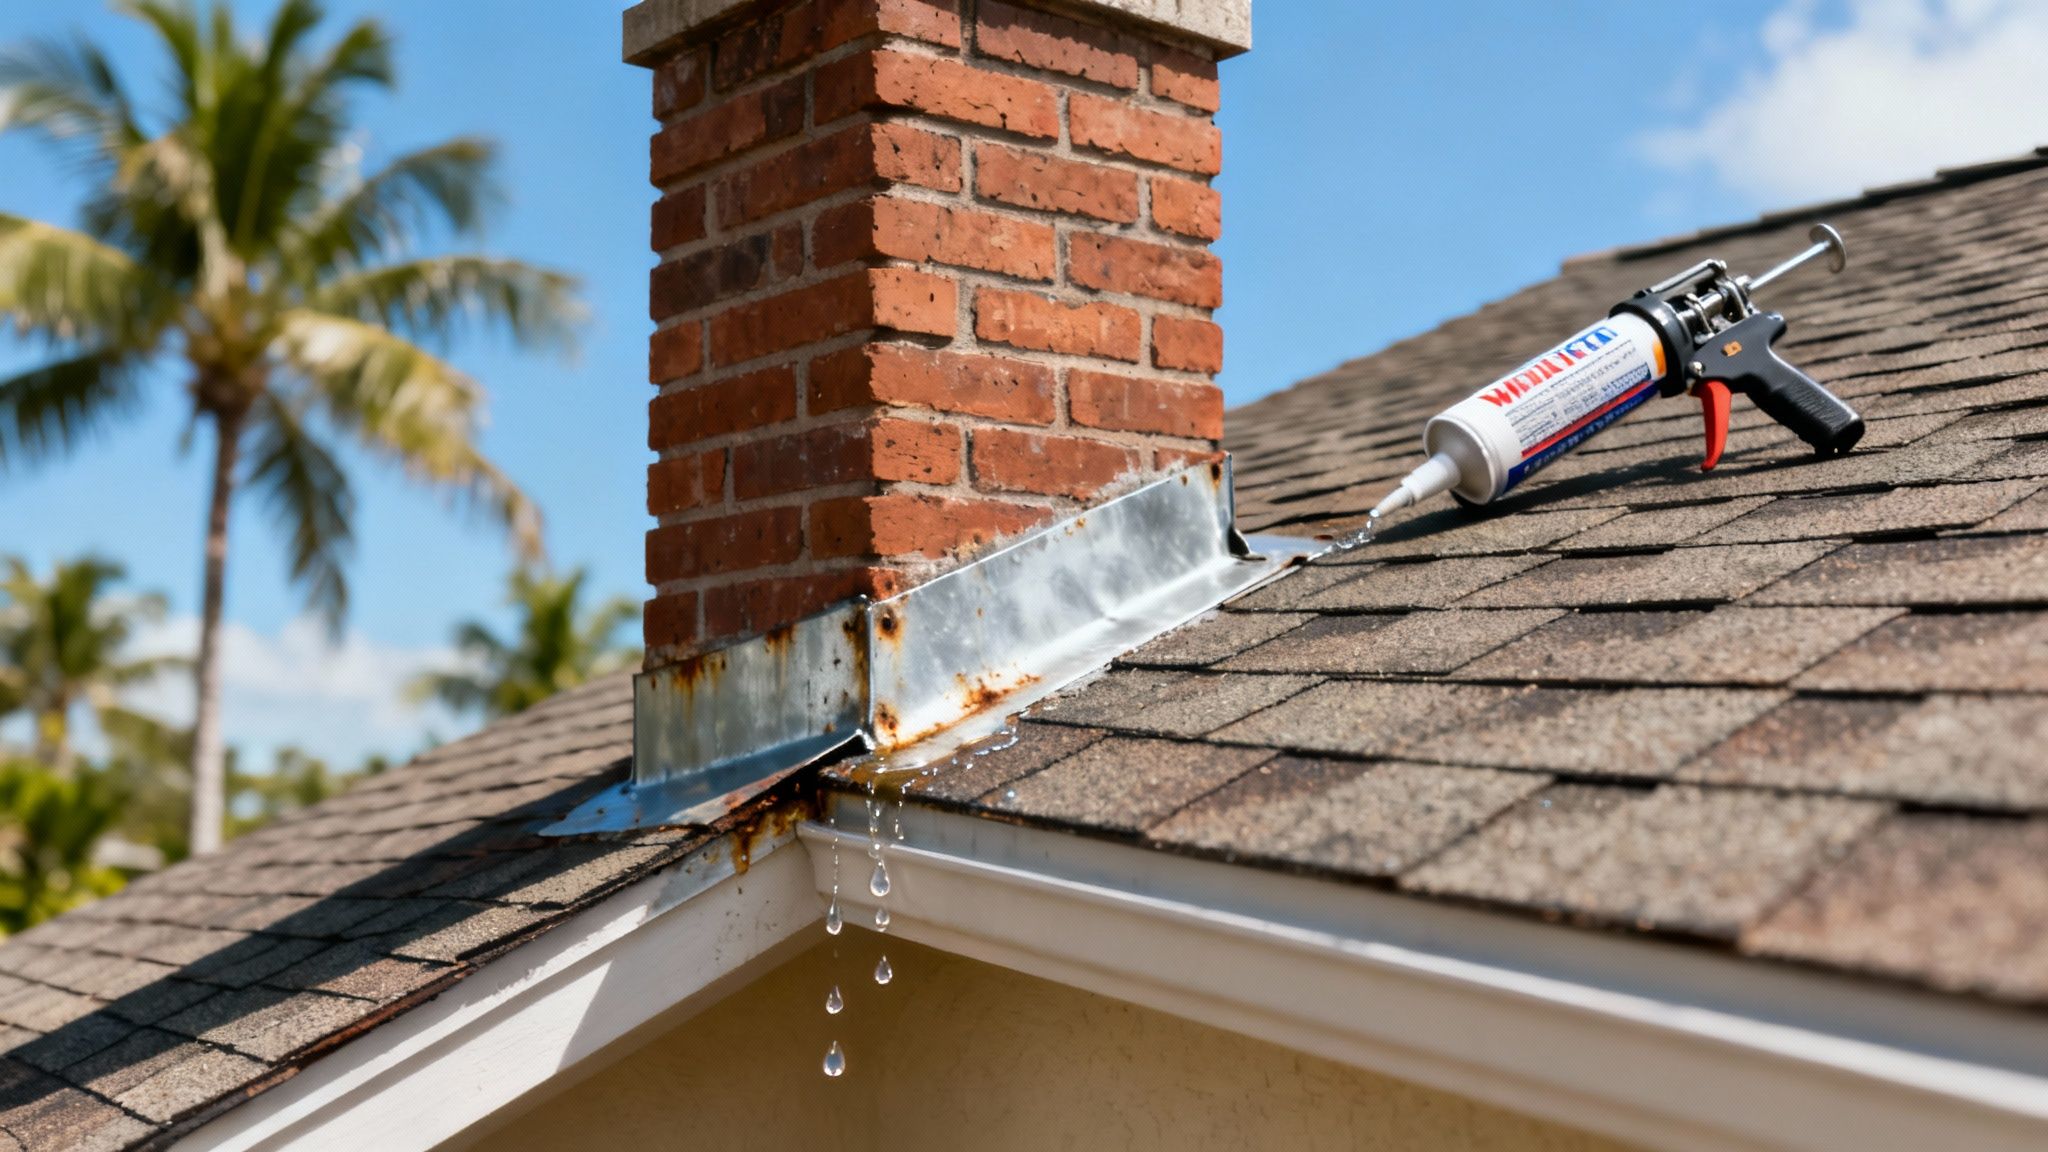
More often than not, the culprit is the metal seal between your chimney and roof, known as flashing. Here in West Palm Beach, that flashing takes a beating. The combination of intense sun, torrential downpours, and the occasional hurricane-force winds puts immense stress on this critical seal. Over time, the sealant cracks and the metal can warp or pull away, creating a perfect pathway for water to get in.
First Response Inside Your Home
Your first job is to control the chaos. Start by moving any furniture, electronics, or other valuables away from the wet area. Get a bucket and place it directly under the drip to catch the water.
If you see the water forming a bulge in the ceiling drywall, don't let it sit there. A heavy, waterlogged section of drywall can collapse and cause a much bigger mess. Carefully puncture the center of the bubble with a screwdriver to let the water drain in a controlled stream into your bucket.
Next, grab some old towels or a tarp to put around the bucket. This simple step protects your floors from splashes and can save you from expensive repairs to hardwood, carpet, or the subfloor underneath. The name of the game is containment.
Why Immediate Action Matters
Even a tiny leak is a big deal. Chimney flashing is the last line of defense for a very vulnerable part of your roof, and when it fails, the problems can get expensive fast. We're not just talking about a simple water stain.
Chimney flashing failures are notorious for causing serious structural damage. Just to replace the flashing, you could be looking at a bill ranging from $1,500 to $4,000. If the water has been getting in for a while and has rotted the underlying roof decking, that cost can easily jump to $5,000 or more. You can get a better sense of these expenses by reviewing this detailed breakdown of roof flashing replacement costs.
A minor drip can saturate your insulation, weaken the wooden support beams of your roof, and create the perfect environment for mold to take hold in as little as 24-48 hours. Acting fast is the single most important thing you can do to limit the final repair bill.
Once you’ve got the leak under control inside, it’s time for a quick, safe look from the outside. Stay on the ground and use a pair of binoculars to inspect the area around your chimney. Look for obvious signs of trouble like rusted or bent flashing, cracked sealant, or any shingles that look out of place. This little bit of homework will give you valuable information to share when you call a professional roofer.
The moment you find a leak, every second counts. Taking these initial steps can significantly reduce the damage to your home and make the eventual repair process smoother.
Immediate Actions for a Leaking Chimney
Follow these steps the moment you discover a leak to minimize damage.
| Action Step | Why It's Important | Essential Tools |
|---|---|---|
| Move Valuables | Protects furniture, electronics, and personal items from water damage. | Willing hands |
| Place a Bucket | Contains the active drip and prevents water from spreading across the floor. | 5-gallon bucket |
| Puncture Ceiling Bulge | Relieves pressure on the drywall to prevent a larger collapse and controls drainage. | Screwdriver or awl |
| Protect Flooring | Soaks up splashes and secondary drips, saving your floors from costly repairs. | Old towels or a tarp |
| Document the Damage | Provides essential evidence for your insurance claim. | Smartphone camera |
| Ground-Level Inspection | Helps you identify the potential source of the leak to inform your roofer. | Binoculars |
By taking these proactive measures, you're not just stopping a drip; you're protecting your home's structural integrity and saving yourself from bigger headaches down the road.
Pinpointing the Exact Source of the Leak
Before you can fix a leak, you have to play detective. The water stain you see on your ceiling is just the end of the story; the real entry point is often somewhere else entirely. Water is sneaky. It can travel down rafters and along ceiling joists before finally deciding to drip into your living room. A proper diagnosis is absolutely everything when you're dealing with a flashing around chimney leaking West new Palm Beach homes so often face.
A good investigation starts in your attic, not up on the roof. On a bright, sunny South Florida day, head upstairs and kill the lights. Give your eyes a minute to adjust, then scan for any slivers of daylight piercing through the roof deck. Those tiny beams of light are basically neon signs pointing to holes where water gets in.
The Attic Inspection
Grab a powerful flashlight and start scanning the underside of your roof. You're looking for the subtle clues water leaves behind on its journey.
- Water Stains: Look for dark streaks or discolored rings on the wood sheathing and rafters.
- Damp Insulation: Check for insulation that looks compressed, matted down, or feels damp to the touch.
- Mold or Mildew: Any black spots or a musty smell are a dead giveaway of a long-term moisture problem.
Always remember to trace any water signs uphill, toward the peak of the roof. Gravity doesn't lie—the entry point will be higher up than where you see the damage inside.
The Controlled Water Test
If poking around the attic doesn't reveal the culprit, the next step is a controlled water test. This is a two-person job: one of you stays on the ground with a garden hose (never, ever get on a wet roof), and the other person is inside the attic acting as a spotter. Do not use a high-pressure nozzle, as this can blast water into new areas and even damage your shingles.
Start by gently soaking the roof area just above where the stain appeared inside. Work in small, isolated sections, starting low and slowly moving up. The person inside needs to be watching like a hawk. The second they see a drip, they should shout. This methodical approach is the single most reliable way to find the exact failure point.
When water does show up, it's critical to accurately distinguish between a roof leak and attic condensation, because the repairs for each are completely different.
This simple process flow breaks down the immediate steps to take when you first spot a leak, making safety and damage control the top priorities.

As you can see, the first move is always to contain the water inside and protect your belongings. Only then should you move on to finding the source.
Pro Tip: Roughly 90% of all roof leaks happen at penetrations—places where something pokes through the roof surface. When doing a water test, focus first on vulnerable spots like the chimney flashing, plumbing vents, and skylights.
Sometimes, what looks like a flashing problem is actually a red herring. A cracked chimney crown or porous bricks that have soaked up water can also be the source. The water runs down the masonry inside the wall and drips out at the bottom, making it look exactly like a flashing leak. By carefully isolating the source with a water test, you can avoid paying for an expensive repair that doesn't actually solve the problem.
Choosing the Right Materials and Repair Techniques
Okay, you've pinpointed where the water is getting in. Now comes the critical part: choosing a fix that will last. When you’re dealing with the kind of flashing around chimney leaking West Palm Beach homes are known for, your choice of materials and repair methods is the difference between a quick patch and a permanent solution. Here in Florida, the combination of intense sun, salt air, and torrential downpours is absolutely relentless on a roof.
This isn't just about grabbing the cheapest option off the shelf at the hardware store. It's about investing in the long-term protection of your home. Get this right, and you won't have to climb back up on that roof to deal with the same leak in a couple of years.
Comparing Flashing Materials for Florida Weather
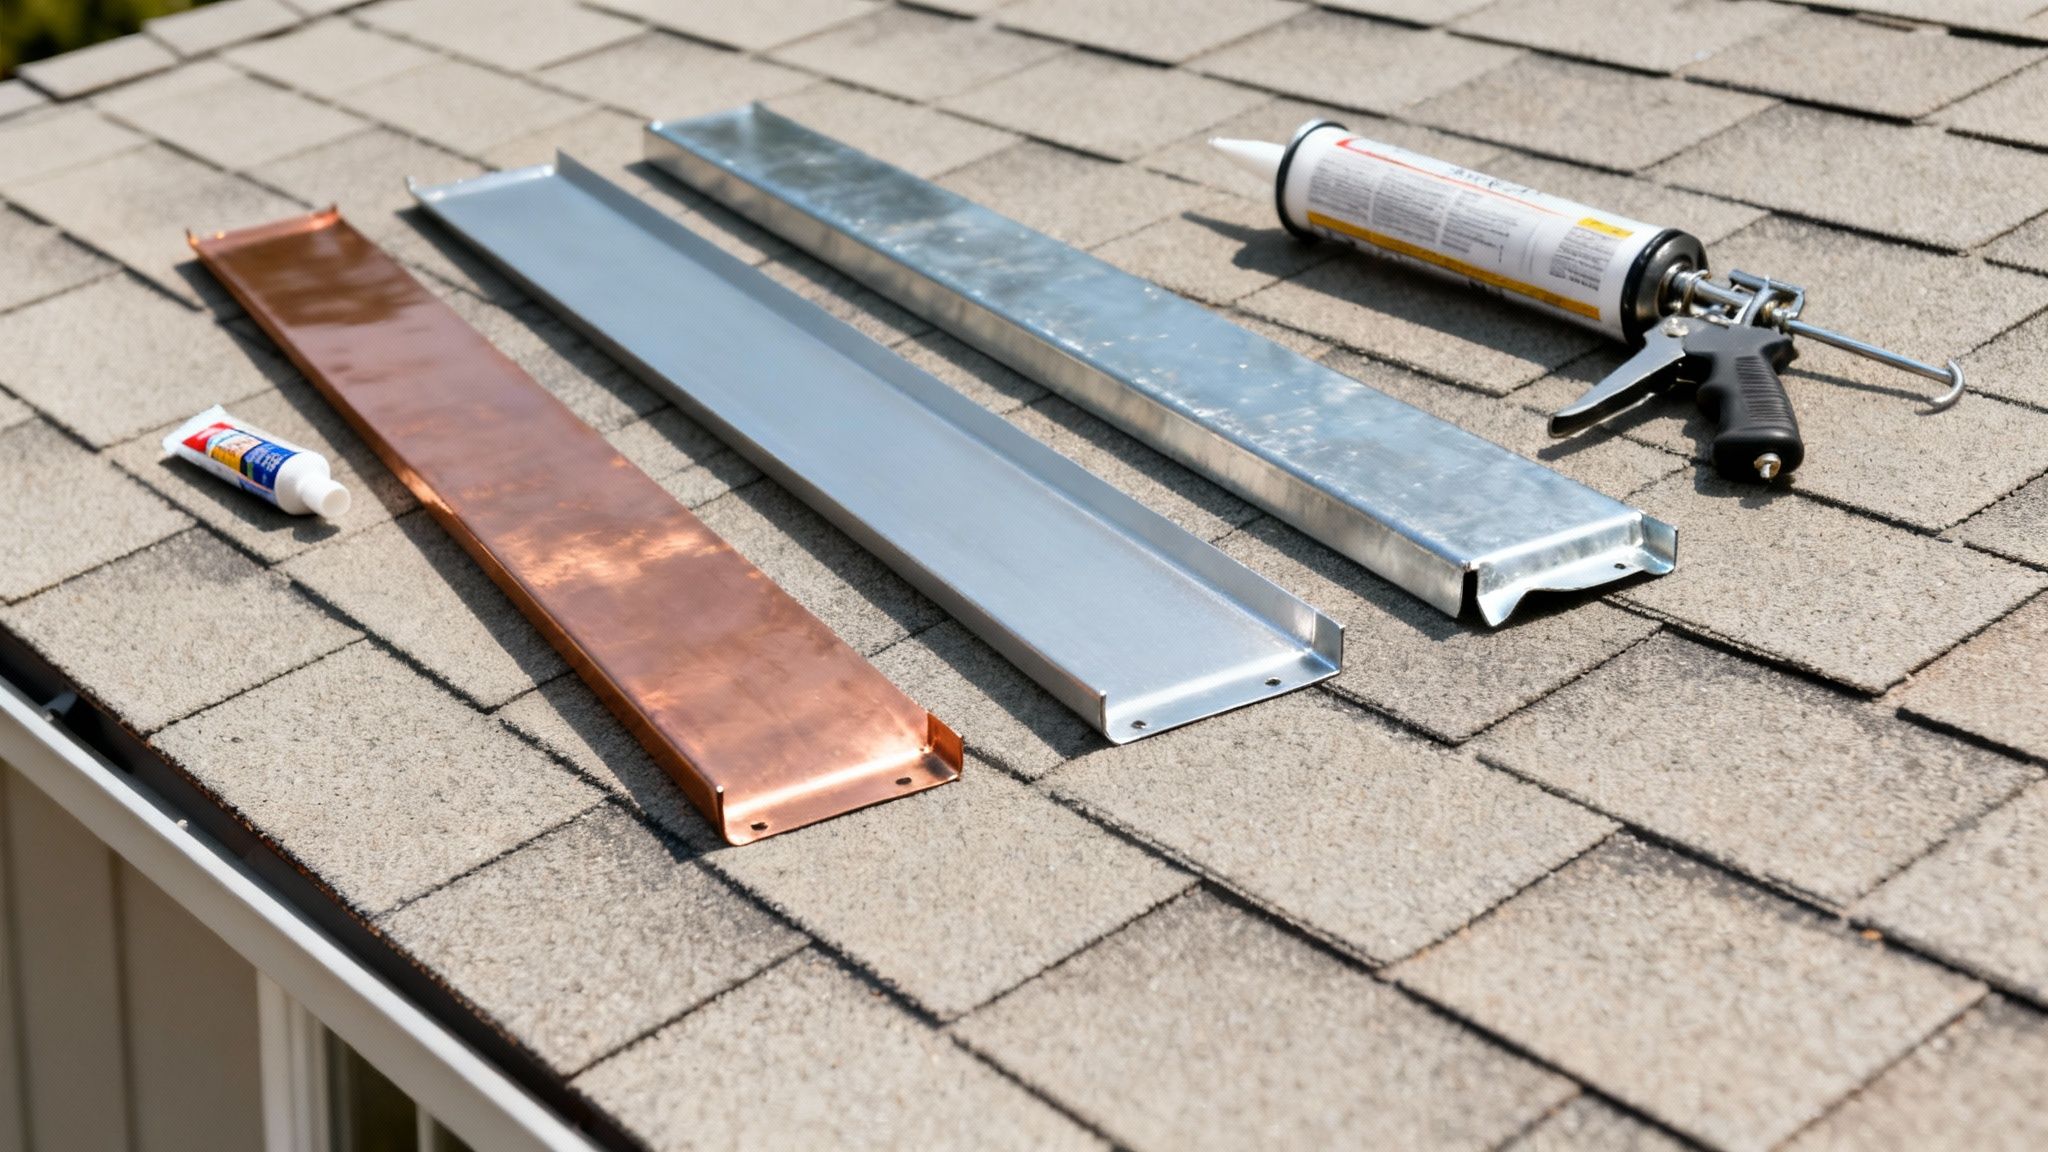
Not all metal flashing is created equal, especially not in our coastal climate. Each material has its own pros and cons when it comes to durability, looks, and price. Knowing the difference is key to a repair that holds up.
-
Galvanized Steel: This is the most common, budget-friendly choice you'll see. A zinc coating protects the steel from rust, but that protection eventually wears away, particularly with the constant assault of salt spray and acid rain. It's a decent option if you need an affordable fix now, but expect to replace it within 10-15 years.
-
Aluminum: Lightweight and naturally resistant to rust, aluminum is a solid step up from galvanized steel. It handles moisture like a champ but is a softer metal, making it more vulnerable to dents from hail or falling branches. It also needs a proper coating to keep it from corroding, especially where it touches alkaline materials like your chimney's mortar.
-
Copper: When it comes to longevity, copper is the undisputed champion. It’s incredibly durable, will never rust, and develops that classic green patina over time that many homeowners love. Yes, it’s the most expensive option upfront, but its lifespan can easily top 60 years. It’s the definition of a "fix it and forget it" solution that will likely outlast the rest of your roof.
Your choice of material directly impacts how long and how well your chimney is sealed. In a place like West Palm Beach, spending a bit more on a corrosion-resistant material like aluminum or copper can save you a world of money and stress down the road.
Techniques for Minor vs. Major Repairs
Your repair strategy really depends on how bad the damage is. A small gap doesn't need the same heavy-handed approach as a big, corroded piece of metal.
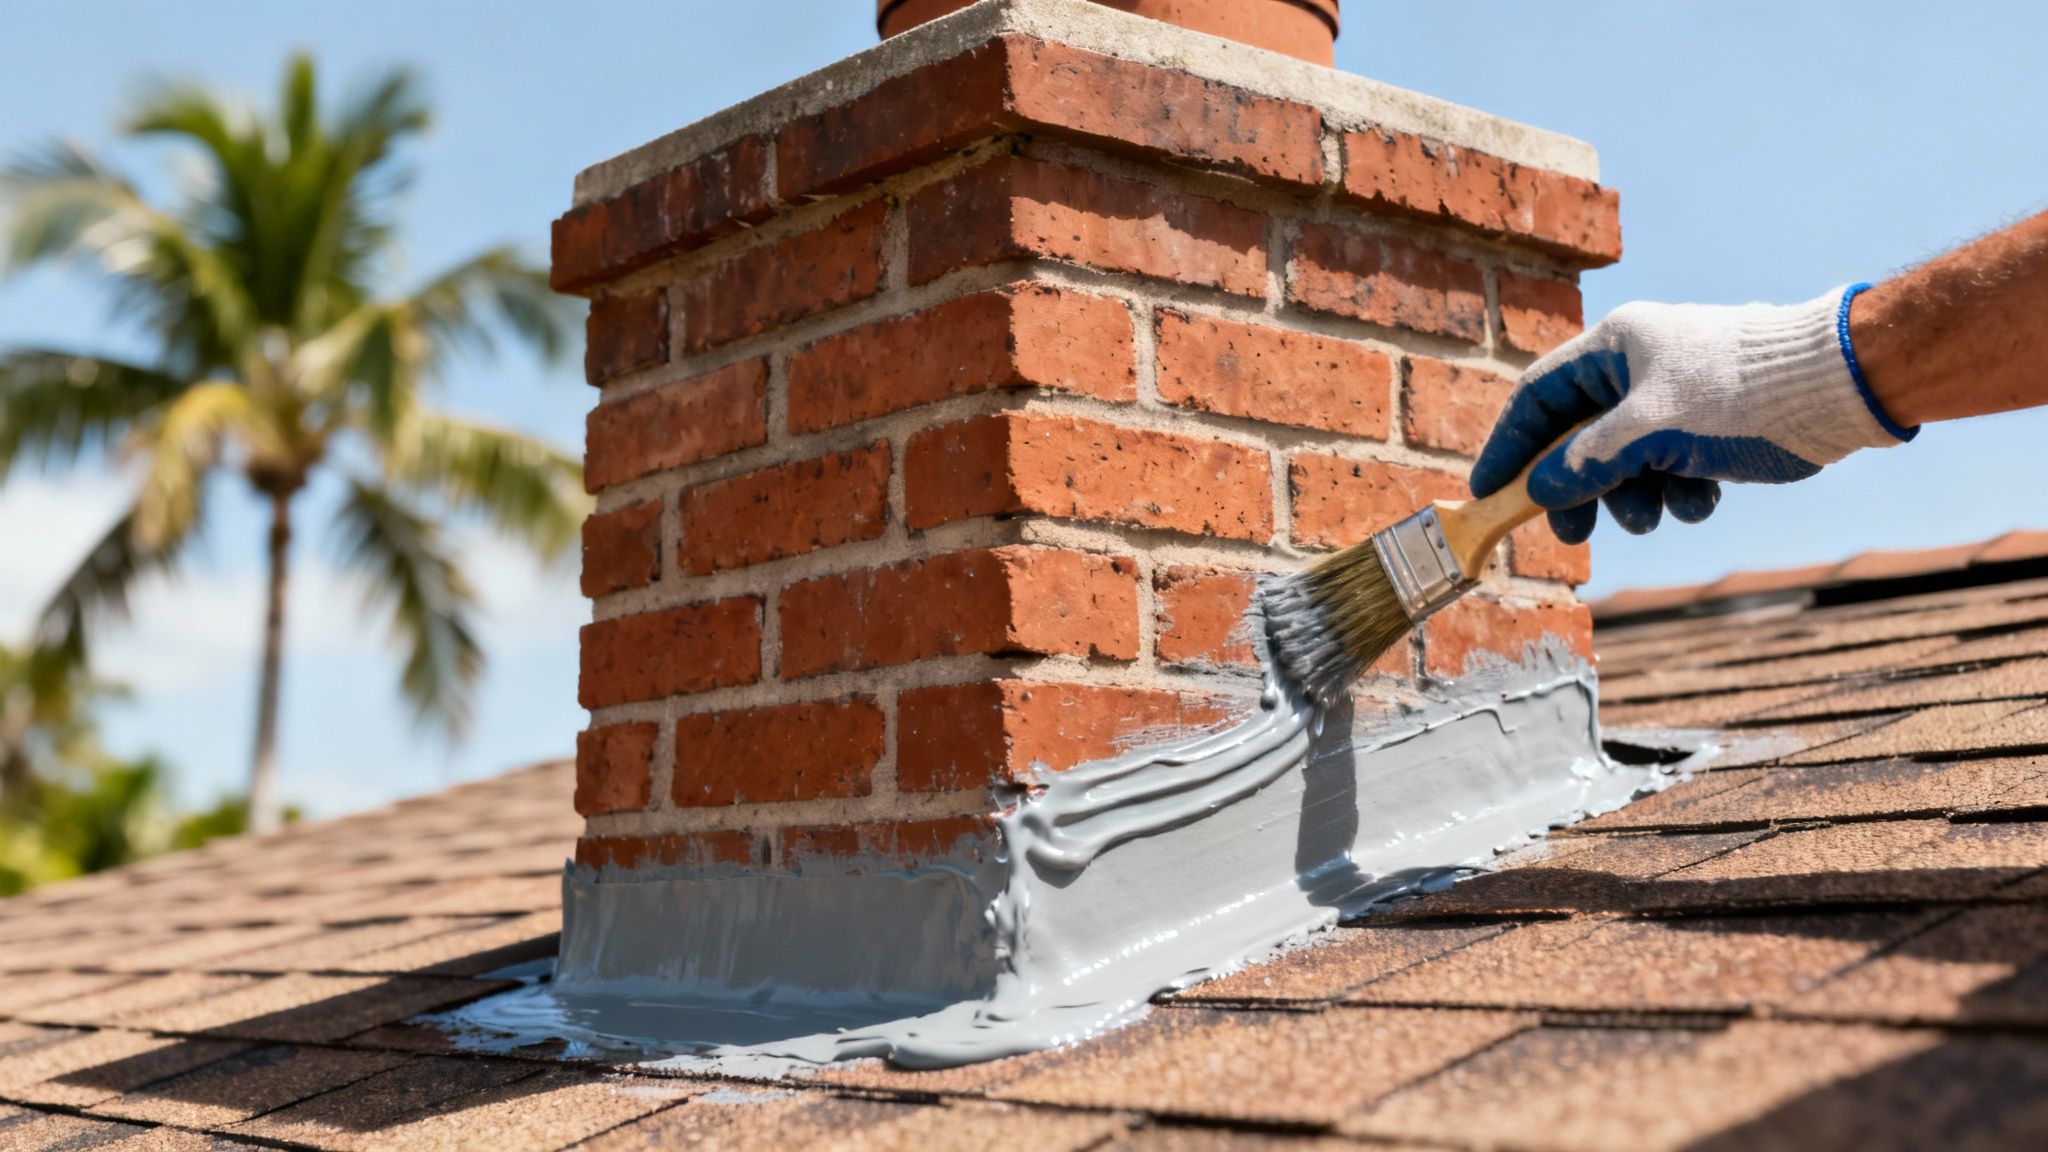
For minor issues—like a hairline crack in the sealant or a tiny gap where flashing has pulled away from the brick—a targeted repair with a high-quality sealant can do the trick. I'm not talking about standard hardware store caulk. You need a polyurethane-based roofing sealant made specifically for flashing. These products stay flexible and are UV-stable, so they can expand and contract with the Florida heat without cracking.
But if you're looking at more serious damage—metal that's rusted through, big gaps you can see daylight through, or flashing that's completely come loose—sealant is nothing more than a band-aid. The only real, long-term fix is a full replacement of the damaged section. This means carefully removing the old shingles and flashing, installing new, properly layered metal, and then weaving the shingles back in to create a completely watertight system.
The Cost of Getting It Right
Fixing your chimney flashing is an investment in your home's structural health. While it's tempting to go for the cheapest fix, understanding the real costs helps you make a smarter decision. The demand for skilled chimney flashing repairs in West Palm Beach is high, and that's reflected in the pricing. Average chimney repair costs in Florida can swing from $150 for a simple sealant job to over $3,000 for major structural work.
To see how the pros tackle these jobs from start to finish, you can check out the details on professional chimney flashing services in West Palm Beach.
Preventing Future Chimney Leaks with Proactive Maintenance
Fixing a leak is one thing, but the real win for any West Palm Beach homeowner is making sure the next one never happens. A proactive maintenance plan is your best defense against water damage, especially with the kind of storms we get here. It’s about shifting from a reactive mindset to a preventative one—a change that saves a ton of money and stress down the line.
This doesn't mean you have to spend every weekend on the roof. It's really about being consistent and observant. A little bit of attention twice a year can turn a potential disaster into a manageable routine, and it's a small price to pay to avoid another flashing around chimney leaking in your West Palm Beach home.
Your Biannual Inspection Checklist
The best times for a good, thorough roof check are in the spring and fall. Think of it as pre- and post-hurricane season prep. This timing lets you catch any damage from the year's worst weather before it turns into a real headache.
- Clean Your Gutters: This isn't optional. When gutters get clogged with leaves and debris, rainwater has nowhere to go but back up under the edge of your roof. This rots the decking and compromises the whole system.
- Examine All Seals: Get a good look at the sealant around your chimney flashing. You’re hunting for any signs of trouble—cracking, shrinking, or gaps where the sealant has pulled away from the brick or metal.
- Check for Corrosion: Inspect the metal flashing itself for any hint of rust or corrosion. Spotting this early means you can treat it or make a small repair before the metal is eaten through.
- Trim Overhanging Branches: Tree limbs rubbing against your roof will wear down shingles and flashing over time. More importantly, a falling branch during one of our storms can cause instant, serious damage.
A proactive approach is about more than just avoiding water damage; it’s a critical safety measure. Neglected chimneys are a serious fire hazard. Each year, over 25,000 chimney fires cause an estimated $125 million in property damage across the U.S. Leaky flashing makes this risk even worse by letting moisture corrode vital parts of the chimney structure. You can learn more about fireplace and chimney safety insights on homelight.com.
Beyond the Flashing: The Role of Waterproof Sealant
While flashing is the usual suspect, the chimney structure itself can be the source of a leak. Brick and mortar are porous materials, and they can soak up a surprising amount of water during a classic Florida downpour. Over time, this trapped moisture breaks down the masonry, causing leaks that look just like a flashing failure.
A great protective step is to apply a clear, vapor-permeable waterproof sealant to the chimney's brickwork. This type of sealant creates an invisible shield that repels water but still lets any moisture trapped inside the bricks escape.
It’s an inexpensive way to add another layer of defense. This protects the entire chimney system, making sure your flashing isn't taking all the punishment alone. This simple step can add years to the life of your chimney and head off future water problems.
Knowing When It's Time to Call a West Palm Beach Roofing Pro
That little crack in the sealant around your chimney might look like a quick weekend DIY project. And sometimes, it is. But there are very clear red flags that signal a problem is way beyond a simple tube of caulk. Knowing when to put the tools down and pick up the phone is the most important part of preventing a small flashing leak from turning into a full-blown structural nightmare for your West Palm Beach home.
Your safety and the long-term health of your house always come first.
One of the most serious signs is discovering soft, spongy wood on your roof deck when you press on it from inside the attic. This is a classic symptom of advanced rot, which means water has been quietly seeping in for a long time. Slapping new flashing over this is like putting a fresh coat of paint on a crumbling wall—it hides the problem but does nothing to fix the dangerous structural decay underneath.
Red Flags That Demand a Professional
Some situations are just not cut out for a DIY approach. Trying to tackle these without the right training, safety gear, and tools can easily lead to more damage to your home or, even worse, a serious injury.
Here’s when you need to call in an expert:
- Detached Flashing Sections: If you see large pieces of metal flashing that have completely pulled away from the chimney brick or are bent and lifted, that’s a full replacement job. Sealant won't fix that.
- Structural Chimney Cracks: While hairline cracks in the mortar can sometimes be sealed, you need to watch out for the big ones. Large, zigzagging cracks in the bricks themselves point to a foundational issue that a roofer or a mason needs to investigate.
- Widespread Roof Deck Rot: As I mentioned, any soft or rotted wood is a dealbreaker. This means the structural support for your roof is compromised and has to be professionally replaced.
- A Steep or Unsafe Roof Pitch: This one is just common sense. Working on a steep roof without a proper safety harness and fall protection equipment is incredibly dangerous. No repair is worth risking your life over.
When you hire a licensed professional, you're not just paying for their time. You're investing in their expertise, their insurance, and their knowledge of West Palm Beach building codes. A botched DIY job can end up voiding your homeowner's insurance and costing you a fortune to fix later.
How to Vet Your West Palm Beach Roofer
Once you've decided to call a pro, finding the right one is everything. Start with the basics: confirm they are licensed and insured in Florida. Don't be shy—ask for their license number and for proof of both liability and worker's compensation insurance. A reputable company will have this ready for you without any hesitation.
When they give you a quote, it needs to be detailed. A professional estimate should clearly break down the scope of the work, the specific materials they’ll be using, labor costs, and a projected timeline.
Ask questions. A good roofer will be happy to explain their process. Inquire about their warranty on both materials and their workmanship. A solid warranty is a sign that they stand behind the quality of their work. Understanding the basics of roof requirements and structural health can also help you ask better questions, as these core principles are key to any sound roof system. And if you want to ensure your entire roof is in top shape, consider our expert roofing inspection services.
![]()
Answering Your Top Chimney Flashing Questions
When your chimney flashing starts to leak, the questions can feel overwhelming. Dealing with the kind of flashing around chimney leaking West Palm Beach homes are known for can be stressful, but getting straight answers is the first step to fixing the problem for good. We hear the same questions from homeowners all the time, so let's tackle them head-on.
Getting clear on these points helps you make a solid decision, whether you're trying to figure out the damage yourself or calling in a pro. A little bit of knowledge goes a long way in making sure the job gets done right.
Should I Repair or Replace the Flashing?
This is always the first question, and the answer comes down to one thing: the actual condition of your flashing. If you've just got a small, isolated problem—like a hairline crack in the sealant—a simple repair can often do the trick. A good-quality, polyurethane-based roofing sealant can patch that up and stop a minor drip in its tracks.
But if you're looking at widespread rust, flashing that's pulled away from the brick, or holes you can see daylight through, a patch job is just throwing money away. In those situations, a full replacement is the only real, long-term fix. Trying to smear sealant over badly damaged metal is a band-aid that's guaranteed to fail the next time a classic South Florida downpour hits.
How Quickly Do I Need to Act on a Leak?
Yesterday. Seriously, there's no such thing as a "small leak" that you can put off. Water damage gets out of hand faster than most people realize.
In just 24 to 48 hours, what looks like a minor drip can soak your insulation, start rotting out structural wood like rafters, and create the perfect damp, dark place for mold to take hold.
The second you spot a water stain on the ceiling or an active drip, your first job is damage control—get a bucket under it. Your very next call should be to a roofer. With water intrusion, time is absolutely your worst enemy. The longer you wait, the bigger and more expensive the problem becomes.
Will My Homeowners Insurance Cover This?
This is a big one, and the honest answer is, "it depends." Most standard homeowners policies will cover damage from a sudden, accidental event. Think a bad storm, hail, or a tree branch falling and smashing your flashing. That's usually covered.
Where you'll run into trouble is if the leak is from neglect or just old age. If your flashing failed because the sealant has been cracked and worn out for years, the insurance company will almost always call that a maintenance issue and deny the claim. Your best bet is to take pictures of everything and call your agent right away to see what your specific policy covers.
When you’re staring down a leak from the flashing around your chimney in West Palm Beach, you need someone who knows what they're doing—and fast. Paletz Roofing and Inspections brings over 30 years of experience to protecting homes just like yours in South Florida. For a free quote from an expert you can trust, contact us today at https://paletzroofing.com.