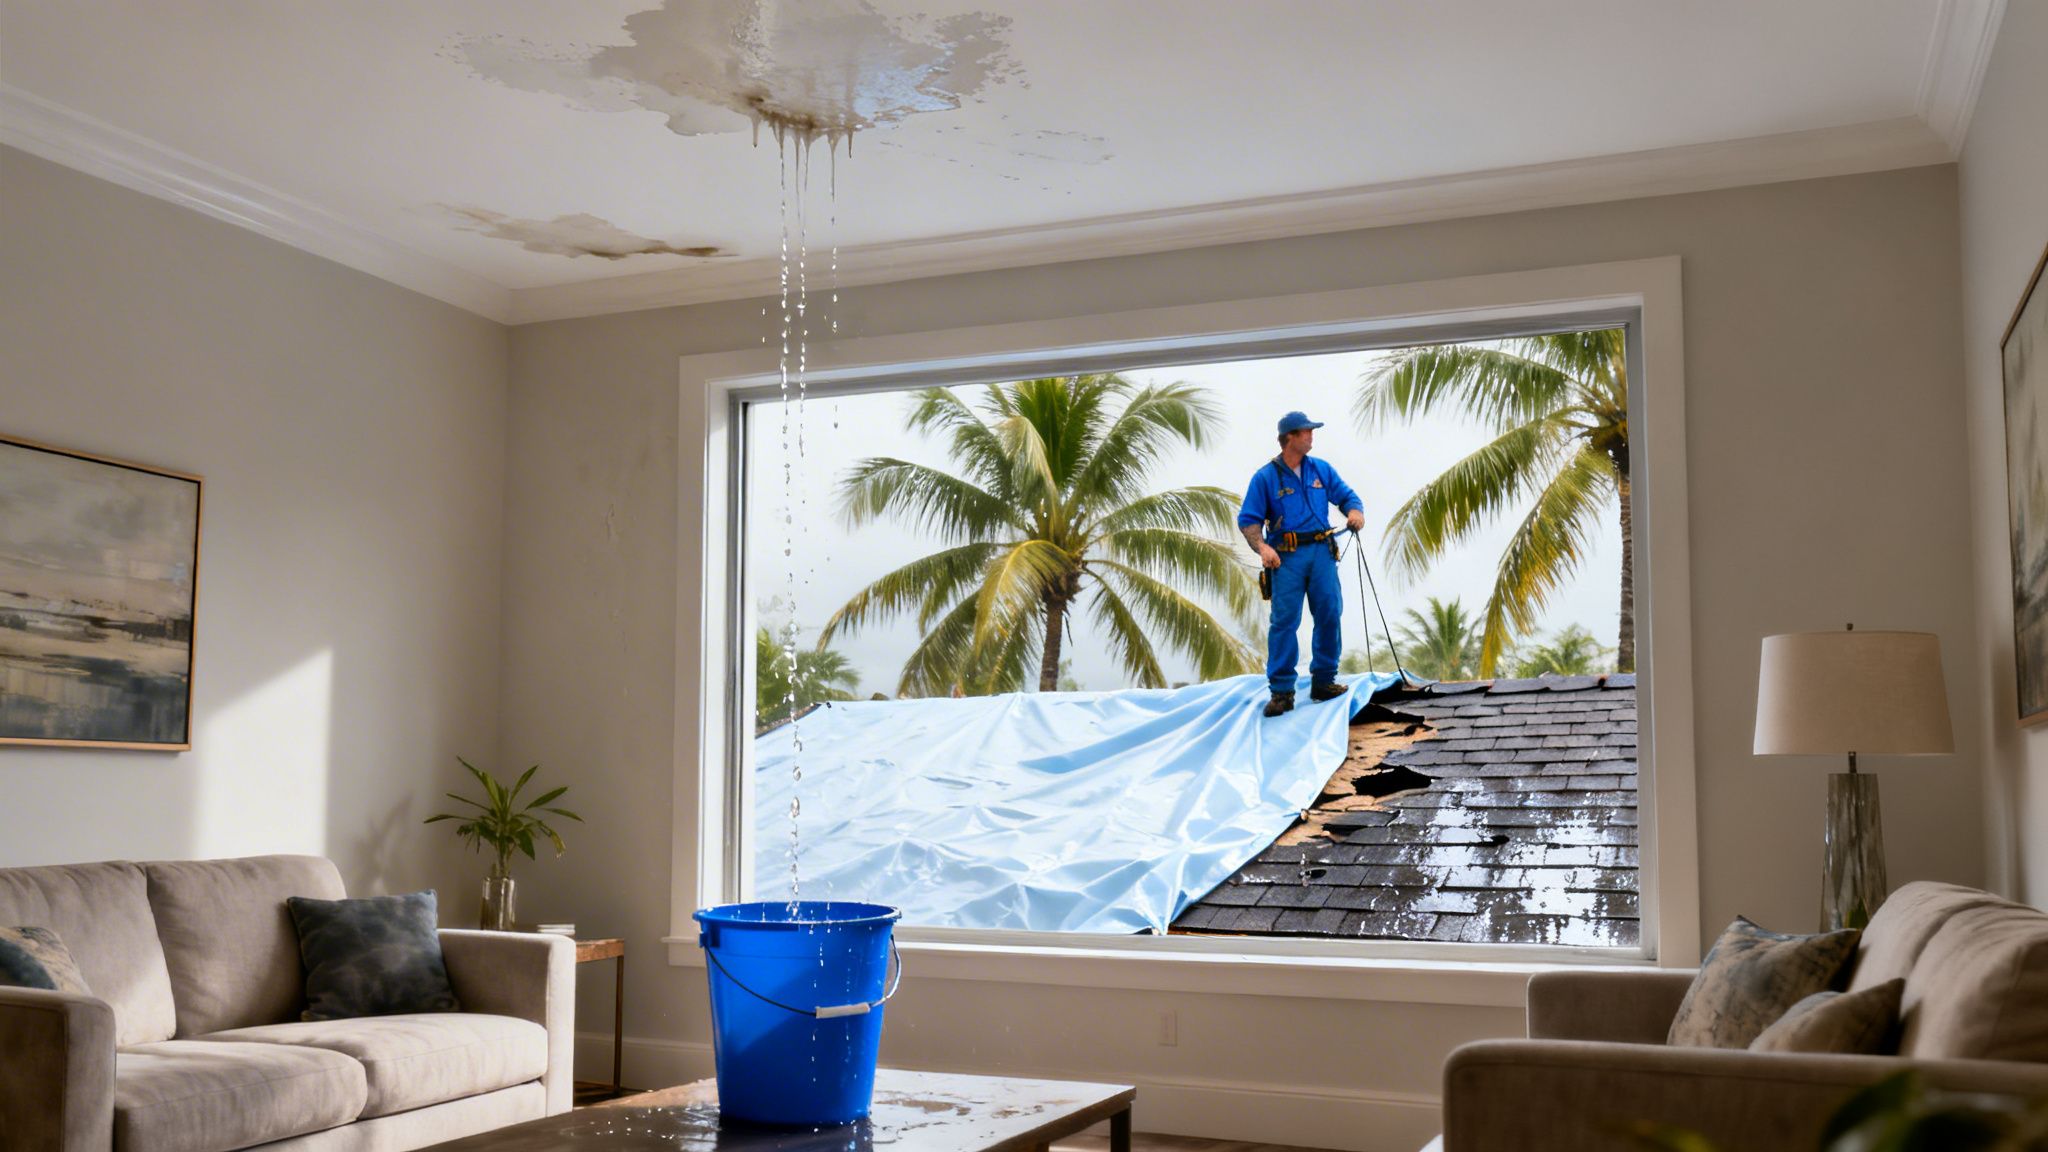
It’s a sound every South Florida homeowner dreads: that first, unmistakable drip, drip, drip during a downpour. When you discover your roof is leaking, the first few minutes are absolutely critical. Your immediate actions will determine whether this is a minor inconvenience or a full-blown disaster. The priorities are simple: contain the water, move anything valuable out of harm's way, and, most importantly, address any electrical hazards safely.
First Steps For Safety And Damage Control
Those first moments after finding a leak are all about protecting your home and your family. What you do right away can drastically reduce the final repair bill, prevent serious secondary problems like mold, and keep everyone safe. This isn't just about cleaning up a puddle; it's about executing a quick and effective emergency response.
Prioritize Electrical Safety
Water and electricity are a lethal combination. If you see water dripping anywhere near light fixtures, electrical outlets, or any visible wiring, your absolute first move must be to cut the power to that part of your home.
Here's a quick reference for what to do when you discover a leak.
Immediate Leak Response Checklist
| Priority | Action | Why It's Critical |
|---|---|---|
| 1: Safety First | Shut off power at the circuit breaker if water is near electrical fixtures. | Prevents a life-threatening risk of electrocution. |
| 2: Contain Water | Place a bucket or large bin directly under the drip. | Stops water from spreading and causing further damage to floors and subflooring. |
| 3: Relieve Pressure | If the ceiling is bulging, carefully puncture the center with a screwdriver. | Releases trapped water in a controlled way, preventing a ceiling collapse. |
| 4: Protect Valuables | Move furniture, electronics, and important documents out of the affected area. | Prevents costly and irreparable water damage to your personal belongings. |
Don't ever touch or try to unplug any electrical device that's sitting in water or even just looks wet. The risk isn't theoretical; studies show electrocution risks can jump by as much as 300% in a water-damaged home. That statistic alone underscores how vital this first step is. You can learn more about the crucial immediate steps after discovering water damage to ensure you're handling the situation safely.
Contain The Water And Mitigate Damage
Once you've managed the electrical hazards, your focus immediately shifts to controlling the flow of water and protecting your property. This step is all about minimizing the immediate mess and heading off the long-term consequences of water getting where it shouldn't.
This visual guide quickly breaks down that initial decision-making process.

As you can see, checking for electrical danger is the first critical choice you have to make before you even think about damage control. With the area secured, grab the biggest bucket or a sturdy trash can and place it right under the leak. If the dripping is causing a splash, toss an old towel or a small piece of wood into the bucket. It’ll deaden the impact and quiet that maddening sound.
Pro Tip: If your ceiling has a noticeable bulge, it's holding a lot of water and is under tremendous pressure. It could collapse. Put a bucket underneath it and carefully poke a small hole in the very center of the bulge with a screwdriver. This will let the water drain in a controlled stream instead of all at once.
Move fast to get furniture, electronics, rugs, and any important papers out of the way. If you have large items you can't move, like a sofa or entertainment center, cover them with heavy-duty plastic sheeting. Start drying any wet surfaces you can reach with towels and get fans running to circulate the air. From our own analysis of costly roof leak repairs, we know that quick action like this can easily halve the final restoration cost, saving you thousands.
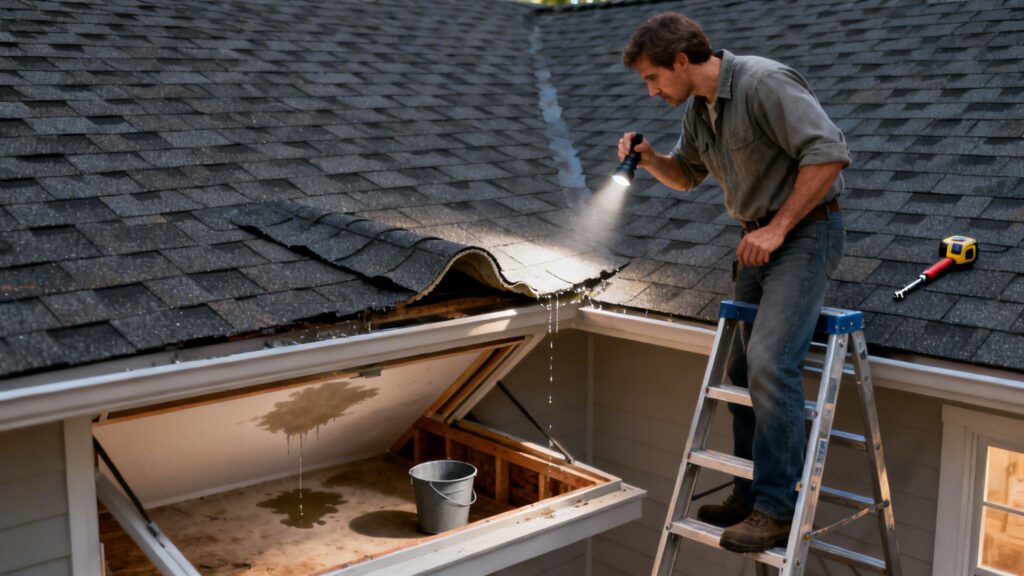
Creating a Temporary Fix from the Outside
Once you’ve contained the water inside, your next thought is going to be stopping more from getting in. This is where you shift your focus to the roof itself, but I can't stress this enough: your safety comes first. A temporary fix from the outside can be a real lifesaver, but only if you can pull it off safely while waiting for a professional roofer to arrive.

Before you even think about grabbing a ladder, your first move should be a solid assessment from the ground. Getting on a wet, potentially unstable roof is incredibly dangerous and is absolutely a job for professionals with the right safety gear. Instead, find a pair of binoculars and scan your roof from the safety of your yard.
Assess the Roof Damage from the Ground
From a safe distance, methodically inspect the entire roof surface. You’re trying to connect the dots between where the water is coming in and the obvious signs of damage on the outside.
Here’s what you should be looking for:
- Missing or Damaged Shingles: Keep an eye out for shingles that are curled up, cracked, or just plain gone. On an asphalt shingle roof, a dark patch often means the protective granules have worn away, leaving it vulnerable.
- Compromised Flashing: Pay close attention to the metal strips around chimneys, vents, and skylights. If that flashing looks rusted, bent, or pulled away from the roof, you’ve likely found your culprit.
- Tile and Metal Issues: For tile roofs, you’re searching for any tiles that are cracked, have slipped out of place, or are missing entirely. On a metal roof, look for panels that seem loose, screws that have popped up, or sealant that has cracked and failed along the seams.
This ground-level check gives you a ton of valuable information without putting you in harm’s way. It helps you zero in on the problem area, which is vital for any temporary patch you might attempt.
How to Safely Tarp Your Roof
If you’ve pinpointed the damaged spot and the conditions are 100% safe—meaning no rain, no wind, no lightning, and you have a low-slope roof you can access without risk—then applying a tarp is your best temporary fix. This method is a staple here in Florida for good reason. For instance, after Hurricane Ian damaged over 1 million roofs in 2022, properly installed tarps were credited with preventing an additional 30% of interior flood damage in affected homes. You can review more about these kinds of roofing industry statistics to see just how effective this can be.
To do this right, you'll need a heavy-duty waterproof tarp large enough to extend at least four feet beyond the damaged area on all sides. You’ll also need several 2×4 wood planks and some screws.
Lay the tarp flat over the damaged section, making sure it’s smooth. Take one of the 2x4s, roll the top end of the tarp around it, and screw it directly into the roof decking on the side of the damage that's highest up the roof slope. Then, stretch the tarp tightly down over the leak and secure the bottom end with another 2×4, also screwed into the roof. This method ensures that any water runs down over the tarp, not under it. You can see how professional roof repairs often address similar widespread damage with comprehensive techniques.
Safety Is Non-Negotiable: Never, ever get on your roof during a storm, if it's wet, or if it has a steep pitch. If you have any doubt about your safety, stop. The risk of a serious fall far outweighs the benefit of a temporary patch. A huge part of knowing what to do when your roof is leaking is knowing when to call for help.
Documenting Damage for a Successful Insurance Claim
Once you’ve managed the immediate chaos and have buckets catching the drips, your focus has to change. A leaking roof almost always leads to a call with your insurance company, and whether your claim gets approved or denied often comes down to the quality of your proof.
Think of yourself as building a case. Your smartphone is now your most important tool.

This step isn't optional. Insurers are meticulous, and weak evidence is the quickest path to a denial, especially if they think the damage came from pre-existing issues or neglect instead of a sudden, covered event.
Capture Everything with Photos and Videos
Start documenting right away, even while the water is still coming in. Don't just snap a single photo of the puddle on your floor. You need to tell the whole story, from start to finish, with visuals.
Your goal is to show the adjuster the full picture. Your evidence should include:
- The Active Leak: Take videos of the water dripping from the ceiling. This establishes a clear timeline and shows the severity of the problem in real-time.
- Interior Damage: Get wide shots of the affected room, then zoom in for close-ups. Capture the water stains spreading across the ceiling, bubbling paint or drywall, and soaked carpets or flooring.
- Damaged Belongings: Photograph any furniture, electronics, artwork, or personal items that got wet. If you can, get pictures of brand names or model numbers on things like TVs or appliances.
- The Exterior Cause (Only if it's Safe): From the ground, use your phone’s zoom to photograph any obvious damage you found earlier, like missing shingles or a tree limb resting on the roof. This helps link the inside mess to an outside event.
Don't curate your photos. Take more than you think you need—it’s far better to have too much evidence than not enough.
Maintain a Detailed Written Log
Your pictures and videos need a written timeline to back them up. Grab a notebook or open a notes app and start recording everything as it happens. The insurance adjuster will rely on this log to follow the sequence of events and see that you took responsible action.
Your log is your official record. It proves you took proactive steps to mitigate damage, which is something every insurance policy requires. A detailed log can be the deciding factor between a paid claim and a denial.
This record is crucial because ignored leaks are a huge red flag for insurers. In fact, postponed leak repairs are behind 25% of all home insurance claims, which carry an average repair bill of $12,000 for the resulting water damage. You can read more about these costly roofing industry trends and understand why proving you acted fast is so critical.
Your log should have simple, clear entries:
- Discovery: Note the exact date and time you found the leak. (e.g., "May 15, 8:45 PM – Noticed water dripping from living room ceiling.")
- Mitigation Steps: Write down every single thing you did to stop the damage. (e.g., "8:50 PM – Placed bucket under drip. Moved sofa and area rug.")
- Communications: Log every call you make. (e.g., "9:15 PM – Called Paletz Roofing for an emergency inspection. Scheduled for tomorrow morning.")
The Importance of a Professional Report
While the photos and notes you take are vital, the most powerful tool in your claim is often the official report from a licensed roofing professional. This document acts as third-party, expert testimony. It confirms for the insurer that the damage was sudden and not due to a lack of maintenance on your part.
An experienced roofer will perform a detailed inspection to find the exact point of failure. Their formal report will outline the specific cause—like wind-lifted shingles or hail impacts—and give a professional opinion that separates this new event from any old wear and tear. This independent analysis gives your adjuster the verification they need to approve your claim, making it the single most persuasive piece of evidence you can provide.
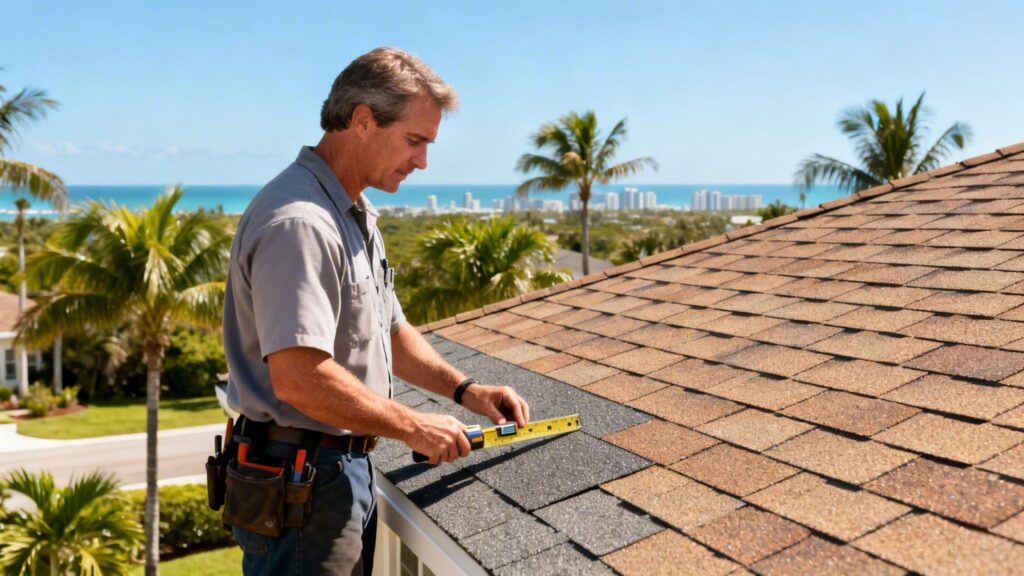
Hiring the Right Roofer in South Florida
A temporary patch might bring a sigh of relief, but when your roof is leaking, it's just a band-aid. To truly fix the problem and protect your home for the long haul, you need a professional. But in a market as crowded as South Florida, finding a roofer you can trust can feel like a job in itself.
This is single-handedly the most important decision you'll make in this process. A great roofer doesn't just slap on some shingles; they find the root cause of the leak, use materials built for our climate, and guarantee their work will hold up against our intense sun and hurricane-force winds. A bad choice? That can lead to more leaks, frustrating code violations, and even more expensive damage down the road.
First things first: safety. As tempting as it is to climb up there and play detective, it's a dangerous move. With 136,740 roofers working nationwide in 2024, there are plenty of trained experts, like the team at Paletz Roofing and Inspections, who have been licensed since 1990 to handle this work safely. For a little more context on just how big this industry is, you can discover more insights about roofing statistics on comradeweb.com.
Vetting Your Potential Roofer
Your vetting process needs to be thorough. In South Florida—where a single afternoon storm can expose shoddy work in a hurry—you simply can't afford to cut corners. Your focus should be on contractors with a real, established presence in counties like Broward, Miami-Dade, and Palm Beach.
Start by checking their credentials. Any legitimate roofer will have no problem providing proof of:
- State Licensing: This is non-negotiable. Confirm they have a current, valid license with the Florida Department of Business and Professional Regulation (DBPR). It’s your first line of defense.
- Comprehensive Insurance: They absolutely must carry both general liability insurance and worker's compensation. If they don't have worker's comp and someone gets hurt on your property, you could be on the hook financially.
- Local Reputation: Look for a company with a physical office and a long history in our community. Dig into their reviews on Google, Yelp, and the Better Business Bureau to see how they respond to customer feedback and solve problems.
A roofer’s quote is more than just a price; it’s a direct reflection of their professionalism. A detailed, itemized estimate shows they're transparent. A vague, one-line price is a massive red flag. Always get at least three quotes to compare.
Key Questions to Ask for an Estimate
When you call for an estimate, you're not just shopping for a price—you're interviewing the company for a critical job. The quality of their answers will tell you everything you need to know about their expertise and how they treat customers.
Come prepared with questions that go deeper than just "how much?"
Essential Roofer Interview Questions
| Category | Question to Ask | What a Good Answer Sounds Like |
|---|---|---|
| Diagnostics | "How will you find the exact source of the leak?" | "We use a combination of visual inspection from the roof and attic, along with tools like infrared thermal imaging to trace the path of the moisture. This ensures we find the true entry point, not just where the drip is." |
| Materials | "What specific materials will you use for the repair, and are they rated for our High-Velocity Hurricane Zone (HVHZ)?" | "We plan to use GAF Timberline HDZ shingles and Tiger Paw underlayment, both of which are fully approved for the Miami-Dade HVHZ. We'll list every single material by brand name in your written quote." |
| Warranty | "What kind of warranty do you offer on both the materials and your labor?" | "The materials themselves come with a 30-year manufacturer's warranty. On top of that, we provide our own 10-year workmanship warranty on the repair. If it leaks again from our work, we come back and fix it, no questions asked." |
A roofer who fumbles these questions or gives you vague, "don't worry about it" answers probably isn't the right fit. The mention of infrared leak detection, for example, is a huge plus. This technology allows a roofer to literally "see" temperature differences in your roof structure caused by trapped moisture, pinpointing a leak's origin with incredible accuracy. It's worlds better than a simple visual guess, which all too often misses the real problem.
If you want a team that will give you a straight answer and a thorough assessment, you can rely on the experts at ![]()
Preventing Future Leaks on Florida Roofs
The best way to handle a leaking roof is to make sure it never happens in the first place. After you’ve wrestled with an active leak, shifting your focus to proactive maintenance is easily the smartest move a South Florida homeowner can make. It’s all about turning a reactive crisis into a manageable, preventative routine.
Our intense sun, torrential downpours, and hurricane-force winds put a unique kind of strain on roofing materials. What works just fine in other parts of the country often fails prematurely here. Honestly, understanding how your specific roof type reacts to our climate is the key to stopping the next leak before it even thinks about starting.
Maintenance Tips for Common Florida Roof Types
Every roofing material has its own set of strengths and weaknesses when it goes up against the relentless Florida weather. You’d be surprised what you can spot just by doing regular visual checks from the ground.
Here’s a quick rundown of what to look for on your roof:
- Asphalt Shingles: Keep an eye out for shingles that are curling up at the edges, cracked, or have big bald patches where the granules are gone. Pay close attention to the adhesive strips—they can fail in our extreme heat, giving the wind a perfect opportunity to lift the shingle.
- Concrete or Clay Tiles: Look for any cracked, chipped, or slipped tiles. It only takes a single broken tile to expose the underlayment to sun and rain, creating a direct path for water to get into your home.
- Metal Roofs: Check for fasteners that have backed out or gotten loose, and definitely look for any signs of rust. You also need to inspect the sealant around seams and flashing, as it can dry out and crack under constant UV exposure.
- Flat Roofs: Scan for any ponding water that sticks around for more than 48 hours after a storm. Also, look for blisters, cracks, or open seams in the roofing membrane itself.
Doing this kind of routine self-inspection every few months gives you a solid baseline for your roof's condition and helps you catch trouble early.
An annual professional inspection is your absolute best defense against major roofing disasters. An expert can spot the subtle signs of wear and tear that are invisible from the ground, letting you fix minor problems before they escalate into ceiling-collapsing nightmares.
Given the unpredictable weather in our region and the sheer amount of damage a leak can cause, securing the right South Florida flood insurance is a critical step for preventing future financial headaches. Proactive roof maintenance and proper insurance coverage work hand-in-hand to protect your home.
Annual Roof Maintenance by Material
Beyond your own visual checks from the yard, a structured annual maintenance plan is crucial. The constant thermal stress—that daily cycle of expansion and contraction from intense daytime heat to cooler nights—is a major reason materials degrade so fast down here.
In fact, the impact is massive. We see a huge spike in leaky roofs after Florida's intense rains, with issues popping up on as many as 60% of tile roofs in Miami-Dade after just 10 years, largely due to this thermal expansion. You can find more details about these roofing trends on localroofingseo.agency to get a better sense of our local challenges.
A professional check-up is designed to find these specific failure points. This table breaks down what an expert is looking for during that yearly visit.
Annual Maintenance Checklist by Roof Type
| Roof Type | Key Inspection Point | Common Failure Sign | Proactive Tip |
|---|---|---|---|
| Shingle | Condition of sealant around flashing and vents | Dried, cracked, or missing sealant | Re-sealing compromised areas every few years prevents the most common type of shingle roof leak. |
| Tile | Underlayment integrity beneath the tiles | Brittle or torn underlayment visible under a cracked tile | Replacing individual broken tiles immediately protects the fragile underlayment from sun damage. |
| Metal | Gaskets on fasteners and panel seams | Worn-out, cracked rubber gaskets on screws | Replacing old fasteners with new, oversized screws ensures a tight, waterproof seal. |
| Flat | Seam adhesion and drain functionality | Separating seams or clogged scuppers/drains | Clearing all drains and debris quarterly and resealing any questionable seams is mandatory. |
Investing in this yearly professional tune-up is one of the single most effective ways to extend the life of your roof. It helps you avoid the surprise and expense that always comes with discovering a leak, turning roof care from an emergency response into a planned, predictable part of owning a home.
Frequently Asked Questions About Roof Leaks
The moment you spot a water stain on your ceiling, a hundred questions probably start racing through your mind. It’s completely normal. The uncertainty can be just as frustrating as the drip itself. We hear these same worries from homeowners all across South Florida, day in and day out. Here are some straight-up, honest answers to the questions we get asked most.
How Long Can I Wait To Repair A Small Roof Leak?
The short answer? You can’t. Not even for a day. That “small” leak you’re looking at is almost always just the tip of the iceberg—a symptom of a much bigger problem brewing out of sight.
Water is sneaky. A tiny drip in your living room could mean water has already traveled across your roof decking, down rafters, and inside your walls. Once it gets into those hidden spaces, it starts causing serious, silent damage. We're talking rotted structural wood, ruined insulation, and the perfect damp, dark breeding ground for mold. In our humid climate, dangerous mold can start growing in as little as 24 to 48 hours.
That tiny drip you’re tempted to ignore today can easily turn into a repair bill for thousands of dollars tomorrow. We're not exaggerating; we see it happen all the time. Acting fast isn't just a suggestion—it's the smartest financial move you can make.
Getting a professional out for an immediate inspection is always your best bet. Catching a leak early and dealing with it properly can slash the long-term restoration costs. Don't let a small problem become a catastrophe.
Will My Homeowner's Insurance Cover A Roof Leak?
This is the big one, and the answer is nearly always, "It depends on the cause." Standard homeowner's insurance policies are written to cover damage from "sudden and accidental" events.
This usually includes things like:
- Damage from a named hurricane or tropical storm
- Wind that lifts or tears off shingles
- A tree branch falling and puncturing the roof
- Hail impacts that shatter tiles or dent metal
Where insurance almost never provides coverage is for leaks caused by old age, lack of maintenance, or general wear and tear. If your roof is 20 years old and has simply worn out, the insurance company will almost certainly consider the resulting leak your responsibility.
This is exactly why documenting what caused the leak is so critical for a successful claim. The insurance adjuster needs proof that the damage came from a covered event, not a lack of upkeep. This is where a professional roofer's report becomes your most powerful tool. That formal assessment pinpoints the exact cause, separating the new damage from any pre-existing wear, and gives the adjuster the validation they need to approve your claim.
Can I Just Repair The Roof Leak Myself?
The urge to save a few bucks with a quick DIY fix is understandable. But when it comes to your roof, it's a massive gamble—both physically and financially. There are two huge reasons why this is a job you should always leave to the pros.
First and foremost is safety. Getting on a roof is incredibly dangerous, even for us. We use specialized safety harnesses, footwear, and have years of training. Now, imagine doing it on a roof that's wet and slippery from the very rain causing the leak. One bad step can lead to a life-altering fall. It's just not worth the risk.
Second, finding the real source of a leak is an art form. The spot where water is dripping into your house is rarely right below where it’s getting in from the outside. Water can run down the slope of the roof deck, follow pipes, and travel along beams before it finally finds an exit point.
Slapping a bucket of roofing cement on the wrong spot doesn't just fail to fix the leak—it can actually make things worse. You can accidentally trap water, which only accelerates the rot and structural damage underneath. A professional roofer has the experience—and the diagnostic tools, like infrared thermal cameras—to trace the moisture path back to the true entry point for a permanent, code-compliant repair.
How Much Does An Emergency Roof Leak Repair Cost In Miami-Dade Or Broward?
The cost for an emergency roof leak repair here in South Florida can vary wildly. It's impossible to give a flat rate because every single leak is unique.
A handful of key things will influence the final price:
- Extent of Damage: Is it a couple of blown-off shingles, or is it a large section where the underlayment has failed? The bigger the damaged area, the higher the cost.
- Roof Type: Repairing a tile roof is generally more labor-intensive and expensive than fixing an asphalt shingle roof. Metal and flat roofs each have their own repair methods and cost structures.
- Accessibility: Is the leak on a steep, two-story roof that needs complex safety rigging? Or is it on a low-slope, easily walkable surface?
- Underlying Issues: Sometimes, we pull back the shingles or tiles and find the decking underneath is completely rotten and needs to be replaced. This will add significant cost to the job.
- Timing: An emergency call-out after hours, on a weekend, or during a holiday will naturally come with a premium service fee compared to a scheduled repair during business hours.
A simple, straightforward patch job might only run a few hundred dollars. But a more complex repair that involves flashing, replacing rotted wood, and a lot of new material can easily climb into the thousands. The only way to know for sure is to get a detailed, itemized estimate in writing from a reputable local roofer who can get on-site and assess the specific damage.
When a leak strikes, you need a team you can trust to respond quickly and fix the problem right the first time. The certified experts at Paletz Roofing and Inspections have over 30 years of experience serving South Florida and are ready to help. For immediate emergency service or a free, no-obligation inspection, contact us today.